Sunday, November 21, 2021

Ornament Exchange

I was asked by a fellow ICADian to participate in a handmade ornament exchange this year and decided to go for it.  It was going to be a one-to-one exchange so no multiples were needed.  The hardest part was deciding what to create.  I've made many ornaments over the years and fell back on a variation of an ornament I painted many, many years ago on a heart-shaped disc of the holy family.  I was originally going to go with a simple snowman as seen here but my exchange partner lives in Arizona and I wasn't sure if a snowman would be appropriate for that climate (although a friend did suggest adding a cactus would help) so I decided on this.  I still have a dozen or so wooden slices so I adapted the pattern to the round shape of it.  I added a plain wooden bead to some suede cording for the hanger.  (For reference, that tree is 9" tip to bottom of base.)


I found a box small enough to repurpose for sending the ornament and few other goodies including some fuzzy socks, candy, hot chocolate, flavored tea, and holiday tissues.  And of course, one of my handmade cards to go along with some info about me and my family.   The ornament had to be in the mail by November 15th and it was and scheduled for a 11/19 delivery.


It was on 11/19 that a package arrived here from my exchange partner in Arizona and in it was.......


A beautiful Christmas lighthouse that stands about 10 1/2 inches tall.  I love the black and white checked ribbon and the polka dotted wreaths with the little ornaments hanging from them.  And look at the lights at the top of the beacon.  Such wonderful attention to detail.  I'm definitely going to enjoy putting this out for the holidays and I'm going to have to remember not to pack it away with the decorations so I can take it to the condo in case we have a Christmas in July party again.  Thank you so much Heidi and thanks to Debbie for organizing this.  

Wednesday, November 17, 2021

Amaryllis Time

I had to look back through my pictures to note when we, or rather HWNSNBP planted an amaryllis with GS1 for the first time.  It turns out that he was 2 1/2 making this his 4th amaryllis bulb and it hasn't seemed to lose it's enjoyment yet - for either of them.  I know that HWNSNBP looks forward to it.  GS2 is at that age now but his mother doesn't think he's ready for this experience yet, plus they have a cat and plants in the house present an issue of a different kind.  


But we're actually experimenting with a new technique at home this year - waxing the bulb instead of planting it.  I had seen an article about waxed amaryllis bulbs and it seemed fairly simple and then we saw some at a gardening center for $30 which made me think that it would be cost effective to give it a try on our own.  HWNSNBP picked up a bulb in a box at Home Depot for about $6-7 and a box of paraffin wax.  We already had a chip brush so it was just a matter of making the time to get this going.

I have to note that we did not have any empty cans available except beer cans and though we did use one with the top snipped off, I would not recommend it.  The aluminum is too light even with the wax in it to sit in the water while the wax melts and we wound up wadding up some aluminum foil to wedge the can in the pot of water so it wouldn't tip over.  If we do this again I will rethink using a wide mouth jar instead.   

You have to soak the bulb in water for about 4-6 hours and then take it out and dry it off.  Then you cut the growth plate off the bottom - the part with the roots - but not so much as to have the bulb peel apart like an onion.  (They say that if you leave a little of the growth plate on the bottom you may be able to plant the bulb in soil after blooming to get it to regenerate.)


Then you use the chip brush to "paint" the warm wax onto the bulb and keep coating it until you can't see the color of the bulb through the wax.  Cutting the growth plate off sends a distress signal to the bulb to flower so it will continue to grow.  The wax helps to keep the moisture in it during the growth time meaning you do not have to do anything else but display the bulb at this point unless you want to decorate it.  


I have seen some dipped into colored wax, some have been decorated with gold foil or other types of foil, and some have been glittered.  The one in the garden center was covered in red wax and a little bit of ribbon.  You can add crayons to the melted wax to color it, or melt down old candles.  Ours is not decorated at this point.  I had intended to warm up the wax with a hairdryer to add something to it but haven't gotten to that and this bulb has taken off.  It has straightened out and has grown about 4" since Saturday.  I've had to put it in a cooler dark area to slow it down.  


I'll keep you posted on the progress.

Saturday, November 13, 2021

Autumn Glimpses

The last of the zinnias.  I picked what I could before the first frost last week.  


But before I got to them, the birds were having a feast on the seeds.


How many can you count?


And one that flew into the window and got stunned temporarily.  A Yellow-Rumped Warbler - something new to the backyard as they were migrating through.


A chipmunk amongst the litterfall.


And today before it rained there were bluebirds - this one close enough for a picture.


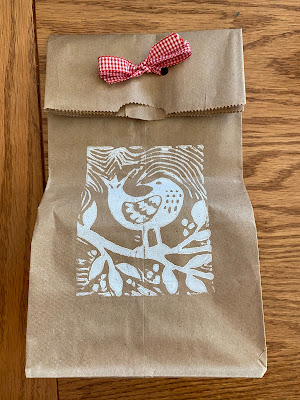
I treated myself to a little autumn pin cushion made by Fabric and Ink.  The package arrived and was enclosed in this printed bag.


And neatly wrapped with this sweet washi tape.


It's a golden gourd gnome house in fall colors.


Hand cut and hand stitched.  


A storm blew through here today with hail and some nasty winds that recovered the lawn with leaves after HWNSNBP spent a good part of the week gathering them up.  Luckily the piles of leaves he left along the roadside for leaf pick-up are still there, but he'll have more days of gathering and estimates it'll take til Thanksgiving for them all to be down.  The township road department circulates throughout the town with the big leaf vacuum until the first week in December and unless you want the grass beneath the leaves to die over the winter, you only pile them up as long as they're collecting.  


Sunday, November 7, 2021

Inktober Solar Challenge and More Sunsets

I chose to do the Solar Challenge for Inktober this year and just finished coloring it the other night..... only a few days late.  Last year I did the Lunar Challenge (link here) so it was only fitting to do the solar one this time.  I started by taping together nine 4x4 tiles to make a 1 ft. square.  On that I drew the outline provided by Pilar Pulido @Zentrarte and Sara Ponce @Manosaltangle .  They also provided the list and step outs for the daily tangles.

You can see that the "solar" image is divided into 31 segments or sections - one for each day of October.


I decided to use a more fall forward color palett and left out the blues and greens.  All the tangles were done in black and white and when they were all added I used my watercolor pencils to add color.  

A lot of these tangles were organic in nature and it was a challenge to fit them into some of those segments but I did it.  Glad it's done so I can move onto November with a clean slate in that department.

We were at the condo Thursday and Friday nights and were treated to some stellar November sunsets.  The position of the sunset is just about out of range at this time of year.  But since HWNSNBP made it possible to open the screens on the back porch I was able to lean out and catch what I could on the left.


I didn't recall ever having seen such an intense orange and then.......


the next night


it became even more intense.  


Wednesday, November 3, 2021

Jingle Belles - Holiday Creature Feature Part 2

Still adding creatures to this Jingle Belles Challenge.  Using up the rest of the images that I colored from the Snome Time set by Craft Consortium.  I used a forest die for the background on these and again the evergreens from Cottage Cutz.  Oh, and the banner and Merry Christmas message are Sizzix dies.  


I had some other images stamped and colored for this challenge but haven't got to them yet but that doesn't mean they won't make it into my Christmas card stash.  Time to count up what I have done and figure out how many more I will need as we've entered November.  

So I will now head over to the Jingle Belles blog and check out the other creatures featured there.  I noticed they've got quite a few.  It's always nice to see what the others have made and to gather ideas for cards in the future.  


Sunday, October 31, 2021

Happy Halloween


I went a little overboard collecting these felt ornaments from the Swede Things shop in Cape May.  I had a few from last year and added a bunch while we were on our lunch break during the lighthouse challenge a few weeks ago.   I think I need a bigger tree.

Going through some "kid stuff" over the past year turned up this little plastic pumpkin that held candy at one time.   


I found a stamp set that had some seasonal scenes and was able to cut the fall one down to fit inside.


I just haven't decided to add a hanger to the back or a magnet for the fridge.


I also remembered that I had this die that makes a little 3-D ornament box.  I added another piece of that scene and repositioned the pumpkins.  The owl comes from another stamp set and was fussy cut out.


These are the other stamps from that set also fussy cut and I added a black spider-webby die cut over the top of the box.  These are meant for the GS's.  


We got to toddler sit earlier this month and I brought some projects for GS2 to have fun with.

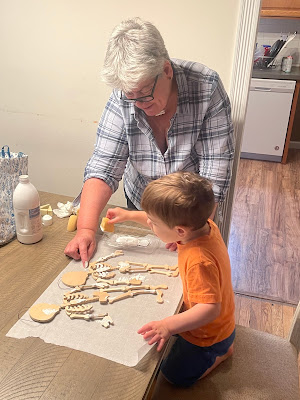
He sponge painted some wooden skeletons that I picked up at the Kirkside garage sale at the beginning of the month.  Dab, dab, dab the white paint.


Then I gave him a 10 x 10 canvas that I had prepped with gesso and some colors to dab, dab, dab which he did until he saw the brush and then wanted to use that.  Remarkably he was very good with spreading the paint with the brush and not just smashing it into the canvas.  


After it dried and he was down for a nap I carved out a pumpkin by adding a background and that flower is there because he made such a nice round shape with the brush that I didn't want to cover it up. 


The best part of this was seeing him grab it off the table when his mommy came home from work and excitedly telling her "I did this!".  He did the same with the skeletons.  That just made my heart swell.  Here he is posing with his cheesy grin.

Saturday, October 30, 2021

Jingle Belles - Not a Creature Was Stirring

Last year I picked up a couple of stamp sets from Craft Consortium called Snome Time.  I don't remember where I saw them, but I loved the little gnome (Snome) and the woodland animals and figured that there would be a Jingle Belle challenge that I probably could use these for...... and I was right.  Not a Creature Was Stirring is this fortnight's muse.  

I stamped the images in fade away ink so I could do some no-line coloring with my Prismacolor pencils.  I stamped two of each image and spent several evenings multi-tasking coloring and tv watching, er, listening.  I pretty much followed the color scheme suggested by the printed package.  In the course of events, though I do like the colors that I was working with, I think that a trip to or order from Blick will be needed in the near future to widen my choice of browns.  Then again, I could add them to my Christmas list............Oh Santa!!!!


There are enough images for a few cards but for right now I'm done with these two.  I used a mish-mosh of Sizzix dies and that evergreen I believe is from Cottage Cutz.  So is that Santa or is that a gnome?  Or shall we just call hin a Santa Gnome?  He is surrounded by a few little creatures that we can see and perhaps, since there is a door in that mushroom on the lower left, there might be some other little creature living in there.


Ooops, I think there's a little creature missing from that lower card.  Hmmmm, has to be here somewhere.  


I hope to be back early next week with some more featured creatures, until then I'm going to check out the Jingle Belles participants and leave some love, and you can too by clicking here.  

Wednesday, October 27, 2021

Bucket List Event

The Back Story

I've mentioned in the past that the East Point Lighthouse is one, if not the favorite lighthouse that I like to photograph.  Even before they repainted it white and the old brick face was exposed.  And when we are there, given the location, I'm not just content with standing next to it to take my pictures.  I like to get it from many angles.  

The parking is very precarious here.  I should make note to take a picture of that the next time.  There is a very narrow driveway from the main road to the back of the lighthouse.  And given the number of visitors on Challenge Weekend the cars line up from the main road to the embankment at the Maurice River/Delaware Bay.  HWNSNBP likes to pull all the way down to the embankment.  And it's a little tricky getting back out to the main road if there's another car coming in.  But he manages.

This used to be an open area to the water with a boat ramp, but the water level has been encroaching on the lighthouse property more and more and endangering the existence of the lighthouse itself so the Army Corp of Engineers has put in these barriers along that beach which is now roped off to humans.


It was after  I had taken pictures with my cell phone of the lighthouse from the back and sides (which I posted several days ago) that I decided to get out my Canon with the zoom lens so we could go back out to the road and down aways to get the front and side views from a distance when it happened.

The Event

I was sitting with the door open on the passenger side with the camera in my hands when I happened to look up........................ and there it was.............


............. an eagle in real life flying over the water right in front of us.  I quickly turned on the camera and started clicking away zooming in as much as I could.  Both of these pictures are further edited to get closer.  It was later that day when I went to use the camera again that I realized that I had it set on macro instead of on sports/action setting that I usually do.  (I seldom if ever use the macro setting with my zoom lens.)


I had gasped and called to HWNSNBP that there was an eagle while I kept shooting.  He in turn, let some challengers who were passing by know there was an eagle and pointed it out.  They thanked him for bringing it to their attention.  

And then I got my distance shots, which would also be a lot clearer if the setting had been right.  


So my bucket list item of getting a picture of an eagle IRL in it's natural habitat was achieved. Check!


Sunday, October 24, 2021

World Card Making Day, Garage Sales, and Sweet Treats

World Card Making Day was on the first weekend of October and we were going to be away so I preplanned a little project.  I needed a get well card for a former co-worker - a male, so I didn't want to make anything floral.  I found this stamp set in my stash - Hi There Bear from Concord & 9th which hadn't been inked and had the perfect sentiment to go along with it.  I couldn't decide weather to go with the brown bear or the panda so I stamped one of each and fussy cut them.  I also found this blueprint background stamp from The Greetery that I thought would be a good background.  I gathered all the necessary supplies and packed them up to take along for when we settled in for the day.


I knew I had a pretty decent set of colored pencils at the condo and I was able to add some detail to that brown bear.  I originally stamped the bear's belly one way and then looked at the package picture and they had it the other way so I turned over the paper and stamped it again their way before cutting them out.  I still don't know which way I like better but I went with theirs.  


The finished cards.


The inside sentiment.


And just for fun, what I stamped on the back.


I should backtrack and say that we started the day at the Kirkside Garage Sale that they have twice a year down the road.  I had my "boxman" with me and I did pick up a few pieces to add to my box of stuff I'm saving to make more garden totems but I don't have any pictures right now.    

And speaking of boxes, we then went to pick up a box of goodies that I ordered from a new-to-us local bakery that they had advertised for a "Restaurant Week" special.  They only open their doors on Saturdays for walk-in customers and we are mostly at the condo on weekends during the summer so since we weren't going til later in the day on Saturday this time because of the garage sale I thought it would be a good time to take advantage of trying out their sweets and I wasn't disappointed.  I did spread them out over the course of the week to enjoy.


And I'm just going to add this for a smile.  GS2's class was shut down for another week earlier in October which meant his parents had to split their days staying home with him.  Our SIL sent us this.


When you're 2 1/2 you know everything, or you let him believe he knows everything when you know he doesn't like eggs.  

Saturday, October 23, 2021

Welcome Fall

I found these fall themed plastic containers at the Dollar Tree recently along with some pretty fall themed paper products which just happened to fit in them.  So I bought a few of each, tied some sparkly ribbon around them and attached a tag I created from some new products from The Greetery and HWNSNBP and I made some drop offs to local friends and family.  


I die cut those leaf sprays our of various shades of fall colors and then used the negative space from one of them in my Misty as a way to hold them so I could stamp the detail on each of them rather that trying to line up the die on the stamped image each time.  It goes so much quicker that way.   


The word "Autumn" is die cut from some sticky backed cork paper.  

I got carried away and made a lot more of those leaf sprays which I'll be using for something else soon.