Friday, May 28, 2021

Jingle Belles - Bling on the Holidays

The Jingle Belles want us to Bling Up our cards this fortnight.  This card started with a gold foil card base.  To it I added the last of my handpainted tea bag papers made with all the different hues of metallic watercolor paint that I have.  That panel is framed on both sides with some gold glitter paper border using Macrame Borders and Tassels from The Greetery.   To make the lettering I actually used the gold foil wrapper from a Christmas candy that I adhered to some index card paper before I die cut the letters using the Bold Alphabet dies from The Greetery.  (Yes, I've been on a kick with The Greetery's products lately.)


This card is so shiny you can see some of my reflection in the bottom portion trying to photograph it. I'm going to check my dies again to see if I have something that would pass for musical notes to add to it....... or maybe some sequins. What do you think?

Time to jump back over to the Jingle Belles blog to give some love to the other sparkly creations.  You can join me by clicking here.

Thursday, May 27, 2021

May Cards

There were a few occasions that sprung up this month along with a birthday.  I've been trying to go through some of the stuff in my stamp/craft room and have been distracted by some of the things that I've found that I put away for when I had "more time".  Well, now I just have to focus the time that I now have on getting some of that stuff used up.  One of the things that I came across was a bin of Stampin' Up Paper Pumpkin kits that I had unboxed and had in clear plastic bags just waiting to be put together.  These first three cards are from one of those kits.  I put my spin on how they were put together and didn't follow the plans from the kit.

I wanted to send some good wishes to a friend recovering from foot surgery.


And these were sympathy cards. 


This birthday card was made with the new Greetery BotaniCut Tulips and Market Basket dies.  I added the detail to the tulips with my Inktense pencils. 


I hope that these tulips still had some depth to them after going through the mail.  I did stick some dimensionals under the petals in the hope that they wouldn't get flattened.  I love this Market Baskets die also from The Greetery.  It has three sizes and you have the option of adding a liner or just using the basket alone.  I can see it filled with lots of things for different occasions.  And there is a little stamp set with sentiments to add to the label should you wish to add it.  


I almost forgot to mention that the background is made from The Greetery's Shiplap Builder die done in all white.  I am looking forward to using this some more particularly for masculine cards.

Tuesday, May 18, 2021

Jingle Belles - Days of Old

Time for a little vintage Christmas for the Jingle Belles Challenge this week.  My vintage stash is slim pickins but I managed to find a few things to cobble together this week.


I found a vintage paper doily that I received in a surprise package from my blogging friend Dorrie a few years back.  Trying to figure out what size card to use it on was a bit of a challenge.  I went with a slimline style which should fit into a regular business-size envie.  The vintage Santa on the horse is a card that I had saved that is 3-D - Santa and the horse are popped up off the paper.  The lace ribbon has been in my stash for years along with the skinny velvet ribbon I made the bow with.  The lace ribbon was originally the edging for a plaid ribbon that I used years ago for some ornaments.  It was sewn on the edge and was easy to remove and of course, I couldn't bear to chuck it, so it went into the lace box.  

I'll be checking out the rest of the vintage-style cards after a bit of weeding.  The weeds are very prolific this year.  I don't know if I'll ever catch up!


Sunday, May 16, 2021

Bright Bits From This Week

These are a bit out of day order but they're all part of this week.

Thursday we were meeting friends for pizza for the first time since this pandemic began.  HWNSNBP initiated this small gathering to thank the "garage boys" for all their help with sheetrocking and painting the interior of our garage.  Our original plans were to eat outside but we got lucky and they put us in the "Barn Room" which meant we were in-but-out so to speak.  The barn doors were open to the outside as it was a pretty pleasant evening.  Though I think if we had eaten outside our pizza's would have gotten cold pretty quickly.  

I decided on a little last minute project (of course).  I had seen that it was National Fruit Cocktail Day and asked HWNSNBP to pick up some small cans of fruit cocktail on his morning grocery store visit.  I used these Simple Fruits stamps and dies from AlteNew to create these "half" cards on a kraft card base.  I have a pack of prescored kraft cards and envelopes that I found during my recent craft room cleaning.  I didn't want something too big, more like a tag so I cut the card base in half and layered the fruits onto it along with the sentiment.


Inside I used another stamp for this sentiment and added the special day greeting.


I put a small can of fruit cocktail and all the leftover chocolate nuggets from the work sessions into the bags and tied them up.  A simple way to celebrate good friends.


During my weeding this week (of which there is much more to be done) I came across my pink Lily of the Valley which I haven't seen in years.  This particular bed has become overgrown with a particularly invasive plant I know as Marsh Marigold.  I am trying to remove most of it but it has these little tubers on the roots that have to come out and being that this is my wildflower bed, I'm not able to just rip it out.  I've had to scoop out the plants by their roots and I'm afraid that I'm going to be losing other things along the way that have past their blooms.  Spring wildflowers tend to bloom and then you don't see evidence of the plant after a while.  But it was nice to find the pink LoftheV again.

 
On the side of the garage we have the brunnera blooming beautifully.  The hellebores that we had here didn't make it (though they did in other areas - go figure).  And I picked up a pulmonaria plant that we added to the front of these.  HWNSNBP also picked out some astilbe that is behind these plants and not ready to bloom yet.


In the other tier of this bed we have some small red barberry shrubs which I didn't realize flowered.  Those golden yellow blossoms are quite a contrast to the red leaves.


And we have forget-me-nots coming up in scattered places.  I leave them where they're happy because they make me happy to see them.  


Rachel had ordered me some specialty marshmallows for Mother's Day that were delivered on Tuesday.  I was happy that it hadn't been too hot to melt them.  I had ordered some for gifts the week before and we had some very hot days and they came partially melted.  That meant they couldn't be gifts which was bad, but they could be eaten, which was good and bad.  I have ordered other flavored marshmallows without the chocolate covering from this company in Chicago that were also quite good.  I loved the chocolate covered ones but it's getting too warm at this time of year for them now.  They will have to wait until the fall for another order from me.


I planted spinach and buttercrunch lettuce in our raised bed planter near the house and the spinach is ready for picking.  Made a few good spinach salads for HWNSNBP and I for lunches this week.  He likes his sans strawberries and with ranch dressing. I went for a raspberry vinaigrette on mine.  Isn't it pretty?


HWNSNBP is hard at work these days putting in our flowering plants.  We have flats of vinca/periwinkle that we scatter around the yard as they are one of the few flowers that the deer do not bother.  He has been on a somewhat of a wild goose chase looking for purple fountain grass.  We usually add a few of these to our front yard landscaping.  They are winter hardy in other zones but not ours.  Here they are considered annuals and he refuses to pay high prices for annuals being that we need about 7 of them.  So he has been visiting nursery upon nursery looking for smaller, less expensive plants without much success.  It's usually in the out-of-the-way place that we get lucky with these so keep your fingers crossed.  

Thursday, May 13, 2021

An Inky Experiment

A fellow ICADian Suzanne Hershey Ford recently posted a little art experiment that I thought I would like to try.  She took flower blossoms and made them into an ink/watercolor by boiling them.  I found some instructions on-line that said you could just pour boiling water on them and let them sit for a while which appealed to me more so I looked around for some blossoms.  

The redbuds were blooming in the yard and were fast approaching the "browning" stage but I managed to collect about a half cup of them.  I spooned boiling water over them and let them sit for a couple of hours but they did not give up any detectible color.

All or most of the daffodils in the yard are done, and we do have other flowers planted but they're much too young to give up enough of their blossoms for this experiment.  Then I looked around inside.  HWNSNBP had "found" a forgotten potted amaryllis bulb in the basement about a week or so ago that was sending up it's flower spike.  It did bloom late last week, but the blossoms were beginning to fade so I picked off the two nearly shriveled ones and tried the boiling water again.


I also noticed that one of my orchid plants had suddenly dropped all of it's blooms and they still had some color in them so why not try these also.


As you can see from the photos above, the amaryllis gave up some good color but the orchids not so much.  There was just the faintest hint of color from them.

So I got out some watercolor paper and started playing around.  I wet the paper and dripped the color on it first and let that dry.  Then I loaded the brush with the liquid and layered some circles on, letting it dry between layers.


On this one I just used the paintbrush pressed lightly onto the paper to make flower petals.  In between the flowers I used the orchid ink in dots to see what it would look like dry.  


When these were dry I took out a sepia and burgundy micron pens and outlined the circles and the flowers.  I also added some white gel pen to the circles and the centers of the flowers.  I used colored pencils to turn those orchid ink dots into flower centers by giving them their own petals pushing them to a lower layer.  


The next test of these would be to see how long the ink lasts when exposed to sunlight.  I think I'm going to test adding Micro Glaze over these to make them into oversized postcards.  We shall see over time.  In the meantime, I'll probably be keeping my eye out for more colorful petals to experiment with.  

Tuesday, May 11, 2021

The100DayProject Wrap Up

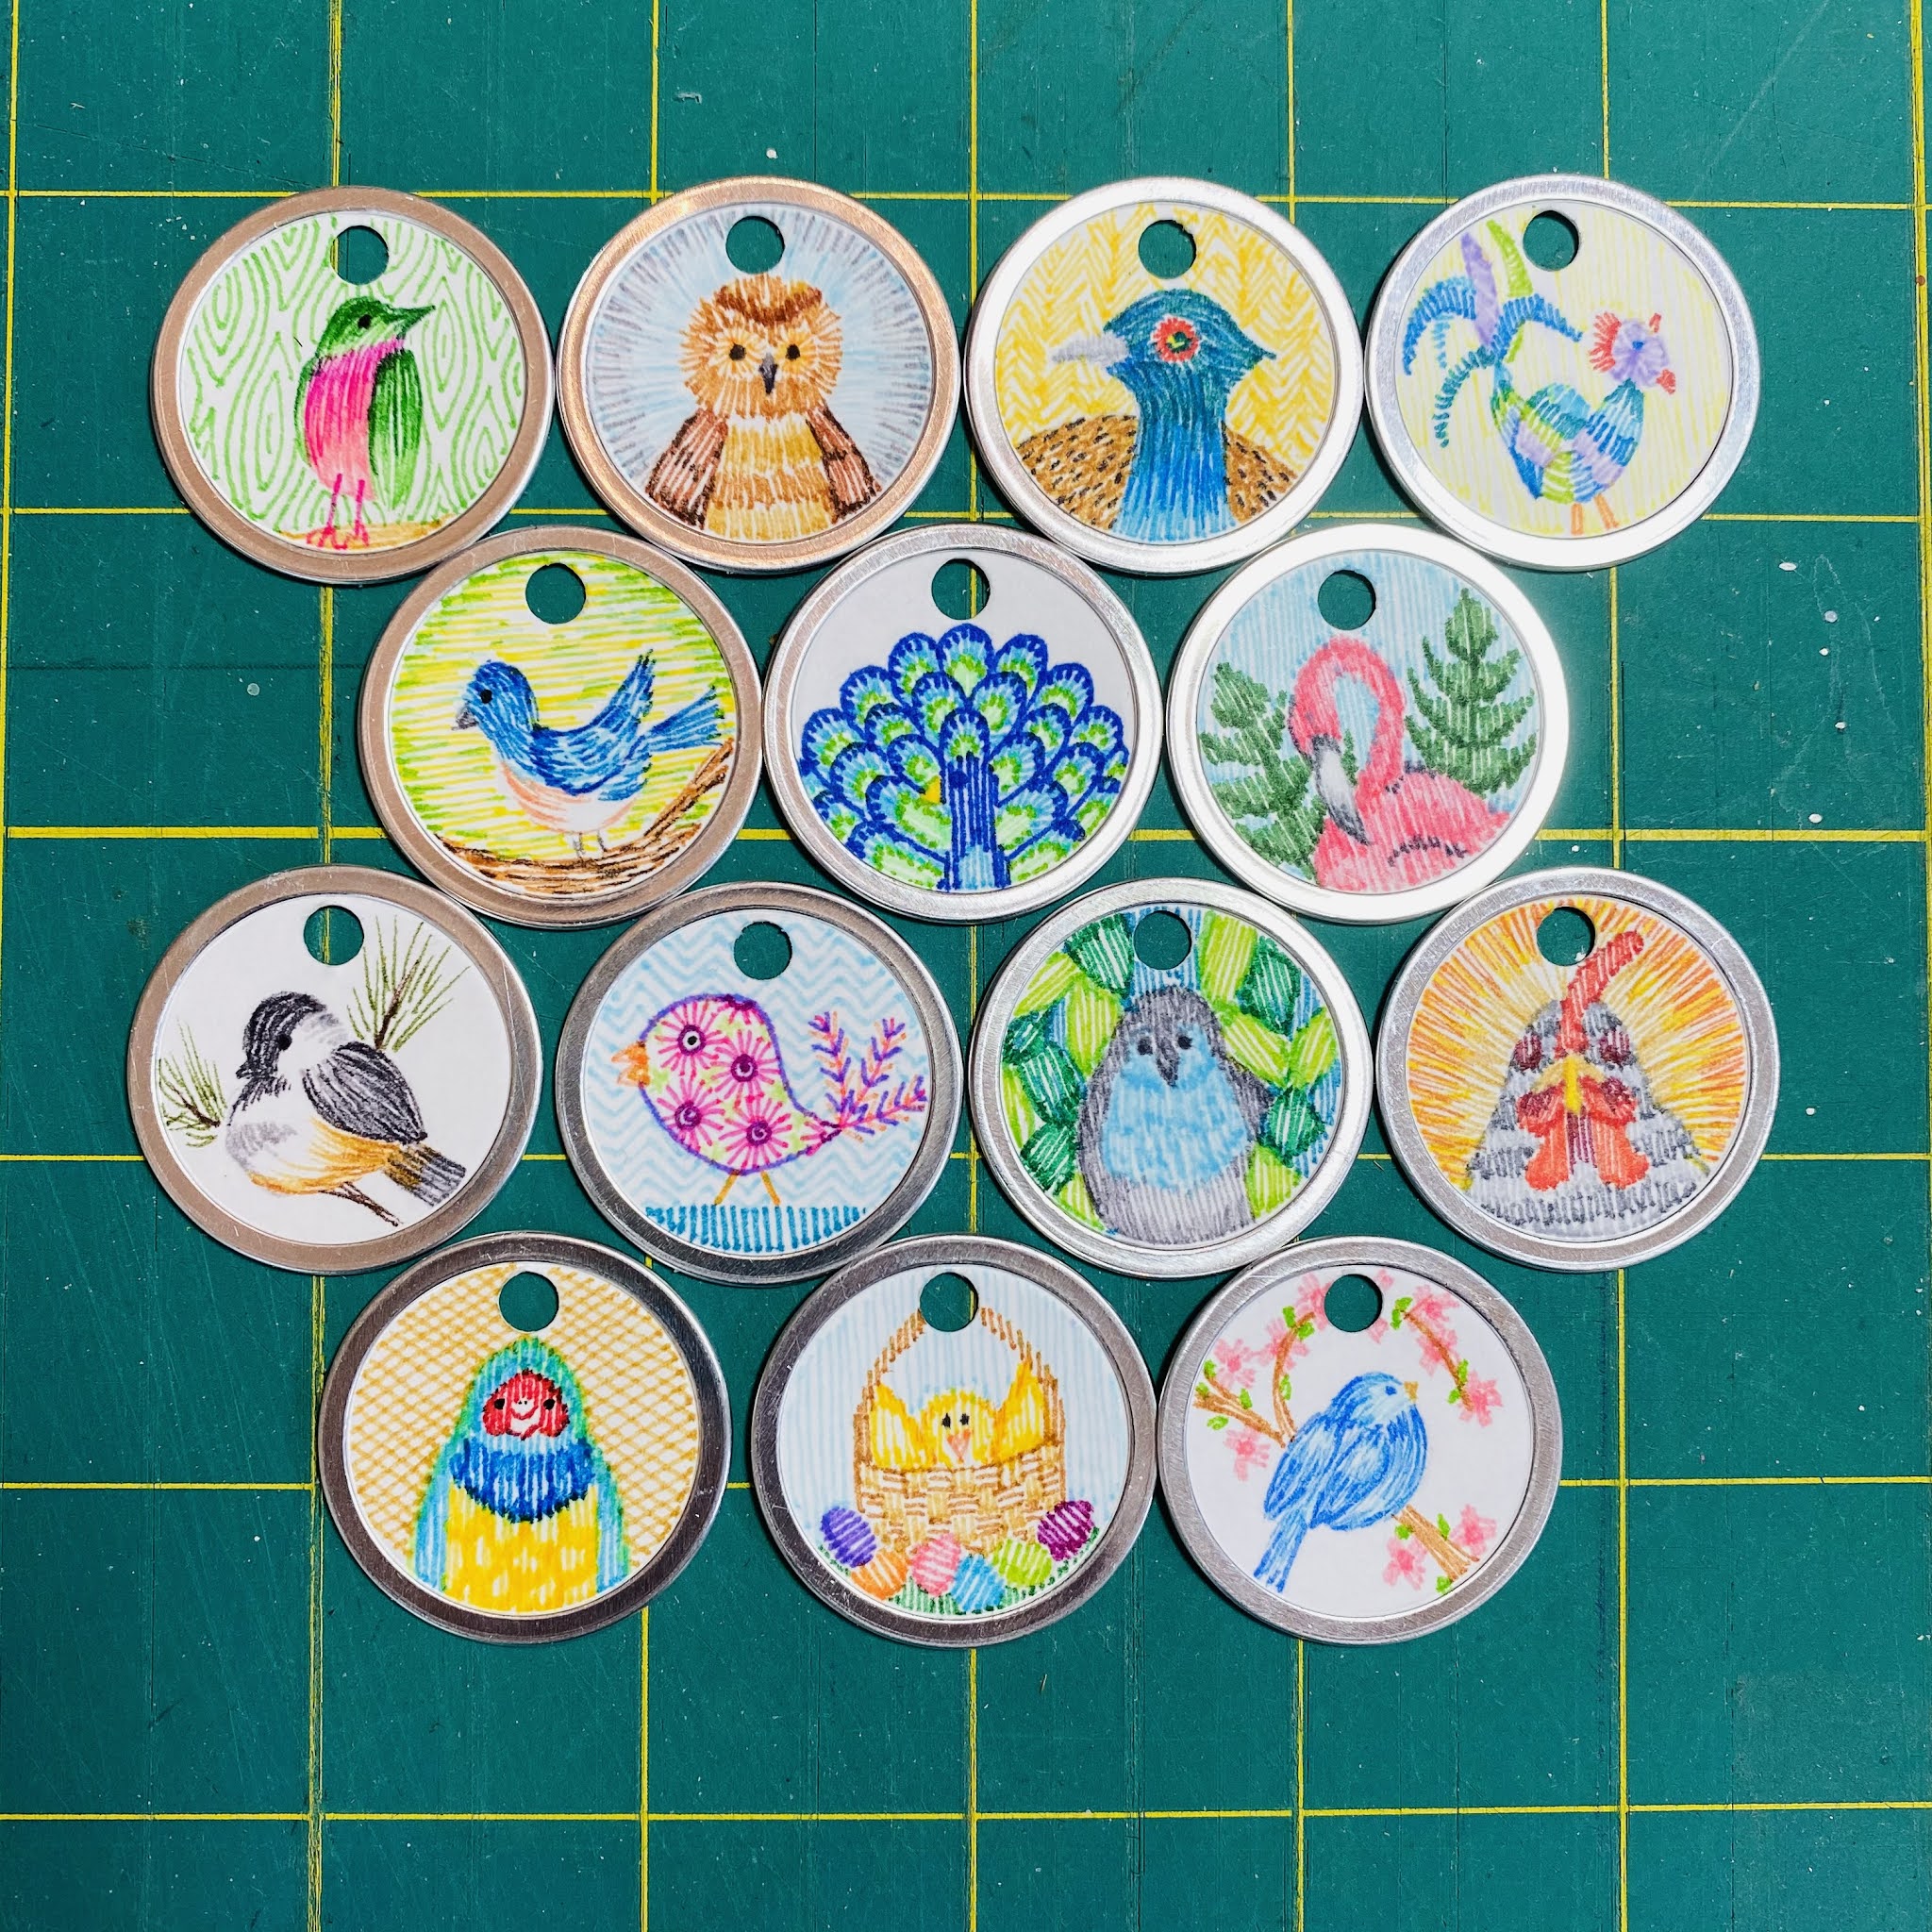
 Well, here they are.  All 100 of them.  Click the picture to enbiggan.

These are all the birds.


Flowers/Plants/Trees


Landscapes (and Seascapes)


Animals/Insects/Shells


Edibles


Miscellaneous


I've used 3 x 5 index cards for ICAD, ATC's, and 2 x 2's for Two Inches of Art, but these - at 1 1/8" - are the smallest substrate that I've created with.  I'm very happy with them.  Well, most of them.  There are a few that I would like to do over or do without, but not many.  My ideas were limited by the space and by the colors.  For instance, you don't see anything with snow or any white animals because even if I used a white gel pen, you wouldn't get the effect of the faux stitching that I was going for.  

If I were to pick a favorite category it would probably be the landscapes, with the birds a close second.  I don't think it would be possible to pick one singular tag as a favorite though.  There are too many that I really like.  

The project was started on January 31st and ended yesterday, May 10th.  Of course, there were no strict rules that you had to finish in 100 days.  Just as long as you created 100 somethings, the dates are flexible.  Truth be told, I did work ahead on many occasions for a couple of reasons.  First, having more than one idea and having the supplies out it didn't make sense to stop after one and come back the next day.  Second, I might have had something planned that took us away from home for a day or more, so I wanted to keep up.  What I did do for 100 consecutive days was to post my tag daily on Instagram.  That kept me motivated to have them done on time.  

And I'm sure you would like to ask the $64,000 question - "What are you going to do with them?"  Well, when I find the rings (they seem to have been temporarily misplaced) I will add them back to the tags and I thought about adding them to some sort of chain to make a garland I can use in my craft room.  My daughter's sister-in-law made a suggestion today to make some sort of lampshade and I was thinking that that could also be a possibility.  I have a lampshade frame that I bought at a garage sale a few years back that is waiting to be used.  We shall see.

I hope you enjoyed seeing these as much as I enjoyed making them.  Now for a couple of weeks respite from long-term projects before ICAD starts on June 1st.

Monday, May 10, 2021

The100DayProject - Final 9

 I'll have a wrap-up post coming tomorrow.  Right now, here are the last nine of the tags.


Not a horse - an alpaca.


A paisley inspired bird.


Snail shells.


Bargello or the inside of a hot air balloon.


This is inspired by the phenomenon called "the glory" - where a rainbow appears around an object when the light is just right in the fog.  

Sunday, May 9, 2021

Happy Mother's Day


I'm wishing a happy Mother's Day to all the women in my life.  I've seen a few articles/posts lately that say that Mother's Day is offensive to those that are not actually mothers and though I don't fall into that category I would hope that that's not the case.  Mother's Day is a day that we honor the women who nurture us, support us, guide us, love us and not just the woman who gave birth to us.  There are so many women in my life that have importance in ways that my mother does not.  I am not downplaying her role either though.  I know that my mother, who gave me four siblings, made the best world for me and my sisters and brothers that she could and I love her for it.  

Tuesday, May 4, 2021

Jingle Belles - Gift Cards

This fortnight the Jingle Belles asked us to create cards that doubled as gift card holders.  Truth be told gift card holders are one of the things I wind up doing last minute.  I think it depends on who and what kind of gift cards we're going to need.  Well, I know that we usually give a gift card to Dunkin' Donuts to the mailperson so I went about thinking of ideas.  I remembered having an Ellen Hutson die that has somewhat of a zippered compartment that would be pretty simple to decorate.  I tried to stick to a simple decorating scheme since the top of this card get's pulled off to get to what's inside.


Here is the backside of the front panel where I hope you can see the perforations around the edge where the panel will be pulled off.  I cut a thin piece of cardstock and attached it to the back with the other end protruding through to the front so the received might have a clue as to how to open it.  I will add a note that I precreased all those perforations, in all directions so that it would be easier for the paper to tear away.  


Here is the tab I added.  I know I have a stamp set with pre-printed directions like "Pull Here" and such which I'll have to search for.  But if I don't readily find it, I can always hand print it on the tab.


I used double-sided tape to adhere the front panel to the backing but I purposely left the side of the tab opened for now so that I will be able to insert the card when it is purchase.  I'll just have to pull the backing off the tape and it will be sealed.


And since I had all the ingredients out, I made another one and now I'm glad I did because I'm thinking that I usually also give my hairdresser a little extra something at the holidays.


So now I'm off to check out the other gift cards for this Jingle Belle challenge.  You can join me by clicking here.

Monday, May 3, 2021

Happy 2nd Birthday

This little guy loves his cars and trucks.  And in particular, he loves the Cars movie.  So it was only right that he had a car-themed birthday.  I found a card on Pinterest by Annette Elias at De Kijkkast using the SU set Moving Along which I got recently.  I wanted to stick to primary colors for the most part but threw in the colorful circle dsp as well as some map dsp from my stash.  


He tells me to sit next to him at the table and he lines up the cars and we send them back and forth between us.  Over and over again.  Sometimes there are sound effects, sometimes he just studies the wheels going round.  


Birthday cupcakes - one of each flavor.


Of course you try to wear the pan on your head after all that sugar!


I see both his mother and father in him, but being born on my father's birthday it amazes me at how much he reminds me of him.  Happy Birthday Maverick!  Happy heavenly birthday dad!