Monday, March 31, 2008

Tool Talk #4

This being the last day of National Craft Month and the last day of March I thought it apropo to include these two tools on my can't live without list. They have a special significance to this day that those of you who know me well will understand and maybe the rest of you will put two and two together.

Let's start with the magnifiers - some call them reading glasses - which I do still keep the sticker on so not to get them confused with the lesser powered reading glasses that I need to read with for the last about 10 years or so. I used to be able to do that detailed work without either pair of glasses, but then - well you know, nothing lasts forever. When I'm at my workspace the glasses are constantly being switched depending how detailed of a project I'm working on. They are definitely needed when cutting and also help when lining things up.

The tweezers, well yes, they're for helping in placing those small cut pieces where they belong and for help in removing the backing on dimensionals and the red sticky tape. Not to mention, always there to help snag that hair or two that seem to pop up on my chin these days - oh yes, it's a nasty trick of nature to turn the hair on my head white and the hair on my chin black, but rest assured the trusty tweezers are never far from reach.

So maybe you've picked out a theme here, maybe not, but the last clue would be to check those numbers on the glass label and know that today two of them became significant in another way (and one of them is not 0).

Sunday, March 30, 2008

Bloomin' Beautiful Blossom

I had another one of the $ store frames - a long skinny one - and I had intended to actually use the framing part for this project, however, it was late and my brain was running slow, so I thought about not using the frame part and just attaching the elements to the backing. Here's how it came out.

I stamped the blossom image from the the Bloomin' Beautiful stamp set in Basic Gray on Confetti White cardstock. I believe this is a poppy and my favorite poppies are pink, so I went with this color combo. I used my SU Markers and blender pen to color in the flower, stem, and leaves.

You can see that I stamped the flower and leaves twice so that I could cut them out and give some dimension to the project. I also colored the center peice of the flower with very, very light More Mustard - I know you can barely see it here - and glued that on the main image first. The two outer petals were cut from another stamped image and just adhered in place at the base of the petals - as they would be on a real flower.

Since I was cutting this from Confetti White, I didn't want the white edges showing - so my tip is to run your marker over the edge of what you're cutting out so that it will blend in with the rest of the project.
Actually, you can't see it here in these pictures, but I think it's also important when using small pieces to use your marker to color the edges of the dimensional as I did with the leaves. They take the color - and that way, when you look at your project even from the slightest side view, the whiteness won't jump out at you because it is somewhat camouflaged. (Blah - Somebody needs a manicure!)
I forgot to give you the colors - the background is Chocolate Chip, the torn pieces are Cameo Coral and Ruby Red. Cameo Coral, Ruby Red, Old Olive and Moss markers were used on the flower image. The wording is stamped in Chocolate Chip ink. I added the Old Olive twill at the top with a swirl from my Hodgepodge Hardware, and the bow at the bottom is in 5/8" Choc. Chip grosgrain. This has the easel backing from the frame so it will stand up, but I think it would also make a very pretty long card.

Friday, March 28, 2008

Altered CD Case

So here is the project that I spent working on most of the day yesterday. I had been browsing blogs (when I should have been stamping) and came across this one (scroll down) and loved the concept. I do have the stamps to do that same project, but I wanted to use something more current, and that I hadn't used already. Then I thought of my new Bloomin' Beautiful stamp set from the Occasions Mini. That paired with the Ginger Blossom designer paper might work -

Now to find the CD cases. I have a couple of few boxes of things that I have set aside to alter and I was pretty sure that there were CD cases in there. So I went on a hunt (this was actually 2 days ago) and found the cases but they were the slim ones - blah! But, I remembered that Stacy had mentioned either in her tutorial or in the comments that went with it that you could get them at WalMart. This wasn't so bad you see, as I was wanting to travel down the highway in that direction to get my first ice cream cone of the year from Polar Cub which opened last week.

So, when my husband came home from work I coaxed him into taking a ride and both things were accomplished - BTW, Polar Cub ice cream can't be beat!!!

And so, the first step was to stamp the image and color it. I chose to use my watercolor crayons and aquapainter (see post below about the extra tool I used). I stamped my image on Confetti White cardstock in SU's Basic Gray Ink - I think it's subtler than the black and it doesn't run or blend when wet. Cameo Coral, Ruby Red, and Bravo Burgundy were used for the flowers. I gave the whole blossom area a wash with the lightest color first - let that dry, then went back and put in the Ruby Red highlights on the edges of the blossoms - let that dry, then put in the Bravo Burgundy highlights only on the points of some of the petals. The centers of the blossoms are Ruby Red. Garden Green was used on the leaves. Because I wanted to pop up some of the blossoms, the blossom image had to be done twice. The third image that was stamped and colored was for the vase and the under layer of flowers. You can't see in the picture, but the under layer is not detailed like the layer that is popped up. (Oh, the vase was colored using Really Rust.)

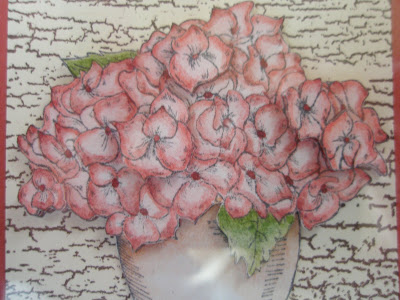
I stamped a square of Very Vanilla CS with Choc. Chip ink using the Weathered background stamp. Then mounted that on a layers of Ruby Red and Choc. Chip CS.

I added the Hodgepodge Hardware piece to the Choc. Chip grosgrain ribbon. I'm pretty pleased with how it came out. Now I either need to get one of those stands or a picture hanger for the back.

BTW - that blue haze in the pictures is not my watermark, it's me. I couldn't seem to get a good picture of the case without getting some kind of reflection. Sorry about that.

Tool Talk #3

This is really a catch up post - I was in the throes of working on a project last night when I got a call at 9 p.m. from my son. He had just returned to his apartment after playing basketball and he had injured his foot. He sprained his right ankle about 3-4 weeks ago but was muddling through with it, and in his words.... it was just starting to feel right again. Well, he messed it up again and was in so much pain that he wanted to go to the emergency room. So, I went to get him and took him to the hospital leaving my project behind. That'll be the next post.

But the tool I wanted to tell you about is something that I used to keep with my painting supplies but it is used much the same way when you are rubber stamping. It's a handheld battery operated fan. You know you've probably seen them in the summer months in $ or department stores. Not the misting kind - you'd get a whole other effect from that. Just your regular little pocket fan.

What's that expression - something like "it's about as interesting as watching paint dry"! When you're watercoloring a stamping project, sometimes it's better to let the layers of color dry in between. But if you're impatient - as I am - you can get your trusty little fan out and let er rip! Yes, you can always use a heat gun, but if you're at a class or don't have your heat gun holstered right next to you, the little fan is great. (Helps with the hot flashes too!)

Wednesday, March 26, 2008

Pretty Amazing

You're probably familiar with these little mazes. You can get them in a pkg. of 8-12 at a $ store. When my daughter graduated college I bought several packages and peeled off the backing and replaced it with a picture of her in her graduation gown with the date, her name, and the name of the school. I had them out in bowls on the tables at her graduation picnic as favors.

While I was searching through my tons of items to alter, looking for something else of course, I came across an unopened package of these and the wheels started spinning. At first I thought I was going to use the Tart and Tangy stamp set with the fruit, then I spied my new Pretty Amazing stamp set and the wheels were spinning even faster. So I quickly mounted the stamps (for those of you who don't stamp I'm referring to mounting the rubber stamp onto the wooden block, not to be mixed up with the spinning wheel references above) - and yes, I hang my head when I say that I have a few sets not mounted yet..... but let me continue

So I stamped the flower image in Soft Sky and used my blender pen to add some Blue Bayou highlights to it. Then I got out the coluzzle circle template and cut it out. I carefully glued the plastic maze (remembering, thank goodness, to include the little ball) on the flower image. Then I cut another circle for the back in Soft Sky CS and stamped the floral with Soft Sky ink, accented with my VersaMark pen, and the "Amazing" in Blue Bayou ink.

Then I sat there for a long time thinking about what the purpose would be for this little amazing thing. I thought of making a hanging ornament, but where would it hang? Then it dawned on me to incorporate it into a card. But I didn't want it to be permanent on the card, so I came up with the green webbing strips. I cut six 1/4" x 1 1/2" Certainly Celery strips and spaced them out on the blue backing. Then I attached that to the maze. I got out the coluzzle again and used the largest circle template as the card, cutting a hole in the center of the front to fit the maze.

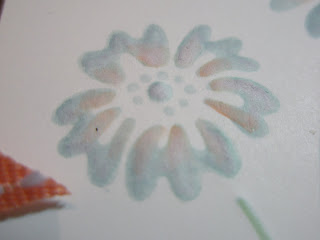
The hardest, well not hardest, the most time consuming part was adding the floral wreath to the front of the card. I got out my stamp-a-ma-jig for that. Using the stamp-a-ma-jig is not hard, but when you're going in circles and trying to make the branches look continuous it is a little tricky. The wreath was stamped in Certainly Celery and the front was sponged with Blue Bayou on the edges and Soft Sky over the wreath. I added a bow in Blue Bayou. Inside I repeated the floral pattern that was on the back of the maze. Pretty Amazing!

The recipient can keep the card in one piece or they can snip the green strips to remove it.

Tuesday, March 25, 2008

Afternoon Tea Purse

I decided to tackle a pretty project yesterday that I had seen on Jan Tink's blog - check out her Carousel Notes Purse Book Tutorial - I cased the outside totally and made some adaptations for the inside.


I also got my exercise with this one - going back and forth between the den where the computer is to the dining room where my workspace is. I love the design of this project. Luckily I had all the ingredients at home to do it. Now I have to decide what pics to put in it and/or who will be the lucky recipient.


Don't you just love this Designer Paper - it's called Afternoon Tea and is in the Occasions Mini, as are the Carousel Notes. The notes don't come embossed but it is easy enough with either the classy brass stencil or with the crop-a-dile.

Monday, March 24, 2008

Tool Talk #2

Right now my workspace is on my dining room table. I have lots of light, a clear view of the kitchen and living room (and TV), and Kirby. Kirby is our cockatiel. Kirby is sometimes loud and always dusty. This makes for lots of bird dust on the table at any given time in addition to the normal household dust. I do vacuum every couple of days but vacuuming my workspace is not always easy depending on what stage of what projects I have going on. Swiffer dusters are great, but still they don't get those little bits of paper or whatnot you might have from your work.

This Christmas my husband got me a wonderful little tool - a Dirt Devil Detailer. It's a little - like the size of a heat gun - rechargeable vacuum cleaner that picks up all the Kirby dust and all those little scraps, including the pull off portion of dimensionals and sticky tape. I can do a quick sweep with this little tool before I get started without having to drag out the regular vacuum cleaner. I keep it plugged in on my kitchen counter. It also works well for those errant crumbs on the counters and kitchen table.

Sunday, March 23, 2008

Easter Wishes

How sad is this that a crafter resorts to adding masks to hard-boiled eggs for Easter! I thought they were cute, my daughter said she will have nightmares from these (she's 25, go figure). Well, when your kids are grown and you don't have grandchildren yet is there a point in coloring eggs? How much egg salad can one eat with all the other leftovers? I thought I was being pretty resourceful - they only cost me a buck during one of my $ store excursions.

Happy Easter to anyone who is reading this. I hope you had a wonderful day with your family (or without if that's how you prefer it). I'm going to go finish my Easter cards (we're way past last minute here) and straighten out my work area to get back to business tomorrow. Luckily I get an extra day off this week. The students and staff are off the whole week, but we, in the office, only get tomorrow unless we use vacation, personal or sick time. Maybe I can call in sick - you know after a couple of days of leftover ham and kielbasa I am going to be sick of it!!!!

Saturday, March 22, 2008

Easter Chicks

Isn't this so sweet. My upline Debbie brought this to me at school the other day. She was dropping off these cute little Easter treats for her sons' teachers. She is such a sweetheart! She wows me with her talent and her enthusiasm. Thanks Deb!

So last night, after I finished all my baskets (which haven't all been delivered yet - sorry), I decided to whip a few of these little treats up myself. This is a perfect project to use up those scraps of designer paper you might have left over because you need very little of it to cover the bottom of the container.

I don't know if you can see in this close up how I used my marker on the chicks. I pounced the color on to look like it had a little texture - well, it was after midnight and I thought I could make something flat look fluffy. What do you think? Did it work?

Bluebirds

Okay, this is not a craft post, and the picture was actually taken in May of 2005, but isn't he beautiful. This was "The Major", named by my husband. We haven't had bluebirds since then but we've seen them checking out the nesting box and we're keeping our fingers crossed that we will have them this year. We had a lot of rain this week and I haven't seen them around since then. If I don't catch a glimpse by Sunday I'll have my husband check the box. He's been itching to do it, but I didn't want him to scare them away too soon. I'll keep you posted.

As I didn't get my craft post up for the 21st I'll try to catch up a little later in the day. I've been working on several projects throughout the day - with many interruptions. Tomorrow will be delivery day and getting ready for Easter Sunday. Got some baskets to stuff now.

Thursday, March 20, 2008

The Bosses B'Day

Sunday will be my Bosses Birthday, but since there is no school tomorrow we wished him Happy Birthday today.

I used Close to Cocoa, Choc. Chip, Bashful Blue and Whisper White Cardstock. Stamped the image using my Close to Cocoa, Bashful Blue, and Barely Banana markers. The sentiment was done in Choc. Chip ink and punched with the word window punch. The Choc. Chip twill ribbon was added under the main image. Birthday Whimsy was the stamp set used.

The only non-SU products used were the Giga Scallop Punch and the Cuttlebug Circles embossing folder.

It looks a little drab in the photo - could have been the photographer, yep, that's it, blame it on the photographer!

Wednesday, March 19, 2008

Easter Baskets

These baskets are really simple (and cute!). You'll need to cut a sheet of 8 1/2 x 11 paper in half lengthwise so that you have a strip that is now 4 1/4 x 11. Then you will need to cut slits 1" apart and 3 1/2" deep down the length of the piece. (This is the same way as you make Chinese Lanterns but you are using half the sheet of paper here.)


You can see how the slits are cut in this picture. The rest of the materials are a 1 x 10 inch piece of double sided paper scored in half lengthwise, enough straightened scallops (see previous post) to fit the 10 inch length, 3 brads, and 9 inches of ribbon. You can see that I have stamped the Pretty in Pink CS in Purely Pomegranate with Boho Backgrounds.


If you turn your slit piece over, you will need to mark the ends of each slit 1/2 " in from the sides and 3/8" down. Here I have used a post-it (again) as my marking tool. I laid the pattern over each slit and punched a hole with my needle tool. After all the slits are marked in this way, punch the holes with a 1/16" punch (your hole will need to be big enough to accommodate a brad).


Glue the prepared piece together to form a tube - you will be overlapping the two end pieces and will end up with 10 slit pieces.
Starting at opposite sides of the tube, alternate putting the slits on the brad and assemble the bottom of your basket.


Here you see it from the front.

Add your straightened scallops to the 1 x 10" band and adhere that to the top of the basket. Using your slot punch, punch on opposite sides of the band. Slip your ribbon through to make a handle. In the examples above I used brads through the pomegranate ribbon and tied the chocolate chip ribbon with pink satin on the other. As you can see, they are big enough to hold a couple of eggs.


Oh, and you know that Chocolate Chip circle you are left with when you are making the straight scallops - I glued one of those on the bottom of the basket to give it a flatter bottom.

Tuesday, March 18, 2008

Cracked Glass

This is not the greatest picture but if you could see it clearer the blue floral area looks like a ceramic tile. I used the cracked glass technique for these little 3 x 3's. I used my Floral background stamp in Basic Blue ink on white cardstock. I then cut that image into 2 x 2 squares. Next you need to cover your image with VersaMark ink and then clear embossing powder and heat. Repeat the last step 2 or 3 more times. The layers of EP build up to resemble glazing on a tile. When you have your last layer done, immediately put your image(s) into the freezer for a few minutes. When you take them out, bend the paper to crack the glazing be careful not to bend too much or the glazing will separate from the paper. It really is prettier in person.

Monday, March 17, 2008

Gettin' Punchy - Going Straight

So how was your day?
No, seriously - this picture shows how to take a scallop punch and make it into a border. First you must punch a 1 3/8" circle in your cardstock and then center the scallop punch over it so that you get what you see on the upper left. Snip it - as in the upper right, and then gently open it up. The paper will bend between the scallops - press it gently with your fingers. Then you can use it like I did below (part of an Easter project to be posted later).

Sunday, March 16, 2008

A Duh Moment and a Sad Moment

Do you know how many times I have picked up a marker to use the brush end and pulled the cap off and it wasn't the brush? Well, I know that there is a little picture there and it still takes a little time picking up the marker, rolling it around in your fingers to find the picture and then taking the cap off. Try that when your adding several colors to a stamp! If you were working with these markers and you needed only to use the brush end could you find it by just looking at them as they are sitting in the picture? The top one would be the quickest to find - the other two, not so much. But wait, there is a way to tell at a glance even when that little brush picture is not visible. Look at the white rings. The brush end has a thicker ring than the fine point does. Thus the duh moment.

The sad moment is having to use this sympathy card. My son's friend and ex-girlfriend's father passed away suddenly yesterday. I did not know the father, but the family always treated my son very well even when he stopped dating the sister. I think that it has affected my son also because the dad was only a year older than my husband --- puts it all in perspective, doesn't it. Well, say a prayer for this gentleman who left a wife, 2 daughters, a son and daughter-in-law. They are in our thoughts and prayers.


The card is cased from this card posted on Splitcoast. Mine is a little different - no vellum, different ribbon and sentiment placement. The colors are Wild Wasabi and Blue Bayou. The stamps are French Script, Touch of Nature, and Warmest Regards.

Saturday, March 15, 2008

Another Post-It Tip - "Look Ma, No Hands"

I have so much to fit into these next two days before the work week begins again. I have goodies to deliver, cleaning (blah) to do, and I haven't even started my Easter projects. While I'm cleaning (blah) today I'm also going to have to try and locate the goodies that bought for Easter and hid and try and remember what I was going to do with them. So, that's why you're getting a tip today instead of a project.

When you need to cut or trim a piece of paper and it is too narrow for you to hold down on your paper cutter with your fingers, take a post-it note and attach the paper or cs to your cutter, line it up, put down the bar, and drag the blade.

I wasn't going to post a picture because there was so much crap, um I mean scrap on the table that I have my big cutter on I didn't want to have to clean everything to take a picture, but after reading my tip myself I thought it might be confusing with just words so here you go -

Got out the portable cutter, but you can see the pink piece of paper was just a little too wide for what I needed it for and I would not have been able to hold it down with my fingers and keep it from moving while pulling the blade down. So I took the yellow post-it (but you can use whatever color you like) and used it to anchor the pink cs to the cutter. Now it won't move. And the post-it is thin enough so you're not cutting through something too thick for the blade.

I know what some of you are probably thinking - why not just cut another piece from a bigger sheet - and to that I say, why not use up what I have in scraps because someday I might need that bigger piece. But seriously, if you are at a workshop and you only have limited supplies, you have to make the best with what you have so keep a couple of post-its stuck to your portable cutter just for such emergencies.

Friday, March 14, 2008

Bag Toppers

First let me apologize for the bad picture. It's hard to take a picture of a shiny object like a clear plastic bag - at least for me!! I just wanted to share this quick bag topper. When you want to group some items together and want to make a pretty presentation of it find yourself a clear bag/envelope the size you will need to accommodate the contents you have planned. You can even use zip lock backs which come in an abundance of sizes these days. Check your $ stores in the crafts or sewing sections for small bags, your grocery store for medium and large bags, and your craft and office supply stores for clear sleeves and envelopes.

This is a very simple topper. I cut my Wild Wasabi paper 2 1/2" x 4 3/4" and scored it lengthwise at 1 1/4". You can add stamped images to that piece before you score it - come to think of it, I should've done that, the Linen Background stamp would have looked nice. Oh, well. Put your folded piece over the open end of the bag and staple it close to the bottom end. In this case, I covered the staples with a strip of white cardstock that I had punched to look like lace. I've forgotten the name of this punch. If you know it, let me know and I'll edit this. Then I just added the same tag that I put on the candy bar in a previous post which I neglected to list the ingredients for.

The tag is made using stamps: Frames With a Flourish, All Holidays, and Holiday Blitz. Stamped in Wild Wasabi and Marigold Morning on white cardstock, punched out with the 1 3/8" circle punch and mounted on Marigold Morning CS. The Shamrock is popped up with dimensionals.

There's Instant Irish Oatmeal, Irish Breakfast Tea, and a foiled shamrock chocolate in the packet. I'll be finishing these tonight to deliver over the weekend to ..............

Thursday, March 13, 2008

Candy Wrappers - Sliders

I bought some Cadbury Irish Creme candy bars for St. Pat's and I thought I'd make a slider wrapper for it using the same background I used on the sock envelope posted earlier. You can find directions for a popcorn slider here on Splitcoaststampers. You don't undo the bow to get to the candy, you pull the whole bow upwards and the ribbon that is wrapped around the candy slides it up the paper tube. Easy!


Here is a close up of the tag. The shamrock is popped up with dimensionals. I tied the tag string into the bow so that moves up with the bow.

I've never tried a Cadbury Irish Creme bar before - hope someone shares theirs with me!

My Hero

If you've ever gone to a craft show or any kind of show where there are vendors you know that they display their wares on and around tables and display set-ups. This past week, when my husband and I attended the Philadelphia flower show there was no shortage of vendors with such displays. We happened upon a little stand that had many cute things and I was attracted to this trellis. The gentleman in charge of the stand noticed my interest and told me that they had more trellises and even pointed to another one in the display. When I finished browsing the stand (with a couple of things already in my hand) I motioned to my husband and pointed out the trellis telling him the price. He said "go for it" so I did. We told the gentleman in charge that we wanted the trellis and pointed to the one that I first set eyes on. He told my husband to have me pay for it and he would go and get another one out of "the back" - the back being some storage room in the convention center.

I have to admit that I was a little nervous about this, not because I thought he might not come back, but I wondered what he would come back with. What would this new trellis look like? Would I like it as much? But I paid for my items and we waited.

The man came back with the trellis and handed it to my husband and walked away. Now, it wasn't a great expense, but it was $35 and I wanted to check it out before we walked away with it. The trellis that he brought out looked basically the same, although the points of wear were in different places and the paint was of a slightly different color. My husband could see that I was not really thrilled with this one and said that he would take care of it. So he went over to the gentleman in charge and told him that we would really rather have the one from the display. I could see that there was some exchange of words but I couldn't hear them. He did proceed to fish the one I wanted out from the display and my husband came over to me.

As we were walking away I told him that I had watched was happening and that I knew that words had been exchanged and asked him what was said. He told me that the man said to him "you know, there's no difference - they're all alike" and he told him "just the same, that's the one she wants."

You have to understand that I'm sure that he could not tell the difference between the two of them, and that he probably didn't care if there was a difference, but the fact that he said that I should have the one that I wanted meant a lot to me. I can't wait until we can find the right place for this trellis in the yard and plant something (hopefully that the deer will not eat) around it.

Wednesday, March 12, 2008

The Sending of the Socks

There should be a sub-title here: Not Just Your Plain, Everyday Envelope

I started sending holiday socks to my daughter and her roommates in college and, even though they're all graduated and no longer live together, the tradition lives on. I was told that they will always expect holiday socks. So, needless to say, it's time to mail the St. Patty's socks (actually, they should have been mailed already but I just picked them up). And, I just realized that the Easter socks should go out too, but we'll wait until the weekend for that.

How do I relate this to crafts, or National Craft Month - the envelope of course. Why send a plain, everyday envelope when you can make it fit the holiday? This envelope started as just your ordinary off-white catalog mailer. I got out my Stampin' Up Speckled wheel and put a layer on with More Mustard ink. Then I got out my Holiday Blitz shamrock and added them in Marigold Morning and Wild Wasabi. I think it came out pretty cute. Of course, I'll have to add the addresses on labels so they can be seen, but maybe it will put a smile on the mailperson's face as well as the recipient's.

Now, you can do this for ocassions other than "the mailing of the socks". Stampin' Up wheels are great for envelope art. The pattern doesn't have to go all over either. You can run them down one side or across the bottom. And, if you don't want to use or don't have a wheel, adding a stamped image always perks up the envy.

Tuesday, March 11, 2008

Pot of Gold?

If you've seen my earlier post about the post-it tip then you might remember the pieces of a project that I planned to show at a later date. Well, the time is now. Here is the result of putting those pieces together. Isn't he cute!!!! I saw this little guy on Splitcoaststampers - I believe his creator is Jodie Vasbinder. If you use the search feature on Splitcoast, you can find her and her wonderful work.
Back to the project at hand - I'll admit that I was lazy and used another little pre-made notecard to attach the leprechaun to. Inside is a poem that I came up with. The card is actually attached to a snack container of Pringles. I pushed the foil that extended around the top edges of the container back onto the lid (without opening the seal) leaving the pull tab out, so that the top could be covered without the red foil hanging out. I traced the opening and used the pattern to cut a piece out of Marigold Morning cardstock. You'll see the detail that I added in the picture below. I punched a 1" circle from the same cardstock to attach to the cover that extended over the pull tab. There is a slit in the pull tab and the punch so that I could feed the ribbon through. The card is just attached with a piece of white crochet thread.

If you look at the close up of the lid, you will see that I tried to add some detail to the top to make it look like there were coins in the pot. I used a 1" punched circle and sponged around the edges (and my fingertips) with More Mustard ink. The ribbon that was used was plain white grosgrain that I colored the edges of with a Gable Green marker. Here is the poem:

I saw a little leprechaun
And followed him all day.
Through shamrocked fields
and rainbowed skies
we passed along the way.
He led me to his pot of gold
And I saw what he makes.
He makes his gold, not into coins,
but into these pancakes.
L.Mastalski'08

Monday, March 10, 2008

Happy Birthday(s)

I'm going to post two cards today as there are two people in my life that share today as their birthday. One would be the love of my life - my husband Thad (also known as Ted, Teddy, Tad, Tedward..... shall I go on), and Sunshine, my son's girlfriend.

This card is Thad's and it is an original - it's a mish mosh of color and the color list would be very lengthy so I'm not even going to try it. I'll just say that I used SU's Sweet Celebrations, Big Pieces, and So Many Scallops. I didn't want some drab masculine card for him, and although this might look a little juvenile, it does have a "happy" feel to it.

This one I cased from JanTink - you can check out her absolutely "gojus" work on her blog . She is a genius designer and knocks me out with her creations. The technique she used (and I copied) for the main image in this card was something that I'd never tried before. When you see the close up below, you may be able to tell that the image is raised and that there are a multitude of colors in it. In her explanation, you stamp your image and then outline it (lightly..... learned that the hard way) with your stylus and then flip it over and gently go over your outline so that your image becomes raised on the right side. The image is stamped in Soft Sky and then after the "raising" you use a blender pen to add the additional colors. In this case, Blue Bayou, Groovy Guava, and Wild Wasabi. All those colors (plus Chocolate Chip) appear in the DS paper "Afternoon Tea." My card is a little different in that I put the corner piece on the bottom and my sentiment is inside. I hope Sunshine will like it.

If you try this technique here is what I learned - you can't use a lot of pressure when you are blending your colors 1) because of the kind of paper you are using (Whisper White) and 2) when you raise the image some of the paper fibers may already be compromised from the stylus so you need to be careful of this. You don't want any pilling. The stem and the leaves are done the same way.

Sunday, March 9, 2008

Candle Top Paperweights

Here is a way to recycle the lids to those jar candles after the candle has burned out. I prefer to use the lids that are flat, but I suppose you could use the rounded ones if you don't mind a little wobbling.


There are two sizes shown here and the one on the left still has the rubber gasket on it. You have to start by removing that gasket. Just snip it off with a good pair of scissors and discard it.


Next, tie your chosen ribbon around the glass lid and then you'll need to assemble your pieces.
For the smaller lid I have used the 1" and the 3/4" circle punches. You need 10 1" pieces and 6 3/4" pieces. As you can see, I've broken the flower down into 4 layers. The base - which I got by arranging 5 large circles in a flower shape and tracing onto cardstock and cutting out. Then there are two layers of the 1" circles - one layer is flat and the other layer is slightly curled at one end (use your needle tool or a knitting needle to do this). Then there will be a layer of curled 3/4" circles and then the center.

Glue your first layer of flat 1" punches onto the cardstock. You can use snail for this.


Add the next layer of curled 1" circles. Again, you can use snail for this layer.
At this point you'll need to get out your Mono-Multi or some Crystal Effects. Make a pool of the adhesive in the center of the last layer and then add your 3/4" curled petals so they are standing up and overlapping slightly.
Take your last 3/4" petal and curl it tightly and add it to the center of the flower.


I've used sticky strip on the top of the rim to adhere the finished flower.
This flower was done using SU's Berry Bliss Designer Paper, Pomegranate CS, and sticked Pomegranate ribbon.


This larger paperweight was made using the 3/4" and the 1 3/8 " punches.
I saw these flowers on the website listed below and wondered what could I do with them. Then I remembered the candle lids that I had been saving to do something with sometime and thought that they would make a nice paperweight. What do you think?