Showing posts with label Thursday's Throw Aways. Show all posts

Saturday, March 4, 2023

Thursday's Throw Aways - Upcycling a Tea Strainer

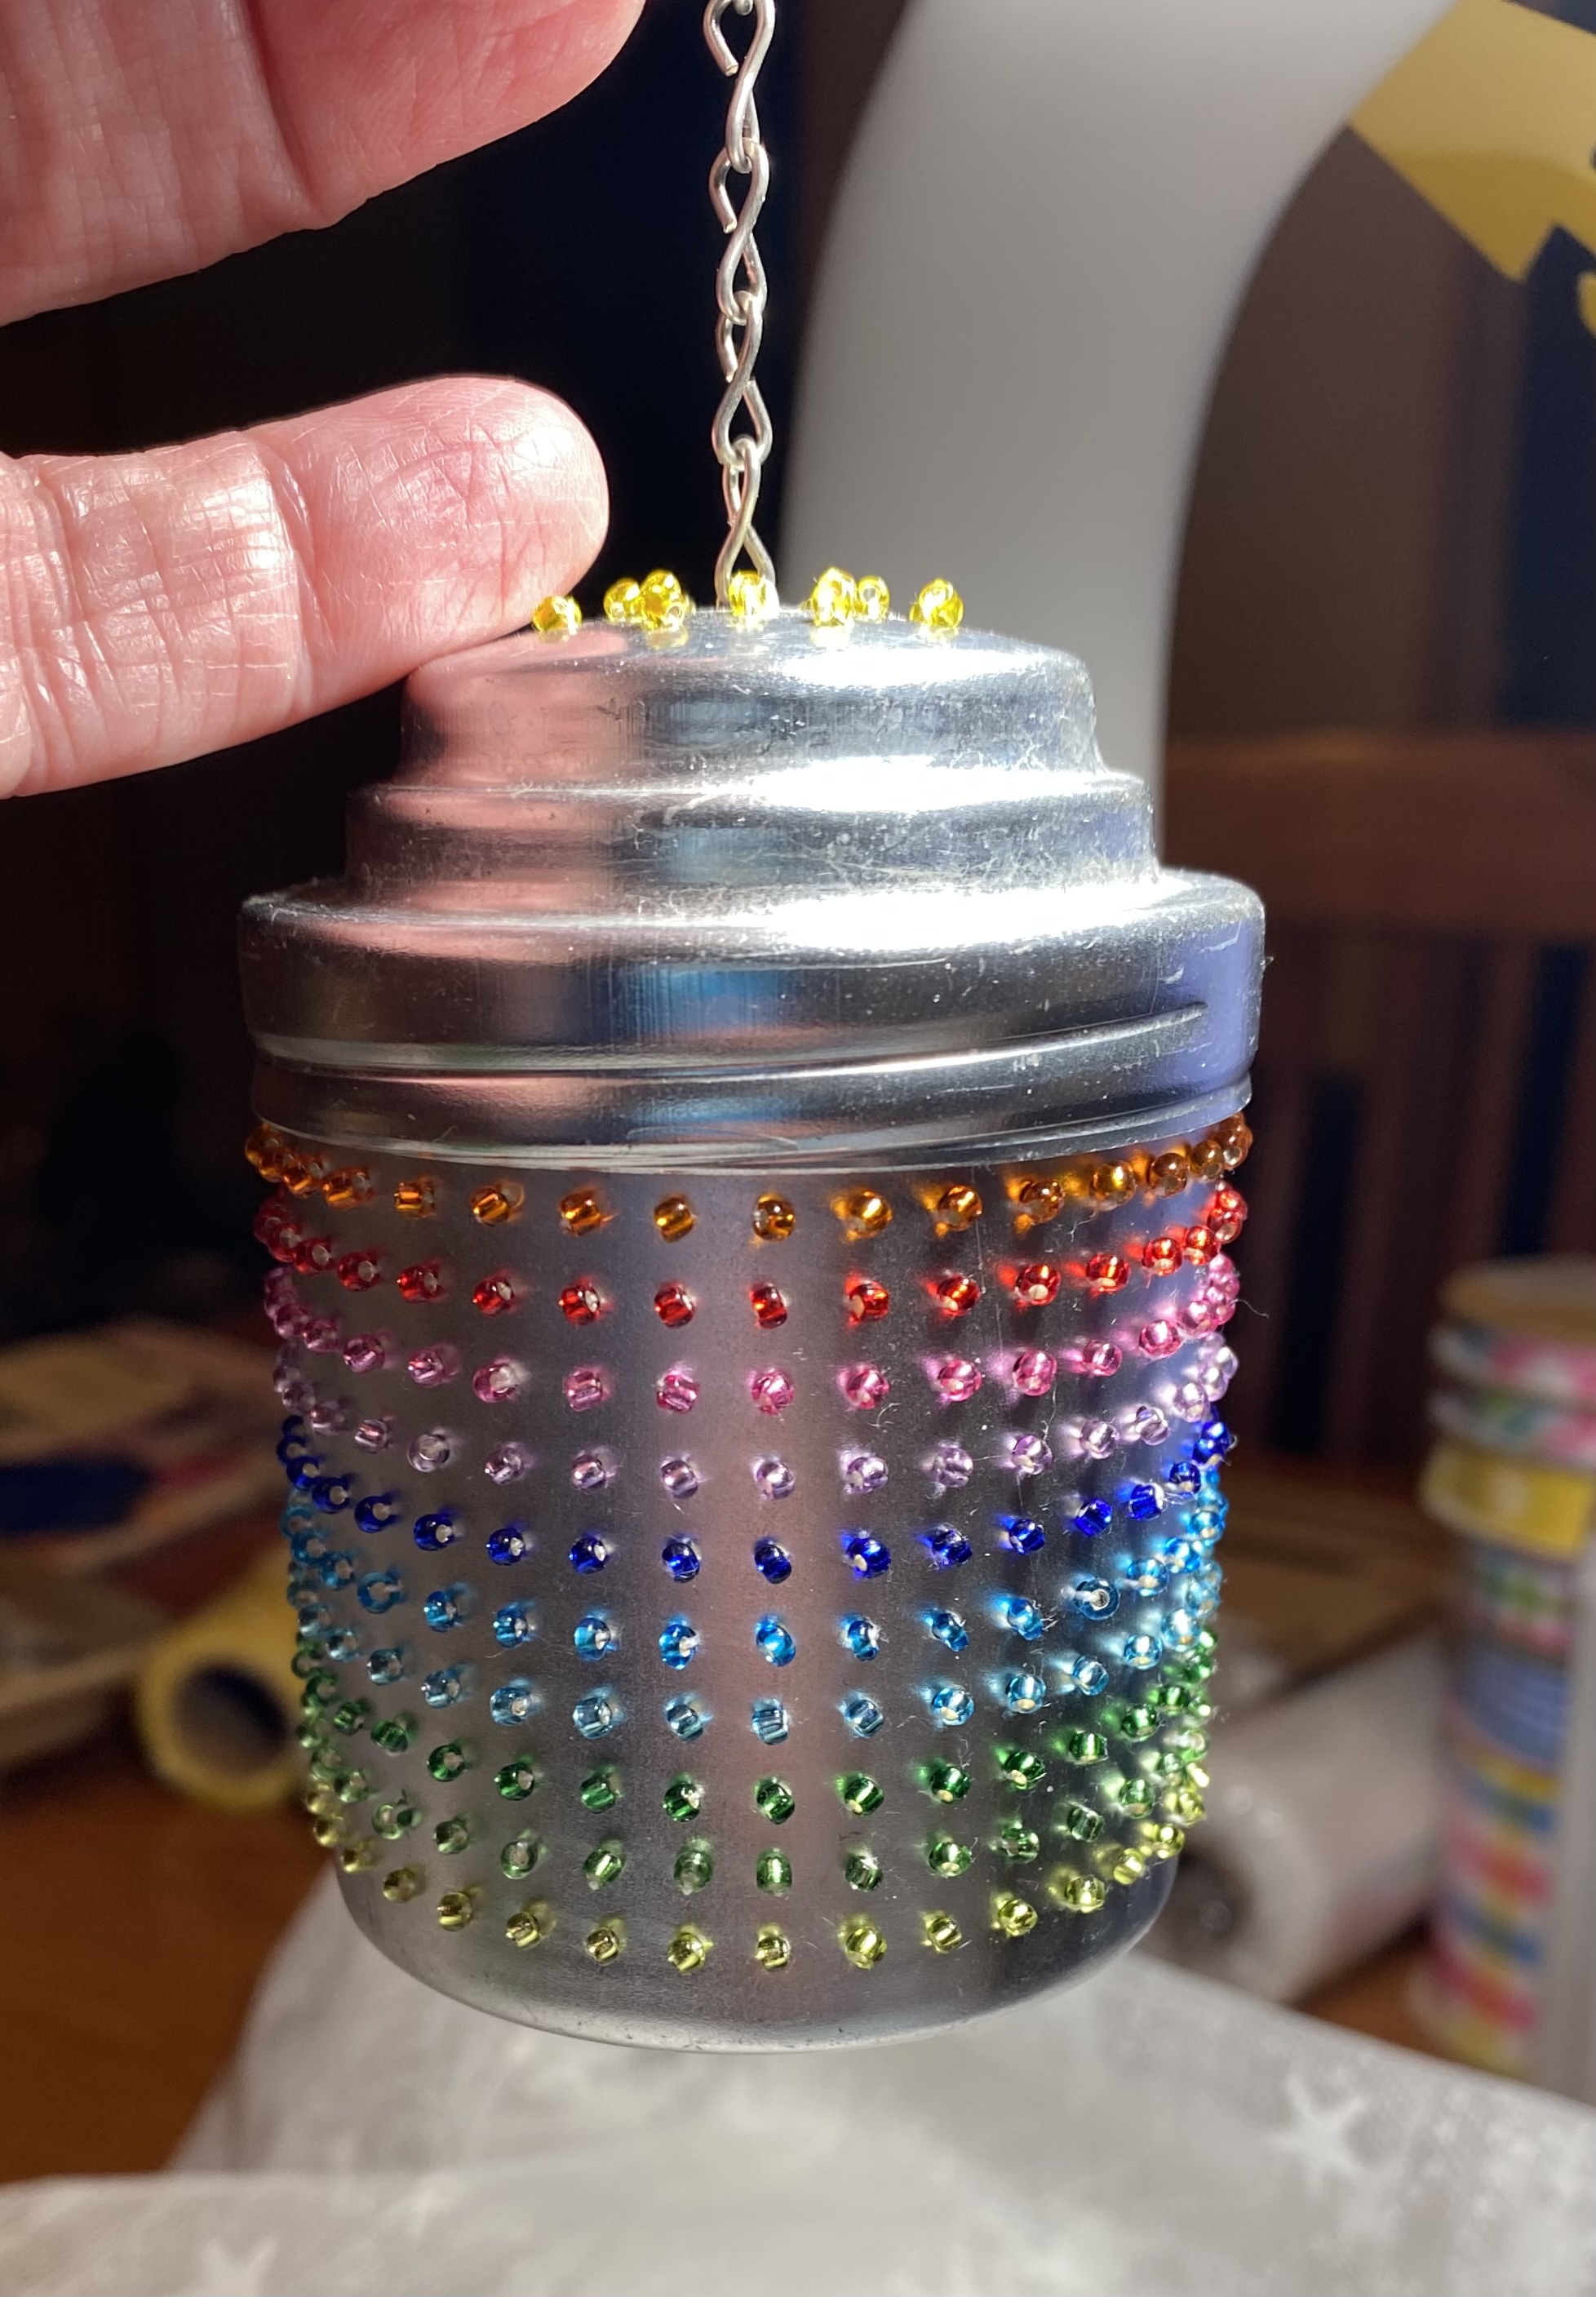
March 2nd happened to be "Old Stuff Day" and I've had a couple of old metal tea strainers hanging around that a friend gave me to use.  Not sure she thought I'd be using them in this way, but this is the way it went.  I started with the larger one she gave me and used the seed beads that I had from the 2022 temperature spiral to add some color to it.  At first I thought it would be a problem getting the long beading needle down to that lowest level but it wasn't hard at all.  


Knowing that the light purple and the light pink on my temperature chart were way too close in value, I left out the light pink and in my mind thought I was going to have to add another color after the top orange row, so I went on a search to find the rest of the set of beads that these came in to find the yellow ones.  That set off a series of small catastrophes including my sewing box sliding out of the cupboard and the contents spilling all over the floor.  Bobbins, needles, spools of thread, scissors, and other assorted sewing notions in all directions.  Plus a box of hooks and eyes opened and pretended to be confetti.  Luckily for me, HWNSNBP was asleep at the time and did not hear the clatter and subsequent colorful grumbling on my end.  Thankfully the box did not crack or break.  After cleaning that up I did manage to find the container of beads and got back to work only to realize that I didn't need the yellow ones for the top row on the side - I hadn't counted right to begin with.  So I decided to used them alone on the top to make it worthwhile.

I added a battery operated string of lights that another friend had gifted me inside the strainer and although you can't see it very well in the picture, it does light up from inside nicely.  The strainer has a built-in hanger so it can hang on a plant, shelf, tree, or perhaps my gypsy rod.  It's a nice size of a little over 3" tall and 2" wide.


I have a second smaller one that I haven't done anything with yet.  The beads will mostly likely be used again, I just have to decide on the color and pattern.  There are more holes on the top and bottom not visible in this picture.  This one can hang also but I don't think it will have a light in it which is fine.


Friday, March 3rd was Dress in Blue Day and I was surprised to find HWNSNBP already in a blue shirt when I came downstairs so I didn't even have to tell him to change his shirt for the day.  We did some errands and he wanted to get a Popeye's Flounder sandwich for lunch so that was our last stop.  However, with all the signage advertising them he was disappointed to find out that they did not have them there so he settled for something else (I had lunch waiting at home).  I told him to ask the woman at the drive-up if it was just a temporary thing and she told him that they don't have them in the warehouse and don't know when they'll be getting them back.  We're meatless on Fridays during Lent and usually have pizza for dinner, but I know he's already calculating where he can get a good fish sandwich next week.  Then there's always tuna fish at home.

We've wished our son a Happy Son's Day today and looking forward to next week will probably be celebrating Cheese Doodle Day (or Goose Turds as Mary Anne's family calls them), Oreo Cookie Day, Meatball Day, and HWNSNBP B'day.  In addition, next Sunday is Art and Found Day and I'm contemplating if I will participate again and with what.  I'll have to see.  

Thursday, February 23, 2023

Thursday's Throw Aways Reboot

If you've been here with me from the beginning you may remember a feature that I did during the first year or so of my blogging experience called Thursday's Throw Aways.  I tried to create something using something that would have been normally thrown away.  Although I can't promise that this will be a regular weekly feature, I thought I might resurrect it and in the process use up some of the "stuff" that has been hanging around.  Or at least, in some cases, use a bit of it before I throw out the balance.  Going through stuff sometimes reminds me of the ideas I had that lead me to save it in the first place.  Some of it, admittedly, is just trash and gets tossed.

What didn't get tossed recently were the metal sewing findings that I have accumulated as I've collected jars and bags of buttons at flea markets and garage sales over the years.  That button project that I did recently turned up more than scads of buttons.  Remember this?


Having the tray of buttons and findings still within eyesight got me to wondering what I could do with all those snaps and fasteners.  So I started playing around with them and this appeared.


I originally laid it out on a sheet of paper and then transferred it to a 5 x 7 flat canvas board I had in my stash.  Initially I was getting very frustrated as all the tweezers I was trying were all magnetized and trying to push the findings off and place them just right wasn't working.  I finally found a pair of tweezers in a cheap manicure set that weren't magnetized and they made such a difference.  I was able to pick the finding up with the tweezers and touch it to a blob of glue so I could then glue it in place.


Couldn't make up my mind as to whether I should lay in color on the background before I got started but I'm glad I decided against it because I think the silver ones would not have shown up as well.

If I come across more of these metal things as I'm going through my stuff I might try to make a partner for this one.  Or maybe I should try another saved material.  Hmmmmmm, I'll have to think on that.

Wednesday, November 14, 2018

Scribble Picnic - Forest (In the Works)

Anybody out there remember my "Thursday's Throw Aways"?  For a brief period I did a weekly post featuring a project that recycled or reused something.  I've got a project like that in the works right now and I thought it would fit in with the Scribble Picnic theme of "FOREST".  

The material I'm recycling is paper - the kind that you get in the mail in the form of postcard-like advertisements.  The more colorful the better.  And since I have access to the recycling bin in the office at school, I have an additional source besides our home recycling.  The weight of the paper is heavier than your regular cardstock and these postcards are laminated so they have a sheen all their own.  

I used a die from Concord & 9th - Take a Bough - and I just kept at it until I had enough of a pile of boughs to make my first tree.


I needed 12 of each of the horizontal boughs and 4 each of the ones that can also double as snowflakes.


First I glued together 2 sets of each size just as they were.  Then I cut the rest in half and overlapped the holes to make sections that were slightly smaller.  The snowflakes were just doubled up.  All totaled there are 18 layers to this tree.


The center hole is 1/8" and calls for a dowel of that diameter which HWNSNBP tried to find in several stores for me without any luck.  Then I thought I should check out my wood stash (yes, I have a wood stash that includes all sorts of wooden things that I used to use in my crafting years ago).  I found another item that I can recycle - the dowel I used is actually a stick from a rock candy lollipop and it has a wooden bead at the bottom end.  I remember saving these to make felt carousel horse Christmas ornaments......another project that didn't come to fruition...............yet.  (There's always hope!)  Oh, and there will be a star for the topper.


I am really pleased with how this came out.  It kind of reminds me of some of the metalwork that I've seen coming out of Central and South America.  


HWNSNBP has some birch branches that I think would be great for bases for these.  


I can't wait to make a whole forest of them.  

I hope my friends at the picnic will be okay with this project for our theme this week.  I'm looking forward to seeing what everyone has come up with.  You know you can join in at anytime if you like.  Our next theme due two weeks from now is GOODBYE AUTUMN.  (News flash - our autumn here in NJ is going to be winter much sooner than anticipated with snow forecast for this Thursday....... and I haven't even gotten out my Snow Day Wand yet!)

Edited to add Scribble Picnic Link

Thursday, April 29, 2010

Thursday's Throw Aways - Chipboard Challenge

Chipboard.  You come across it on a daily basis, but not always in an artistic format.  Yes, you can get precut chipboard shapes and add ink or paper to them, but it also can be found in the form of cereal boxes, the backs of notepads, cd mailers, shirt boxes -  you get the picture.   Today's Way To Use It Challenge is to use chipboard and since it's also Thursday I thought it would be best to repurpose one of those everyday sources of chipboard.  Here's what I started with.........


A chipboard mailing envelope and a waxy piece of tissue paper that was used to wrap something glass I bought at the Dollar Tree.  I cut a 6 x 6 square of each and then ran the chipboard through my Xyron with the sticker cartridge.  Then I placed the tissue paper on top of the sticky side and burnished it until it was nice and flat - no wrinkles.  Once that was done I ran it through my Big Shot with the Circles 2 die to get the nice big scalloped circle you see here.........


The big Melon Mambo flower was made with the new Island Floral Bigz die.  Actually the center was another Throw Away - a button from an old shirt.  I fed some pink cotton thread through the holes and tied the ends in knots to look like stamens.  The other flower is from the Floral Fusion die with a center from the Three For You Punch.  I stamped the diagonal Ballet Blue piece with Boho Backgrounds in Brilliant Blue ink. 

The sentiment comes from Teeny Tiny Wishes and it was stamped in Melon Mambo and punched out with the fancy label punch.  I sponged the ends of the label with Ballet Blue ink.  The sentiment is popped up on dimensionals as is the large flower.  There is a half daisy under the large flower ...... you might say I was cleaning up the scraps on my work table and you would be right.  Most of what you see in this project was bits and pieces of what I had lying around unused. 

I added the white taffeta ribbon to the bottom left by putting little pieces of red line tape down and making rivers and valleys with it, sticking at the valley points.  The card base is Old Olive. 


This is kind of wild, but I like the drama of it myself and I'll be able to hand-deliver it to my mother on Mother's Day. 

Tuesday, April 20, 2010

Teapot Tuesday 90 and Thursday's Throw Away (Early)

And they're off! No I'm not talking about the teapotters being off, although you might take it that way sometimes!   This week we're off to the races.  The big one.  The Kentucky Derby, and yes, we are a week or so early, but Cindy says we need to practice and to shop, and to.....well, stay out of trouble too!  Here's our teapot for this week...........

Well, not having a horse stamp, it was a stroke of luck that my son got a letter delivered to our house this week with a stamp that had a horse on it.  Not just any horse but Seabiscuit.   Now Seabiscuit may not have won the Kentucky Derby, but I'm sure if given the chance, he would have liked to try again. 


I carefully cut the stamp off the envelope and mounted it on Real Red cs.  Then I ran a piece of Creamy Caramel through my Big Shot with the new embossing folder and highlighted that with my Creamy Caramel ink pad, direct to paper.  That piece was also backed with Real Red.  The Vanilla panel was stamped with some Kentucky blue grass - the grass stamp from Inspired by Nature stamped with Handsome Hunter ink.  Again, mounted that on Real Red and used a Barely Banana cs base.  I had this little horse charm that I attached to a piece of grosgrain and just tied a piece of hemp onto the ring.  The sentiment comes from Inspired by Nature and was stamped in Creamy Caramel. 


I was actually excited about how this card came out and how I was able to combine a "postage" stamp with a "rubber" stamp and come up with something like this.

So head on over to the Teapot Gallery to check things out for this week.  I just know there will be a lot of interesting stories as well as cards this week!

Thursday, April 8, 2010

Thursday's Throw Aways

I was cleaning my desk at work today and found a couple of things I thought I would bring home to use for today's throw away projects.  Yes, there are two.  And one of them will even qualify for the Ways to Use It Challenge - Angled Interest.

Each morning part of my job is to go through all the dismissal notes that come into the school for the day.  Sometimes these notes are written on odd scraps of paper and sometimes they're almost formal and written on notecards.  This is one such notecard that I rescued.  I loved the pattern so I just cut the top of the notecard off to use.

Sorry that's a little blurry. 

I picked out a stamp set that I hadn't used yet - Peace Within and stamped my image in Basic Gray on watercolor paper.  Then I took my aqua painter and SU markers and colored the image. 


We've never had an orange cat, but I wanted the cat to match the overall design so she's orange!  She also matches the orchid and the butterfly.  The accent color is Taken With Teal on the pillow and the flower pot.  I backed the watercolored image and the notecard piece with Taken With Teal cs, added some Dusty Durango ribbon, and arranged everything on a Tangerine Tango base.


I really like the way this came out and it was very relaxing to come home and do the watercoloring.

The second project involves some bakery string.  I got this the other day when our mail lady came in with a box of fresh bakery macaroons (she knows I like them!) as I hadn't seen her last week on my birthday because school was closed for spring break.  The macaroons were delicious by the way!!!


The Ways to Use It Challenge for today is called Angled Interest and you were supposed to create something with angled or diagonal lines.  This string looks like it has diagonal lines to begin with but I also wrapped it diagonally on the red panel on this card.


I used the strawberry stamp from Tart & Tangy and a flower from the Blossom Party die in front of and behind the wrapped string.  The center of the flower is my first attempt at using some Flower Soft that I picked up last year sometime. 

It is kind of weird-looking close up, don't you think?  Anyway, the sentiment is from Teeny Tiny Wishes and is punched out with the word window punch. 

I've made a little pledge to myself to try and use more of the things I already have on hand this month.  I don't believe The Peace Within stamp set hadn't been used yet - I have so many ideas for this one.  And the flower soft has been sitting in a drawer for almost a year now.  The string is new, but I'm glad it didn't just get chucked.

I'm pretty happy with both of these.  What do you think? 

Sunday, April 4, 2010

Easter Wishes

First let me wish everyone a wonderful Easter.  We are being blessed with gorgeous weather here so I know we will enjoy the day.  Here are some Easter projects that I have been busy with this week.

The first project is "The Sending of the Socks".  I have been sending my daughter and her college roommates holiday socks since they were living together at the University of Delaware.  Since then, she has added two more deserving young ladies which brings the total to five.  I love shopping for the socks (usually at the $store) and preparing a little something else to include in the package. 


That little petal card envelope contained some candies and a small whistle.  I put the envelope along with the little notepad in the layers of the socks and tied the whole thing up together as you see.  The Spring pencil was added to the padded envelope. 

This next project uses a little chickie stamp I've had for some time and a new sentiment that I picked up at One Little Spark a couple of weeks ago.  I wasn't too sure about this color combo (Cameo Coral with the Orchid Opulence) but it's growing on me.  I packaged some peeps individually.  Here's a hint for you if you do this - once you pull apart the peeps, dip the raw marshmallow sides in some rice flour so they don't stick to the plastic bag.


This next card was supposed to be an April Fool's joke about bringing deviled eggs somewhere, but  I never got it posted on April 1st.  The colors were inspired by the Color Challenge this week at SCS.  (Bermuda Gray Saffrons). 

It looks a little dull to me.  I'd love to know what you think.

The last project is a combination of a couple of things.  I was inspired by a Easter cupcake wrap I saw somewhere and a birthday one for apples.  So, you'll see mine is an Easter Apple Wrap.  Oh, and I almost forgot that this meets the Thursday's Throw Away guidelines.  I've used those paper coffee sleeves again!


I made a few of these and to save time, left off some of the flowers on the right and used less under the sentiment and they still look pretty.  The sentiment is from Well Scripted and I used the butterfly embosslit for the butterflies.  The flowers are punched from the Three For You punch and the centers are some MS beads.  Leaves are punched from the two-step bird punch.  Tombow glue and a pair of tweezers really helps when building these little "floral arrangements". 

I think this would make a great little something for someone who cannot have candy or cake.  Hmmm, I may even use this for Administrative Assistant's Day later this month.  

Thursday, March 25, 2010

Thursday's Throw Aways - Tip Week

Well there is a throwaway involved, but this is more of a tip because I'm not creating something with it, just using it to help creating something else. 


What you see is the leftover sheet from stamp labels.  It's a glossy paper that you peel the labels off of which is how I got the idea to use them in this way.


I removed all the excess sticker pieces and take my red line tape and lay it out in rows.  I load up the paper and then when I'm doing a project I can just go and cut the paper and tape all at once to the size that I need.  It does help things go a little faster. 


Thursday, March 11, 2010

Thursday's Throw Aways - Coffee Sleeve

Raise your hand if you like coffee.  I like an occasional cup of coffee though I'm more of a tea drinker.  And it definitely has to be decaf.  My particular favorite is Decaf Hazelnut and I usually get it at Wegman's.  Or, I should say, HWNSNBP usually picks it up for me.  Most of the time he forgoes the cup sleeve - being a man you know he would prefer to tough out holding that hot as hades cup.  But not me.  If I'm not wearing gloves, there has to be a cup sleeve. 

Recycling paper coffee cups is out of the question, but not the cup sleeve.  (At least not when you have a blog feature that needs recycling ideas!)   The cup sleeves are usually pretty sturdy and stuffing it back into your purse would probably suffice, but why not make it your own by decorating it.  I've seen some pretty nice ones recently that were made out of fabric, but not having a working sewing machine at this time and having a seemingly unending supply of lovely paper, I chose to use the nice cardboard sleeve that Wegman's provides. 


I gently pried it apart at the seam and used it as a pattern, cut it out of a piece of DSP and glued the DSP onto the original with glue stick.  The seam was reinforced with red sticky tape.  Then with a coordinating patterned paper, I made a flower and used a brad to adhere it to the sleeve.  I also put a patch that consisted of a circle of cardstock over the brad prongs on the inside of the sleeve so the prongs wouldn't accidently puncture a cup.  Wouldn't that be a mess!


These flowers are pretty cool and pretty simple.  They're made with a 12" x 1" strip of dsp punched with the eyelet punch and then run through a paper crimper several times to make it pliable.  Then you take a circle of cardstock (I used a 1 1/2" circle), cover that with red sticky tape and starting at the outer edge, gently gather the paper while attaching it to the circle. 


So now I can keep it in my purse right along side the folded up shopping bag. 

Friday, March 5, 2010

Thursday's Throw Aways - Denim Again

With all the flower shows that HWNSNBP and I have been attending recently I was inspired to use my Blossom Party Die for this week's throw away.

Here's the start of the first project.............


After die cutting the flower pieces, I used my paper piercer to make a hole big enough for the brad to go through.  I cut the ribbon to approx. 9" and tapered each end.  The flower was added to the ribbon using the brad.  You can't see the back and I forgot to take a picture, but the ribbon is folded over the brad in the back and glued down. 


The second project revolves around some clothing tags I recently saved.  I thought these tags from Kohl's could be made over to something useful.


I used a regular white brad to put the blossom together and adhered it to the front with a large sticky dot. 


On the back I stamped the floral image from Vintage Vogue in Bordering Blue.  Then I stamped the bird tag from Garden From the Heart also in Bordering Blue, colored the bird and highlighted the edges.


Now I have a cute little package tie-on ready. 

I know I've used the denim before but it just seemed to be perfect for today's projects.

What do you think? 

Friday, February 26, 2010

Thursday's Throw Aways and a Free 4 All

I hadn't gotten to my Thursday Throw Away yet and saw the new Free 4 All Challenge on Splitcoast today so I decided to combine the two. 

The throw away I used this week is a thin piece of packing material.  I think it came wrapped around something delicate...........


The challenge requirements were to make a card with textures, patterns, and a color that you don't usually use. 

I used the Floral Fusion Sizzlit to punch out some flowers from this textural material that I joined with yellow brads in the center.  Then I took a piece of Glorious Green CS and ran that through the Big Shot using the Dots folder.  I punched out little hearts and glued four at a time to a 1/2" circle to make shamrocks.


The pot was made with the cupcakes sizzlit out of Creamy Caramel CS and I used a dauber to age it with Bravo Burgundy and Handsome Hunter ink.  The leaves are punched from the Little Leaves sizzlit out of Gable Green and daubered with Glorious Green Ink. 


For the background I took a piece of Confetti Cream CS and embossed it with the diamonds folder.  Then I got out my watercolor crayons and added some Glorious Green to the diamonds to punch it up a little.  The sentiment is from Teeny Tiny Wishes and is stamped in Close to Cocoa and punched out with the small oval punch.  I daubered the edge of that with Glorious Green.  The ribbon was a leftover from a Christmas gift that I just gathered up and sewed the button to. 

To add just a little more texture (as if there weren't enough already!) I crinkled up some Creamy Caramel CS and then ran it over an inkpad of the same color to highlight some of the wrinkles.  This was added to the corners. 

I've used green in cards before but not to this degree - so that would be my other requirement fulfilled.

Friday, February 19, 2010

Thursday's Throw Aways

Ahhhh, Valentine's Day can provide some pretty nifty items to repurpose.  Of course there are candy boxes and such, but I was given something else and I knew exactly what I wanted to try with it.  One of the teachers I work with gave me this piece of fabric that was wrapped around the bouquet of flowers she got for Valentine's Day.  The hearts are metallic gold.


I used my Scallop Circle Die to punch out 10 large and 10 small scallop circles.


Then I cut eight scallops off the large ones and four scallops off the small ones.


Next I used a needle and thread to sew a running stitch along the straight edge of each scallop. 


First I stitched all 10 large ones and tied that off. And then I did the same for the smaller ones.


Then I gathered a corduroy brad, a circle of stiff felt (I punched this out with a 1 3/8" circle punch and made a whole in the center), and a pin backing.


I sewed the pin backing to the felt making sure to keep the center hole free.


Once that was done I took the brad and inserted it through the rings that were created with the scallops and then through the felt circle making sure the brad came out the center hole of the pin back. 


Turn it over and you have a cute pin or package topper. 


(This was not my creation.  I expanded on a ponytail holder designed by someone for Stampin' Up.)

For something that was going to end up in the garbage can I think I've managed to make it pretty one more time. 

I'll be trying this with cotton fabric very soon.  Stay tuned!