Showing posts with label Recipes. Show all posts

Wednesday, September 25, 2024

September Anniversaries and Birthday

HWNSNBP and I celebrated out 47th anniversary earlier this week.  This is the card I made for him.  Yes, I know it's a floral and some might consider it a little too feminine, but here's my thought process - there were flowers at our wedding and he almost always gets me flowers for our anniversary so why not make him a floral card.  I also get to display it and enjoy it here.  
 

While they are not the colors of the flowers that we had at our wedding, they are the colors that I mostly go to.  It took me one evening plus a little time the next day to do the stitching.  I wasn't sure what I was going to put in the center but was glad to find that I had the "Love" die that fit perfectly in the space and for the occasion.  


The next three cards were kind of cobbled together with parts and pieces that I came across while doing some rearranging (still in progress) in the stamp cave.  The first one I used as a birthday card for my mother.  I took the picture before I added the sentiment in that blank space near the leaves.


I actually added the handwritten sentiment to this card. 


And this was used for another anniversary.  


We're going to try to get to Cape May for our annual September anniversary visit in the near future, but we did manage to get a visit in to Hens & Honey down in South Jersey a couple of weeks ago.  As we were driving there, we noticed some work being done on the water tower near the restaurant. We'd never seen the "cleaning" process on a water tower before.  I only got to snap the pictures because there was a traffic light we had to stop at right next to it.


My guess here is that he is making sure it's working or adjusting the force of the spray.  The shadow in both pictures is because I was taking the pictures through the windshield.


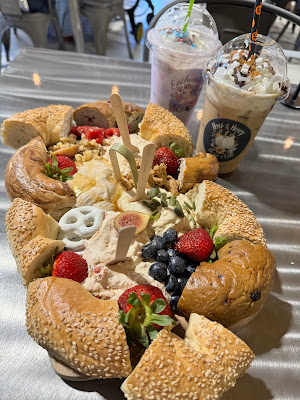
We had the Cream Cheese Board for our lunch.  It came with 4 different flavored cream cheeses and we wound up with five after the hostess realized that she had put two of the same flavor on our board by mistake.  She brought the additional one on a pumpkin plate and I didn't get a picture of it.  The flavors were pumpkin, cinnamon roll, roasted tomato, and not pictured was strawberry.  We did bring about half of it home with us, because it is a lot even for two people.  HWNSNBP had the Vanilla Bean drink and I had the Harvest Moon Smores coffee.  


The last time I posted about this restaurant I had forgotten to get a picture of the area they have dedicated to Taylor Swift but I made a point to get it this time. 


There's a mirror on the right that says "You're like really pretty........now go get coffee".


One last thing for now, I tried a new cake recipe this weekend.  It's called "Do Nothing Cake".  I think it's only called that because it's quick and easy to put together.  


You mix the batter all in one bowl and bake it.  While it's in the oven you make the icing which can even go on the cake when it comes out of the oven so it will seep into the warm cake.  I let this cool a little longer than I should have and the icing didn't get a chance to seep into the cake too much but did run off a little more when it was cut.  I won't write out the recipe here but here's the link.  If  you've got a can of crushed pineapple, a can of sweetened condensed milk, flour, sugar, baking soda and some eggs, you're on your way.  The coconut and chopped pecans on top are to your choice.  I had to send HWNSNBP to the store for the pineapple and condensed milk so I asked him to get coconut and pecans also.  The cake is sweet and our problem is that it is too much for the two of us.  He said I should try to halve it the next time.  We'll see.  If you try it, let me know what you think.  

Friday, April 21, 2023

Week 8 of The 100 Day Project 2023, Trees, and a Recipe

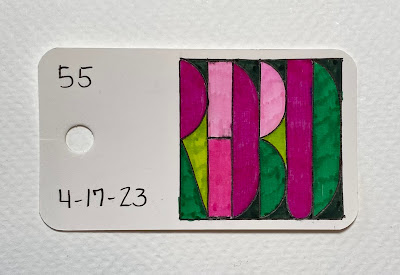
I'm pretty sure a couple of these are easy to decipher but good luck with 51 and 56.  


A view of the backyard from last weekend.....

And yesterday - saying goodbye to that big dead tree that had us worried.


I found out recently that those beautiful redbud trees are forageable.  The blossoms, leaves, and seed pods are all edible.  This came to my attention when I saw a post somewhere about making redbud jelly with the blossoms.  It was quite timely to see that as our trees burst into blossom last Friday and the procedure wasn't too complicated, I just needed to get Pectin and the right size jars.  

Picking the blossoms off the tree(s) doesn't take long, but I found that you need to pick what looks to be twice the quantity needed to get what's needed for the recipe because they grow in bunches and you need to pinch off the stems.  They say the stems can make them bitter, so I complied and pinched away.  I think that step took the longest time.  I needed a cup of blossoms.


Then I boiled them in 2 cups of water for 3 minutes.  See how the heat takes the color away as soon as they hit the water.


This "tea" is then strained and 3/4 cup of it, together with 3 tsp. pectin, 1 tbsp. lemon juice, and 2 drops of vanilla go back into the pot, stirred, and brought to a boil.  Then add 1 1/2 cups sugar and boil low/medium for 3 minutes.  You then pour the boiled liquid into clean 4 oz. jars, wipe the rims, and seal.  This is a refrigerator version, so it will only keep in the refrigerator for two weeks.  It can be canned for longer storage, but I opted not to do that this time as I didn't know how good it would taste.

Not quite as magenta as the trees, but pretty still.


It tastes a little like cotton candy with citrus and floral notes.  You know it would be sweet with all the sugar, but it really isn't too sweet, and it is flavorful.


I tried mine on an English muffin with a schmeer of cream cheese.  You could use this at a party over a small block of softened cream cheese using mini pretzels to "dip" into if you like that sweet and salty balance.  

They say you should pick the blossoms before they start wilting on the tree for optimum flavor.  After the first step, I still have enough "tea" left that I might freeze for another batch at a later date.

  The redbud has always been a favorite tree for me, not just because of the beautiful magenta blossoms, but the leaves are heart-shaped which I love.  There was a tree like this in the yard where I grew up, planted by my grandparents.  It is also sometimes called the "Judas" tree as it is said that that's the tree that Judas hung himself from when he betrayed Jesus.  They say the blossoms turned from white to red because of that.  We have had these trees for years in our yard and we get lots of small seedlings sprouting up everywhere from the seed pods.  Some of them we've replanted or given away.  I never knew that they had this edible property.

Saturday, May 7, 2022

Happy Mother's Day, Flower Tutorial (Picture Heavy), and a Recipe

Happy Mother's Day to all the wonderful women out there who nurture, care, and love us.  I didn't make any cards this year.  But I did put a little something together for my Mother and Godmother.  These little pre-made bags were decorated with one of the die cut paper zinnias so I thought I'd share how they're made.


I die cut the pieces and put them into a mini muffin tin like this to keep them sorted.


The first step is to add the pan pastels to the appropriate pieces on the teflon matt from the tool kit.  I've learned to be a little heavier with this because in handling them to put them together, some of it rubs off on my hands. I just use a make-up applicator to do this.  


Then I use the sponge matt and this tool to shape the petals by pressing down from the tip to the center.


See how it curls as you apply pressure.


Then I use this medium stylus tool to shape it even more.


Gluing the petal pieces together is next.  Gluing is done on the teflon matt. I use Tombow quick drying paper glue.


Then I prepare the stamen pieces by using the pan pastels again to give them a little more interest.


I use a small scissor to snip those stamens in half.


Then the stylus helps to cup them.


The leaves are scored on the felt matt.  First the center line and then turned over for the diagonal veins.


The little florets are cupped using the smallest stylus tool on the sponge matt.


I fluff up the stamens and glue them onto the petals.


I prefer to use my own regular tweezers to adhere the little florets to the stamens.  The tool kit has a nice pair of reverse tweezers but I have more "muscle memory" with the regular ones so I use them.  I just gently touch the floret to the glue blob (tacky glue used here) and place them onto the stamens.


They don't have to be perfectly straight and it's better not to use too much glue or they'll slide all over the place.


I add a couple of the leaves to the back of the flower and there you have it.


Now, what was in those little bags?  Biscoff Blondies from Savvy Bites.  Something new that I decided to try.  They're supposed to be able to be made in one bowl, however, the recipe was written in grams so I had to resort to measuring all my ingredients on my scale which I was lucky could convert from ounces to grams, and that meant more bowls were used.  (Thank goodness for empty Cool Whip containers.  And yes, I was able to account for the tare of the bowls when I measured.


Preheat the oven to 350º.  
Prepare a 9 x 9 pan with parchment paper.
Mix together:
350 g light brown sugar and 2 eggs
Add 225 g of melted salted butter (cooled a little)
Add
285 g of regular flour - batter will be very sticky
Spoon batter into prepared pan and smooth out
Measure out 100 g of Biscoff spread (reg. or crunchy) and drop that by tbsp. onto the batter
Take a knife and swirl it through the Biscoff spread (like you're marbling it)
Sprinkle about 50 g of crumbled Biscoff cookies over the battter
Bake for 25 mins. or until a knife inserted in the center comes out clean.


If you like fudgy brownies you will like these.  They have a fudgy texture - I think the crunchy spread would be good for these but I got the smooth.  Biscoff spread is often used in place of peanut butter for those that have nut allergies.  The cookies and spread have a caramel and cinnamon flavor.


The original recipe says to cut into 9 pieces.  I cut mine into 12 and think that they could be even smaller given how rich and fudgy they are.  You can also add to them - chocolate or nutella would be nice.  HWNSNBP had a taste and said they were okay - this is good coming from a man whose favorite flavor is vanilla. 

Sunday, February 27, 2022

From Bunnies to Pizza

So, back before Christmas I purchased two of these microfiber mop clothes at The Dollar Tree to use as a beard for a gnome project.  I didn't quite like the way it turned out and wound up ordering some white fur for that but never refinished it to post... maybe for next Christmas.  In the meantime, I got another idea to use the one that hadn't been sacrificed already.  


I turned it over and made a slit down about 3 inches on one side and then took my hot glue gun and glued those together so you can see the fluff on both sides.


Then I took a short length of cotton string and tied it around the base of those two that are now ears.


I took another length of string and tied that completely around the cloth about 1 1/2" from the last tie to make the head and body.


And then I kept it simple by tying a layered bow around the neck and adding a flower-shaped button.  I decided for now not to add a face, but two button eyes and a pink pom pom nose with some whiskers might be in the future.  It is flat on the back for now, but I'm thinking I can glue the other saved 1/2 to the back on the bottom and weight and stuff it to stand up on it's own.  It's soooooo soft.


I did see a bunny out on the driveway the other night before I went to bed.  I usually turn that light on to check the back yard and there it was.  I think it was going to have a drink in the birdbath but I frightened it away.  

We had a coating of ice the other day and I stopped at the end of the driveway to take a picture of the branch that was heavy with ice and skimmed the top of the car.


When the sun did come out, there was a brief period of time when all that ice was illuminated before it quickly melted enough to tumble to the ground.


The roads were in good shape so HWNSNBP and I decided to take a ride to the Home and Garden Show at the expo center.  I told him that I would only go if we could get there when it opened because I wanted to avoid the crowd that would come later in the evening.  We were there as some of the vendors were still setting up, but no crowd.  

I picked out a pot of pink tulips you see here next to what's left of my Valentine's flowers.


On the way home you could see the sunlight spilling from the clouds.


When we got home there was a package from HWNSNBP employer containing all the ingredients for making a pizza which we'll probably do sometime next week, because on Saturday night we had one of our annual Table 7 events - pizza night where the guys make the pizza while the women sit and catch up.  It's always a fun time full of laughs and reminiscing.  The hosts supply the dough, sauce, and cheese and we bring toppings.  HWNSNBP wanted to bring some loose cooked sausage so I fried that up before we went.  


I also made a "cookie pizza" to bring for a dessert.  I used this recipe from Sally's Baking Addiction which turned out well.  This recipe has a little cornstarch in it which gives a nice texture to the cookie.  I think I might try adding some to my regular chocolate chip recipe (the one on the bag) to see if I get the same results.  I also brought along a bottle of caramel sauce to drizzle on - yum!


Hard to believe that we're already at the end of February!