


I had some time to color last Sunday so I colored a bunch of these. The outside stamps are from Unity. The embossing folder is from Michael's. It was a great way to unwind after a very busy week.
Don't forget to Spring Forward!

 This being the last day of National Craft Month and the last day of March I thought it apropo to include these two tools on my can't live without list. They have a special significance to this day that those of you who know me well will understand and maybe the rest of you will put two and two together.
 So here is the project that I spent working on most of the day yesterday. I had been browsing blogs (when I should have been stamping) and came across this one (scroll down) and loved the concept. I do have the stamps to do that same project, but I wanted to use something more current, and that I hadn't used already. Then I thought of my new Bloomin' Beautiful stamp set from the Occasions Mini. That paired with the Ginger Blossom designer paper might work -
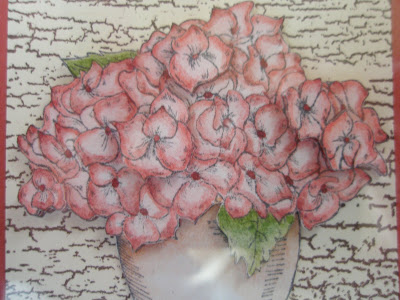 I stamped a square of Very Vanilla CS with Choc. Chip ink using the Weathered background stamp. Then mounted that on a layers of Ruby Red and Choc. Chip CS.
 I added the Hodgepodge Hardware piece to the Choc. Chip grosgrain ribbon. I'm pretty pleased with how it came out. Now I either need to get one of those stands or a picture hanger for the back.
BTW - that blue haze in the pictures is not my watermark, it's me. I couldn't seem to get a good picture of the case without getting some kind of reflection. Sorry about that.
 While I was searching through my tons of items to alter, looking for something else of course, I came across an unopened package of these and the wheels started spinning. At first I thought I was going to use the Tart and Tangy stamp set with the fruit, then I spied my new Pretty Amazing stamp set and the wheels were spinning even faster. So I quickly mounted the stamps (for those of you who don't stamp I'm referring to mounting the rubber stamp onto the wooden block, not to be mixed up with the spinning wheel references above) - and yes, I hang my head when I say that I have a few sets not mounted yet..... but let me continue
 The hardest, well not hardest, the most time consuming part was adding the floral wreath to the front of the card. I got out my stamp-a-ma-jig for that. Using the stamp-a-ma-jig is not hard, but when you're going in circles and trying to make the branches look continuous it is a little tricky. The wreath was stamped in Certainly Celery and the front was sponged with Blue Bayou on the edges and Soft Sky over the wreath. I added a bow in Blue Bayou. Inside I repeated the floral pattern that was on the back of the maze. Pretty Amazing!
 The recipient can keep the card in one piece or they can snip the green strips to remove it.
 This Christmas my husband got me a wonderful little tool - a Dirt Devil Detailer. It's a little - like the size of a heat gun - rechargeable vacuum cleaner that picks up all the Kirby dust and all those little scraps, including the pull off portion of dimensionals and sticky tape. I can do a quick sweep with this little tool before I get started without having to drag out the regular vacuum cleaner. I keep it plugged in on my kitchen counter. It also works well for those errant crumbs on the counters and kitchen table.


 Sunday will be my Bosses Birthday, but since there is no school tomorrow we wished him Happy Birthday today.
 These baskets are really simple (and cute!). You'll need to cut a sheet of 8 1/2 x 11 paper in half lengthwise so that you have a strip that is now 4 1/4 x 11. Then you will need to cut slits 1" apart and 3 1/2" deep down the length of the piece. (This is the same way as you make Chinese Lanterns but you are using half the sheet of paper here.)
 You can see how the slits are cut in this picture. The rest of the materials are a 1 x 10 inch piece of double sided paper scored in half lengthwise, enough straightened scallops (see previous post) to fit the 10 inch length, 3 brads, and 9 inches of ribbon. You can see that I have stamped the Pretty in Pink CS in Purely Pomegranate with Boho Backgrounds.
 If you turn your slit piece over, you will need to mark the ends of each slit 1/2 " in from the sides and 3/8" down. Here I have used a post-it (again) as my marking tool. I laid the pattern over each slit and punched a hole with my needle tool. After all the slits are marked in this way, punch the holes with a 1/16" punch (your hole will need to be big enough to accommodate a brad).
 Glue the prepared piece together to form a tube - you will be overlapping the two end pieces and will end up with 10 slit pieces.
 Starting at opposite sides of the tube, alternate putting the slits on the brad and assemble the bottom of your basket.
 Here you see it from the front.
 Add your straightened scallops to the 1 x 10" band and adhere that to the top of the basket. Using your slot punch, punch on opposite sides of the band. Slip your ribbon through to make a handle. In the examples above I used brads through the pomegranate ribbon and tied the chocolate chip ribbon with pink satin on the other. As you can see, they are big enough to hold a couple of eggs.
 This is not the greatest picture but if you could see it clearer the blue floral area looks like a ceramic tile. I used the cracked glass technique for these little 3 x 3's. I used my Floral background stamp in Basic Blue ink on white cardstock. I then cut that image into 2 x 2 squares. Next you need to cover your image with VersaMark ink and then clear embossing powder and heat. Repeat the last step 2 or 3 more times. The layers of EP build up to resemble glazing on a tile. When you have your last layer done, immediately put your image(s) into the freezer for a few minutes. When you take them out, bend the paper to crack the glazing be careful not to bend too much or the glazing will separate from the paper. It really is prettier in person.
 No, seriously - this picture shows how to take a scallop punch and make it into a border. First you must punch a 1 3/8" circle in your cardstock and then center the scallop punch over it so that you get what you see on the upper left. Snip it - as in the upper right, and then gently open it up. The paper will bend between the scallops - press it gently with your fingers. Then you can use it like I did below (part of an Easter project to be posted later).
 Do you know how many times I have picked up a marker to use the brush end and pulled the cap off and it wasn't the brush? Well, I know that there is a little picture there and it still takes a little time picking up the marker, rolling it around in your fingers to find the picture and then taking the cap off. Try that when your adding several colors to a stamp! If you were working with these markers and you needed only to use the brush end could you find it by just looking at them as they are sitting in the picture? The top one would be the quickest to find - the other two, not so much. But wait, there is a way to tell at a glance even when that little brush picture is not visible. Look at the white rings. The brush end has a thicker ring than the fine point does. Thus the duh moment.
 The sad moment is having to use this sympathy card. My son's friend and ex-girlfriend's father passed away suddenly yesterday. I did not know the father, but the family always treated my son very well even when he stopped dating the sister. I think that it has affected my son also because the dad was only a year older than my husband --- puts it all in perspective, doesn't it. Well, say a prayer for this gentleman who left a wife, 2 daughters, a son and daughter-in-law. They are in our thoughts and prayers.
 I know what some of you are probably thinking - why not just cut another piece from a bigger sheet - and to that I say, why not use up what I have in scraps because someday I might need that bigger piece. But seriously, if you are at a workshop and you only have limited supplies, you have to make the best with what you have so keep a couple of post-its stuck to your portable cutter just for such emergencies.
 First let me apologize for the bad picture. It's hard to take a picture of a shiny object like a clear plastic bag - at least for me!! I just wanted to share this quick bag topper. When you want to group some items together and want to make a pretty presentation of it find yourself a clear bag/envelope the size you will need to accommodate the contents you have planned. You can even use zip lock backs which come in an abundance of sizes these days. Check your $ stores in the crafts or sewing sections for small bags, your grocery store for medium and large bags, and your craft and office supply stores for clear sleeves and envelopes.
 I bought some Cadbury Irish Creme candy bars for St. Pat's and I thought I'd make a slider wrapper for it using the same background I used on the sock envelope posted earlier. You can find directions for a popcorn slider here on Splitcoaststampers. You don't undo the bow to get to the candy, you pull the whole bow upwards and the ribbon that is wrapped around the candy slides it up the paper tube. Easy!

 Now, you can do this for ocassions other than "the mailing of the socks". Stampin' Up wheels are great for envelope art. The pattern doesn't have to go all over either. You can run them down one side or across the bottom. And, if you don't want to use or don't have a wheel, adding a stamped image always perks up the envy.
  If you've seen my earlier post about the post-it tip then you might remember the pieces of a project that I planned to show at a later date. Well, the time is now. Here is the result of putting those pieces together. Isn't he cute!!!! I saw this little guy on Splitcoaststampers - I believe his creator is Jodie Vasbinder. If you use the search feature on Splitcoast, you can find her and her wonderful work.
 This card is Thad's and it is an original - it's a mish mosh of color and the color list would be very lengthy so I'm not even going to try it. I'll just say that I used SU's Sweet Celebrations, Big Pieces, and So Many Scallops. I didn't want some drab masculine card for him, and although this might look a little juvenile, it does have a "happy" feel to it.
This one I cased from JanTink - you can check out her absolutely "gojus" work on her blog . She is a genius designer and knocks me out with her creations. The technique she used (and I copied) for the main image in this card was something that I'd never tried before. When you see the close up below, you may be able to tell that the image is raised and that there are a multitude of colors in it. In her explanation, you stamp your image and then outline it (lightly..... learned that the hard way) with your stylus and then flip it over and gently go over your outline so that your image becomes raised on the right side. The image is stamped in Soft Sky and then after the "raising" you use a blender pen to add the additional colors. In this case, Blue Bayou, Groovy Guava, and Wild Wasabi. All those colors (plus Chocolate Chip) appear in the DS paper "Afternoon Tea." My card is a little different in that I put the corner piece on the bottom and my sentiment is inside. I hope Sunshine will like it.
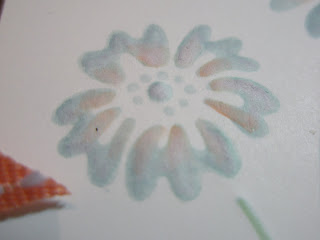
If you try this technique here is what I learned - you can't use a lot of pressure when you are blending your colors 1) because of the kind of paper you are using (Whisper White) and 2) when you raise the image some of the paper fibers may already be compromised from the stylus so you need to be careful of this. You don't want any pilling. The stem and the leaves are done the same way.


 Glue your first layer of flat 1" punches onto the cardstock. You can use snail for this.
 I've used sticky strip on the top of the rim to adhere the finished flower.
 March comes in like a lion and goes out like a lamb - so the saying goes. Here are a little lion and a lamb that I made using the SU scallop punch as a base. The idea came from this site http://jas.familyfun.go.com/arts-and-crafts?craftid=11693&page=CraftDisplay which I found shared on another craft site that I frequent.

