Showing posts with label Get Well Cards. Show all posts

Wednesday, March 16, 2022

Congratulatory Get Well

A male friend of ours recently underwent knee replacement surgery.  We wanted to send a card but I didn't really have anything masculinely appropriate for this particular guy.  So I went a different direction than a typical "get well/get better" card.  This is a card congratulating him on his new knee.  I used my long forgotten Just Right stamper that allows me to make my own messages.  


Inside was a little note telling him to take it kneesy and to let us know if he kneeds anything.


I took some of the scraps that were by my papercutter and put this card together.  There's no sentiment on it yet - we'll see what it can be used for in the future.  But I figured why just put the scraps in the scrap box?


We finally have some signs of spring in the yard.  These crocuses decided to pop up yesterday.


And last night's sunset was pretty intense through the trees.

Sunday, October 24, 2021

World Card Making Day, Garage Sales, and Sweet Treats

World Card Making Day was on the first weekend of October and we were going to be away so I preplanned a little project.  I needed a get well card for a former co-worker - a male, so I didn't want to make anything floral.  I found this stamp set in my stash - Hi There Bear from Concord & 9th which hadn't been inked and had the perfect sentiment to go along with it.  I couldn't decide weather to go with the brown bear or the panda so I stamped one of each and fussy cut them.  I also found this blueprint background stamp from The Greetery that I thought would be a good background.  I gathered all the necessary supplies and packed them up to take along for when we settled in for the day.


I knew I had a pretty decent set of colored pencils at the condo and I was able to add some detail to that brown bear.  I originally stamped the bear's belly one way and then looked at the package picture and they had it the other way so I turned over the paper and stamped it again their way before cutting them out.  I still don't know which way I like better but I went with theirs.  


The finished cards.


The inside sentiment.


And just for fun, what I stamped on the back.


I should backtrack and say that we started the day at the Kirkside Garage Sale that they have twice a year down the road.  I had my "boxman" with me and I did pick up a few pieces to add to my box of stuff I'm saving to make more garden totems but I don't have any pictures right now.    

And speaking of boxes, we then went to pick up a box of goodies that I ordered from a new-to-us local bakery that they had advertised for a "Restaurant Week" special.  They only open their doors on Saturdays for walk-in customers and we are mostly at the condo on weekends during the summer so since we weren't going til later in the day on Saturday this time because of the garage sale I thought it would be a good time to take advantage of trying out their sweets and I wasn't disappointed.  I did spread them out over the course of the week to enjoy.


And I'm just going to add this for a smile.  GS2's class was shut down for another week earlier in October which meant his parents had to split their days staying home with him.  Our SIL sent us this.


When you're 2 1/2 you know everything, or you let him believe he knows everything when you know he doesn't like eggs.  

Thursday, March 12, 2020

Sympathy and Get Well Wishes -

Boy, this has been quite a year so far hasn't it!  I've lost two cousins, a great aunt, an aunt, and my sister since the beginning of January and I'm kind of hoping that I don't have to make any more sympathy cards for a long time.  


One of our school nurses fell at school a couple of weeks ago and had to have surgery to fix her broken leg.  There is a shortage of school nurses already which makes not having her in the district ever so much more of a challenge.  I thought I'd send her a card to cheer her up.  


Tonight we were notified that tomorrow will be the last day of school for our students until April 14th.  Our teachers are using Monday and Tuesday to prepare remote class lessons.  What this means for those of us who work in the office is yet to be determined.  There's only so much of my job that can be done remotely.  I'll keep you updated.  

In the meantime, make sure to wash your hands and keep your hands away from your face.  And let's all hope that these quarantine practices will slow down this virus.  

Thursday, November 21, 2019

Get Well's Needed Again

Our future son-in-law's dad had surgery recently and this has been my GO TO card for a quick get well (especially for a guy).  Just a touch of humor to get them through it.  (Sorry it's so fuzzy.)


And for a couple of lady-friends with a personal note inside.  I have a small stack of stamped images that I'm slowly trying to color/watercolor/paint so I have them on hand and this pumpkin was perfect for this time of year.

Saturday, November 10, 2018

Happy 60th Birthday, Get Well, and a Wedding Card Too

The last of our Table 7 gang celebrated her 60th birthday the end of October.  This was the envelope for the card I made.


Once again, the seasonal theme for our group.  Each of these seasons is a separate die but I chose to keep them together in a square format, backing each season with an appropriate color.  You can't tell from the picture, but the sentiment "Celebrate" is die cut from a wood veneer sheet and painted with bronze glimmer paint.


A co-worker of HWNSNBP's recently had some neck surgery.  I thought this sentiment was appropriate and stuck with the fall theme.  


Inside.


And lastly, another wedding card for Rachel using the colors of the Philadelphia Eagles - favorites of the bride and groom.


Friday, October 12, 2018

Get Well for the Little Guy and an Anniversary

Our  little guy had a little procedure recently so I made him a couple of cards.  I just loved this little dinosaur stamp because it reminded me of his costume from Halloween last year.  


This pig stamp is interactive, though it's probably still a little hard for his little hands to figure out. The wings flap when you pull the tab.  (Of course you know I had to have this flying pig!)


His mom sent us this little video of him.  He melts my heart.  (And yes, we're currently grandpa grandpa.)


Shortly after that our son and daughter-in-law celebrated their 6th anniversary.  I played around with some Color Burst powders and used them with this new leaf die that I recently got.  Paired that with the bow die which has longer tails that actually end in snowflakes, but I cut it down and replaced the snowflakes with 6 hearts.  


I did one more card with that leaf but sadly, it was a sympathy card.  


Wednesday, August 8, 2018

Feel Better

A couple of people I know needed a little perking up after recent surgeries.  I have a small pile of unfinished card elements on my work table and decided to put some of them to use.  On this first one I had used this beautiful stamp gifted to me by my blogging friend Sabrina.  I apologize as my photo did not seem as dark when I edited it.  But don't you think it came out nice?  I stamped the image in Crumb Cake ink and then used markers to "watercolor" it. 
 
 
This giraffe stamp is from Unity and it comes with a different sentiment that I masked out.  I used a SU sentiment on the outside and inside which I thought fit it well.


Summer is really flying by and there's so much more I want to accomplish. 

Wednesday, January 25, 2017

Happy Birthday Chickadee!

It's our daughter's birthday today so I sent her a bouquet of flowers in a box card.


I'm not sure it got to her in time though.  But I told her it's on the way.  We finally had some sunshine today and you could definitely tell how much all the dreary, rainy days had affected everyone.  What a change in mood.   


I got one more card in this evening for our friends' daughter who just had surgery.  I have to say that having a MISTI certainly made stamping that background much easier.  And, it was fun to make it into an ombre of blues.  I used Bashful Blue, Marina Mist, Pacific Point, and Dapper Denim.  The flowers were colored with my Zigs.  


Looking forward to some more sunshine this week and then they say more cold weather is on the way.  Oh well - it is January!

Friday, January 6, 2017

New Tool and a Quick Get Well

So...... I'm home sick again for the past few days with what seems to be a reoccurence of a sinus infection from early last month that didn't completely clear up.  I swear that as I get older, when I get sick it seems to take so much longer to recuperate.  Or maybe I'm just babying myself.  And not to mention the fact, as I told a friend recently, that coughing and sneezing has now become and adventure of it's own and I shall not go into details.  

Today I rounded up enough energy to do two worthwhile things...... otherwise I was "just as useful as the g in lasagne".  

My dear HWNSNBP truly went overboard ordering Christmas gifts from my Amazon wishlist (which comes in very handy if your family wants to treat you to something that you really want).  Not only did he splurge for a set of Copic Markers that I mentioned in a previous post, but he also got me this nifty little tool called a Cuttlelola Electric Dotspen.  I had seen this little gadget reviewed on two blogs that I follow (Understand Blue and Life Imitates Doodles) and having wanted to try my hand at pointillism, without jeopardizing aggravating my creaky neck, this seemed to be worth wishing for. It is a little more expensive that your average stamp or die set, but it's a tool and I've always said that good tools make all the difference.

It's battery operated, but rechargeable right to a USB port and you can use it while it is recharging. There are two speeds and it's not at all noisy.  It comes in a nice little tin, which is also a plus.  There is an advisement that it contains magnetic parts and therefore shouldn't be near watches or cards with magnetic strips and also not be used by someone with a pacemaker.  (Shucks, I just noticed that I put the box down on a pile that contained a giftcard I was registering - hopefully because it was still in the box, it didn't do any harm.)

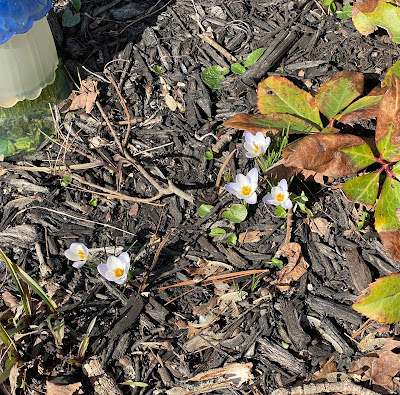
Here is my first try with it.  I freehanded a flower on a thin sheet of cardboard paper, and I'm pretty pleased with the outcome.  Can't wait to do some more experimenting.  Next step will be adding color.  Then changing the subject-matter and so on.


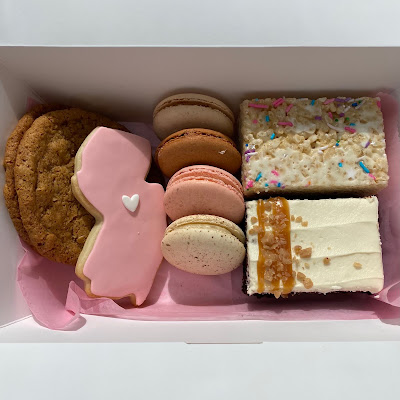
Secondly, well actually I'm going in reverse order because I did this card this morning and the new tool later this afternoon.  One of our friends recently had some surgery and we wanted to wish him well and since HWNSNBP was passing by their place today on another errand, I quickly put this card together and he picked up some sweets on the way to go with it.  

For the watercolored background I used one of the backs of those Color Burst cards I cut off. I had my cheap set of watercolors nearby and again, since I was in a hurry, I took my spritzer and spritzed the set with water to activate them. Then I picked up some colors in complementing families and quickly added them in no particular order, and without cleaning my brush in between to blend them. I did have to dry it with a hairdryer.  The bear and the fish were stamped and diecut and then I quickly added some color to each with markers.  I added the sentiment by hand and lastly attached some silver cording to the string of fish.  This friend takes our big snapper blues that we catch during the summer and smokes them for HWNSNBP as a winter/holiday treat.


Tuesday, October 11, 2016

Flowers and Leaves

They were predicting a frost last night so I spent some time outside when I got home from work cleaning up some potted plants to bring inside for the winter and cutting some zinnias for a bouquet. HWNSNBP found a pack (or a couple of pkgs.) of seeds in the basement earlier this summer labeled wildflowers.  He decided he wanted to plant them to see what came up.  We were both surprised to see zinnias come up as we don't consider them wildflowers.  But they sure were pretty.


I think I've mentioned that I've been reorganizing my craft supplies since HWNSNBP finished the floor and walls in the stamp cave.  I still have so much to go through.  One of the things that I did come across was a plastic bag full of stamped and embossed leaves in fall colors.  Honestly, there are so many of them and I can't for the life of me remember why I put so much effort into creating them in the first place.  That was one reason I decided not to toss them.  I used some, and I really mean only some because there are still many left, on this card.  


I started with a kraft card base (I believe these cards are 5 x 7) and added a band of washi tapes in kraft and gold.  Then I took a variety of leaves - these happen to all be embossed with gold, and arranged them in a neat pile.  Before I added the last leaf to the top of the pile I took some thin gold cording and gathered that up into loops.  I taped that down on the pile and then added the last leaf with a dimension.  I wasn't intending on adding the sequins however, when you drop a leaf glue-side-down onto the card base and leave a smudge where the glue was, you need to come up with something.  I had another package of 5 complimentary colored sequins (all shades of gold, some orange, and brown) which I glued sporadically around the front.  


I really like the way this came out.  I'm going to use it as a get well card for one of our cafeteria aides who just had some minor surgery.  She likes to wear a lot of bling so I think she will like all the bling on this card.  

I might throw together a couple more of these cards just to have as seasonal notecards because I've got a ton more of embossed leaves.  It was pretty quick to assemble.  And I like things that are pretty quick and that I can fit in when I've got little snatches of time.


Friday, July 1, 2016

I Would Have Loved to Learn to Play the Piano

I always wanted to learn to play the piano.  Living upstairs in my grandparents house there was barely room for the seven of us in four rooms let alone a piano.  But anytime I visited any friends or family that had a piano I was always drawn to it.  I could pick out a couple of common tunes including "Chopsticks" of course.  And I did get to play an instrument eventually - the clarinet.  Though that was short-lived.  


We bought the kids keyboards for Christmas one year and the thought crossed my mind yet again to properly learn how to play it, but I never pursued it.  HWNSNBP played the accordion - pretty well I'm told.  We still have it I think, but he hasn't touched it since the kids were very small and he brought it out to show them.  

My cousin(s) played the accordion extremely well when they were teens and performed in competitions.  I think playing the accordion helped my cousin to easily learn to play the piano.  Sadly, she doesn't do much of either these days as arthritis has affected her dexterity.  Today happens to be her birthday and so I made her this card which is a combination of old and new.  The butterflies were in my scrap box - all else is new including the butterfly embossing folder which is barely visible in these pictures.  (The white panel is embossed with the butterflies.)


We'll be going to tea in a couple of weeks to celebrate her birthday because right now she's taking care of her husband after his recent knee surgery.  So I created this card for him to wish a speedy recovery.  I think I need a little more practice with my brayering technique, but this didn't turn out too bad.  


Being on vacation this week afforded me the opportunity to catch up with some other projects like these thank you notes.  The stamp is from Unity and I used my MISTI to stamp all the images first and then used my aquapainter and inks to color them.  


Oh geez, I just reminded myself that I owe "prizes" to two staff members for a little contest we had ordering supplies.  I try to do something handmade for the winners.  Do you think a set of thank you notes (not necessarily with this image) would be good?  A box of 4 or 8 maybe?  


Number wise there are 5 baby blues in this picture that was taken when they were 9 days old.


And here they are at 12 days old.  I suspect that they will fledge within the 3-4 days.  It will be the second brood for Mr. & Mrs. Blue this summer.  


Just sneaking in a picture of the photographer of these bird pictures.  See how he had to stuff the opening of the box just in case they started jumping and found their way out.  We won't open the box again.


Thursday, April 16, 2015

Hello and Thinking of You - PP240 (2)


I mentioned that I had another idea for this color challenge and tonight I got a little extra time to put it on paper.  I just love these Essential by Ellen dies!  So using my Gorgeous Grunge stamp I added some splats in VersaMark and in the paper colors to the papers before I die cut the flowers and leaves just to give them some interest.  The center-most flower was popped up for a little more dimension.  I also added the grunge to the card base and then used another die cut "hello" for my sentiment in a tone-on-tone way.  All I did with that was press it into my VersaMark ink pad before I added it to the card.  Yes, this color combination was a lot of fun to play with.

Also having fun with a bunch of stamp sets to put together this "Thinking of You"/get well card for a male friend.  I feld butterflies and flowers were definitely out, but leaves were fair game.  


I used The Open Sea, Choose Happiness, Butterfly Basics, Wetlands, and Gorgeous Grunge again. And the ink choices were Pistachio Pudding (which is so faint you can barely see it), Crumb Cake, Wild Wasabi, and the sentiment is in Chocolate Chip.  All stamped on a base of Very Vanilla.

Please say a prayer for my cousin's husband who underwent some serious surgery earlier this week. Last I heard everything went well, but he has a long road ahead of him.  

Wednesday, February 18, 2015

Jingle Belles and Snow Day Hijinks


HWNSNBP left for a basketball game the other day (he's a basketball ref in addition to his regular day job) and he left the TV tuned to The Rifleman.  He had been watching it while I was making a pot of vegetable soup.  So what has this to do with my card?  Well, the episode was about a Chinese father and son who came to town and were being tormented by some of the locals.  Of course The Rifleman and his son befriended them and helped them to get their Chinese laundry business going. As I was listening to the TV from the other room, I was wondering how the Chinese got to be so good at laundering and of course the phrase "no ticky, no washi" came to mind which made me think of washi tape, which reminded me that this week's prompt for the Jingle Belle Challenge was to use washi tape (or any other form of decorative tape) on our cards.  Some would call that synchronous thinking - how we tie things together.  In my case it spurred me in the direction of the stamp cave and got my wheels spinning in the direction of my collection of washi tape and some new dies that I have not yet used.  

I went with a gold and silver pallet on some Whisper White cs.  The card base is a very yellow gold paper that is quite sturdy.  The Laurel Wreath was cut from metallic silver paper and the deer was cut from textured gold.  I'm kind of happy with the way this turned out and I have another idea brewing for next week.  


So as I was finishing up with the washi tape, I kept glancing over the the card that I had started for my son's birthday but then abandoned.  When I was working on it the other day it just wasn't coming together so I went with the simpler (and I already said "lame") card if only to make sure that he received it for his birthday.  But this one was calling to me to finish.  I already had the splats and the stenciled part done and I had the strip of navy also.  I decided to put some feathers on it in the colors of the ink that I used - Bermuda Bay and Marina Mist - and then I thought it should have a bird. But not just any bird.  It would have to be a peacock with those colors and lo and behold (who says that?), I just happened to have a peacock stamp.  So I stamped it in Marina Mist and then colored it with just about every other blue, blue/green marker that I could put my hands on and then fussy cut it out.  I took a navy marker and added the accent lines to the stenciled motifs.  Now I'm thinking this isn't as lame as the other one and I think that this will make a nice get well card for a co-worker.  


And now here's where the hijinks come in.  (Doesn't that look strange with those three tittles in a row?  Go ahead and giggle, I did!)  

We had a snow day yesterday (I might have mentioned that before) and instead of baking chocolate chip cookies like I would usually do (sorry Peach!) I had prepared myself to do a little Pinterest- inspired project.  I wanted to make a Post-It Origami Icosahedron.  Why?  Why not?  I had purchased some colorful post-it notepads at the dollar store and had saved the instructions to my Pinterest page so I got to folding.


I folded 10 units of each color and then started puzzling them together to make..........................


It's about the size of a large orange.  The colors are really off in that last picture, but I think you can definitely see that it all fit together.  And now it joins the rubber band ball on my desk at work!

Think of all the calories I saved by not making those cookies!