Thursday, August 23, 2012

Cheating and Sharing

I can't stop myself from checking out the $1.50 bins at Mike's when I go there.  Though I wish they had kept the price to $1.00, but I think that they found that it was a gold mine of snatch and grabs on the way out of the store that they knew they would be able to raise the price and still get their sales.  And their marketers think they're so smart adding signs 2/$3.00.  Well, duh (and I hate that word), isn't 2 x $1.50 three dollars anyway.  Like you need a sign!  They're probably the same people that thought up the 10/$10.00 signs they used to have when the items were priced at $1.00 a piece.  This is why I prefer to wait for sales of percentages off your total purchase, just to get these things for a little less, but sometimes, especially when they put new stuff out, I splurge and spend the complete $1.50 on the item for fear that they will not have any of what I want when I next return.

In this instance, it was these notecards...... again.  I just loved the strawberry print.  But they looked like they could use a little pizzazz so I added some ribbon and a big white die cut daisy.


Here's a close up of the daisy where you can see the dimension I added to the center by chopping up, very finely, some of the cs and then using Tombow glue to adhere it.


But wait!  There's a double cheat on this card.  I actually was going to make four of them but I did not have enough ribbon for four cards to go completely around the top.  Just enough to get around to the back.  But that doesn't look finished and is pretty messy looking.


So I punched out a circle of plain white cs, slit that in half and glued it over the raw ends of the ribbon which had already been taped down.


It's a little bit of camouflage and it looks a lot neater and stretches your ribbon.


So while I am sharing, I thought I would also share some of the tools that I find help me a lot when I'm doing my projects.  

I'm getting old(er) - no surprise, aren't we all - and my eyes are not what they used to be.  So in addition to my normal cheaters, I have a pair of 350 magnifiers that I find very useful when doing close-up work.  I bought this purple pair so I could differentiate between those and my everyday ones that are not so, shall we say, cheerful.  

I also have found that Tombow Multi glue can be counted on to dry fast and stays glued.  I keep this straight pin tucked into the plastic around the label so I can use it to unplug any stoppages in the tip.  This way I don't have to search all over for the darn pin when I need it because there's creativity going on which usually means chaos on my work table.


I have several pairs of these pointy tweezers that I have picked up at flea markets.  They are the best for peeling off the backing on pop dots and red line tape, and they are wonderful helping to place things on my projects.  


If you're going to use the red line tape, you might want to invest in a pair of teflon coated scissors, or at least have a dedicated pair of scissors for cutting this as it will gum them up.  Also, invest in a box of alcohol wipes  (you can get them at your pharmacy) to clean the adhesive residue off your scissors now and then.  Just be careful when swiping them across the blades because you can cut yourself and it will be ever so more painful with the alcohol!


And recently I picked up a couple of these letter size cardboard trays at Target's Dollar Spot.  They are perfect for gathering the things I need for a specific project, should I want to work on it some place besides my stamp cave or if I have multiple projects going on at the same time they help to keep things together.  And when not in use, you can just stack them or use them for storage in your crafting space.


Wednesday, August 22, 2012

JB12:17 - Oh Christmas Sketch


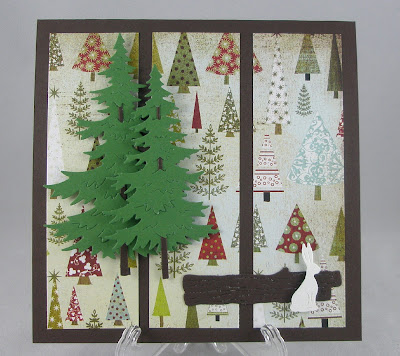
This is the sketch that the lovely Stephanie put together for this challenge.  Pretty cool, eh!  Oh, the possibilities!

Well, I just got a new Cottage Cutz die that I fell in love with when I saw a creation by Pat Smethers recently.  The trees with the woven trunks are what I really wanted and paired with this Christmas Tree paper I think it works pretty well.


I also used the log and the bunny that came with the die. 


I know, no sentiment, but doesn't it say Merry Christmas with all those trees?

Tuesday, August 21, 2012

Busy Bird Day


We started out with a bike ride this morning and as we neared the bay beach I glanced over at the marshy area across the street and the birds were very near the road just on the other side of the tall grass.  There were a few places where you could see through from the road so I quickly turned my bike around and got out my camera.  There was a woman walking in the same area and she had a camera also - with a very big lens.  She motioned for me to step into the weeds where there was a path made to get some pictures.  I did not have my newest camera with me with the zoom lens so after I snapped a couple of pictures,  HWNSNBP and I quickly high-tailed it back to the condo to get the newer camera and drove back to the place we had seen the birds.


The woman was still there and I think we surprised her a little when we came back, but she happened to live right across the street on the bay and told us that there was another path that she had made a little further down across from her house.  


She said that the birds are usually in this area nearer the street at this time of year and later in the morning they will take off over the bay to Long Beach Island for the rest of the day.


A trip to the lighthouse was next on the agenda, but as we were getting ready HWNSNBP called up to me to bring my camera quick.  He said there was a hummingbird at the plant in the barrel at the base of our stairs.  It stuck around long enough for me to get some pictures, but I had to disappoint him and tell him that this was not a hummingbird but a hummingbird moth.  You can tell the difference by the antenna - hummingbirds do not have antenna.  It's not easy to see that when they're flitting around so fast.  But what appears as a beak is actually a proboscis much like that of a butterfly that curls into a spiral when it's not straight out feeding.  (click on the picture to make it larger)


When we did get over to the lighthouse we trudged walked out to the end of the rocks and I spent some time sitting on my towel while HWNSNBP did some surf fishing.  He did not have any luck though.

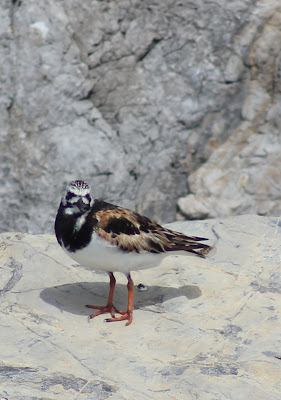
On the way back I had to stop frequently because of my hip and at one point, when I looked over to the rocks and saw this Ruddy Turnstone.  I don't recall seeing these birds before but I do love their coloration.


And some more birds on top of the rocks.  


What I did not take a picture of was a poor seagull who had tried to steal someone's bait only to have swallowed the hook and he/she had the leader and bobber protruding from it's mouth.  Several people tried to corral it, but being a bird and frightened and most likely in pain, it flew off as we neared.  

Monday, August 20, 2012

Butterfly Memories

When I was little we lived upstairs from my grandparents.  I remember my grandfather had a shiny black Chrysler complete with the wings in the back.  There was lots of silver chrome on it too, and it usually was parked in the driveway in front of the garage because he was a big man and once you put it in the garage there was not much room to open the door for him to get out.

We would clambered down the stairs and out the front door, run up the driveway side of the house past the car to the back yard to play.   On one such day I stopped in my tracks because there was a butterfly on the ground in front of the car.  A monarch butterfly. 

Apparently it had gotten caught in the grill of the car and couldn't escape until the car came to rest.  It was slightly damaged and the wings pulsed a little, but it was the first opportunity I can remember to really see a butterfly up close.  I carefully picked it up and I know that it eventually died, but I had it for some time in a box.

I was reminded of this the other day as I was returning from getting my hair cut and a butterfly flew in front of  the truck on the way home.  It was just lazily flying along and sadly there was nothing I could do to avoid it.  I wondered if it would be in the grill of the truck when I got home, but it was not.  Still it inspired me to make this card.


I have some mat board scraps that I got from my blogging friend Michelle's aunt and I've been meaning to make something for her from it as a thank you.  On my trek up to the pool that evening my eyes caught site of these sparkly stones amongst those that we have surrounding the pool.  Believe me, they are much prettier IRL or I would not have used them, but I thought that they would make a great flower or butterfly and since I was thinking about butterflies this is how it turned out.  I put the mat board together with the rocks (used Crystal Effects to attach them), some silver foil tape and some textural ribbon for this card.  


The orange, basketball-like textured mat board was also in the scraps I got.  So marrying the orange and black brought my monarch butterfly together.... sort of.  I used some snippets of silver elastic cord for the antenna and popped up the butterfly panel.  After I mounted that to the orange, I put the whole thing on some Confetti Cream paper to complete the card.

Yes, this will be a little bulky to mail, but I have a little something else to send with it, so it will be safely bubble wrapped!

Tuesday, August 14, 2012

Apothecary Roses


My sister is celebrating her 55th birthday tomorrow and the card above is already on it's way to her.  I had stamped and colored these images from Apothecary Art some months ago thinking that it would be good to have them on hand when I was pinched for time and it seems I'm always being pinched for time these days.  Maybe that's where these strange bruises came from on my arm.  No, I don't have some strange disease, I've been unpacking boxes at work and stocking the supply room.  Thus the bruises.  But working these 10-hour days to get Friday off leaves very little time to do everything that I want to do when I get home from work.  Still, I managed the other day to get these two cards done thanks to my earlier coloring session.


I brayered my new embossing folder (from the SU Holiday mini) with some Daffodil Delight ink and boy did that pattern pop.  I cut a two slits in the banner portion of the image so I could thread some Daffodil Delight seam binding through it and that's how I added the bow.  The sentiments come from a retired set called Warmest Regards.  

The second card is going to an acquaintance who just had her hip replaced and is recovering very nicely I've heard.  

I can't make up my mind which one I like better.  Which would you choose?

Saturday, August 11, 2012

Ribbon Wreath

I had seen a wreath project in a magazine I picked up .....last fall.  It involved two things, a styrofoam wreath form and ribbon.  Lots of ribbon.  The one in the magazine used grosgrain ribbon - about 1 1/2" wide.  I knew that would be a little costly so I put that idea on the back burner.  In one of our many visits to Costco before the holidays, I was glad to find they had rolls of ribbon.  Nice ribbon. 50 yards of it, for only $7.99.  But not grosgrain.  So I chose a pattern that I thought I could use that was not too busy.

Wrapping the styrofoam with the ribbon was the first step.  Then I cut 15" strips - about 60 of them, and started adding them to the wreath form with a simple knot. 


Because this was wired ribbon, there was an additional step I did before tying - removing the wire.  That's pretty easy once it's cut in the strips and using a pair of needlenose pliers.  

Since this ribbon was only printed on one side, I had to pay attention to the way that I tied the knot, repeating the process completely around the wreath form.  This really didn't take  long to do while I was watching tv one night.  


It came out pretty nice, but I decided to go back and cut the ends of the ribbon into points.  I did this by slightly folding the ends together and then cutting a triangle out to make it pointed on both ends.  I think you can see what I mean in the finished picture below.


I have just about a half a spool of ribbon left, so I may have to make a second one of these.   This one (and any subsequent ones) will be put aside for a Christmas gift.  

Monday, August 6, 2012

Wedding Invitations


They started out with watercolor paper that I taped to ceramic tiles. 

Then I gathered reinkers in water colors.  A drop of each on a plastic lid, a bowl of water, and a nice angled paint brush.


I gave the paper a wash of water and then quickly dabbed the brush in the colors I wanted.


The wet paper helped them to blend. I learned fast to start off the paper so as not to get too strong of color in the starting place.  Water and ink mixed until I got the effect that I wanted.  Then I put them aside to dry. 

HWNSNBP brought me twelve 12" tiles so I was able to do about 24 at a clip.  Took me two sessions to get 70 done. 

Then they were trimmed down and mounted onto Bermuda Bay cs.


Jump to the finished product outside.   The "folders were created using Sahara Sand paper.  The short fold was stamped with a wheel resembling sand and layered with another strip of Bermuda Bay - the sand and the sea with their torn edges. 

The belly band of Bermuda Bay is dry embossed with a seashell motif and tied with some Pool Party twine.  The little starfish you see here and will see on the inside are punched using a MS punch and the edges colored with Bermuda Bay.  (Thanks to HWNSNBP for punching out 360 of these little gems for me.)  We ordered some Oatmeal envelopes from Enveloper right here in NJ.  They come in a 5 x 7 outer size, so the invites fit perfectly and weren't scrunched a bit.


When the folder is opened you can see the invitation and the pocket on the side that holds the directions and accommodation information as well as the response card.


It took some trial and error (and a new ink cartridge), but I finally got the ink color to match the Bermuda Bay almost to perfection.  The wording was printed onto Whisper White CS and then mounted on another piece of Bermuda Bay.  The sand dollars were stamped using an old SU shell set onto watercolor paper and embossed with Pewter EP.  I cut these out while sitting on the balcony at the condo one Saturday night listening to a concert across the street.  Always multi-tasking!

Doing the edges of the starfish was made a lot easier after I stacked them in piles of about 8 and stuck a pin through the centers so I could use a little make-up sponge stick (thank you Rachel for letting me pocket a couple of those testers when we went to the make-up store!)  The pin hole was covered with a pearl on most of them so I just had to make sure that I had two for each without holes - one for the pocket and one for the belly band. 


The pocket was embossed using the seashells like the belly band.  A strip of Bermuda Bay,  some more Pool Party twine,  and another starfish finished them off.


The response postcards were printed on Pool Party cs.  My future daughter-in-law was responsible for all the wording on these invitations.  She researched and of course got my son's input and I love everything about them.  She also did all the VersaMark stamping of shells on the response cards and tied all the belly bands, in addition to printing and cutting to size the accommodations and directions cards.  (I am loving the fact that she's crafty too!)


They had postage stamps printed from Zazzle which actually was recommended by the USPS office that she took the prototype to to find out the postage.  The stamps the USPS had were not, should we say, fitting with the theme.

Here's a close up of the belly band - hope you can see the embossing.  (It's appearing to look turquoise in this picture, but it's definitely the darker Bermuda Bay.)


Here's the outside postage stamp up close.

And they added these cute stickers on the backs of the envelopes.  I did all the addresses on the envelopes in my modified/relaxed calligraphy. 

So that's what I've been up to for the past month or so.  HWNSNBP was under strict orders that should our place catch fire, the box with the paper/invitations and supplies should be grabbed first.  And when I transported them back and forth from the condo (it was so much more pleasant being able to work there in the air-conditioning!) everything was sorted into plastic bags first. 

It was a thrill to be asked and trusted with such an important part of this wedding process.  It was truly a collaborative effort.  And it was so exciting to get ours in the mail!

July - Wrapping Up with Some Photos


Happy to report that Mr. and Mrs. Blue successfully fledged a clutch of 5 little ones.  We were able to see them hatch via the nest cam and watched them almost right up to the day they fledged.  They fledged on a weekend and we were away.  But we have seen them come and go a few times since.  

These are the remnants of a bouquet of flowers that I bought for the Fourth of July.  This was a red spider mum that I forgot to dispose of before we left the condo to come home and it was the prettiest spider that I have ever found on the floor in a corner.  


Our friend Jackie treated us to a wonderful July 4th indoor picnic at our friend Joan's condo.  She fried up catfish and hush puppies, made barbequed chicken and coleslaw, and treated us to these delicious lemon blueberry individual pound cakes for dessert.  


I spent most of my creative time during the month of July making the invitations for my son's wedding.  Since they went postal a couple of days ago, I'll have pictures to share shortly.  

August is starting out steamy and sticky and I'm sure it will pass quickly.  HWNSNBP and I spent some time this past week emptying out the stamp cave/castle.  He boxed up some of the things that our son still had in there and I started sorting through my craft supplies.  I can walk into the room without stepping over things for the first time in a long time, but this will take some time before the whole room is done.  I want to pull up the carpeting and paint and I've been promised a ceiling fan and new lighting (as well as a new laminate floor).  It will be difficult, but not impossible to get some projects done, but I am determined not to put my creativity on complete hold while we attempt this renovation.