Wednesday, June 29, 2011

Jingle Belles 26 - Order of the Opus Gluei - Tagging Along


If ever I cut a corner close it was with this challenge today.   I've been home for the past couple of days, taking it easy after a second cortisone injection in my lower back, hoping that maybe this will help it to work this time, and though there's not much big stuff I can do, I've been getting over involved with the little stuff and losing all track of time.  I knew basically what I wanted to do, and I actually got it done in what I thought would be enough time, then the computer decides to do a crash dump on me and by the time I went to upload on the JB site there were 0 mins. left to add my link.  I think someone must have been on my side - every second counts.

Anyway, enough excuses I know, and let me get to the challenge.  The title of the challenge is Lonely This Christmas - aka Tagging Along and you guessed it, probably by the picture above, that not one, but two items were part of this.  A card and a tag.  And this challenge is Tagging Along with that of the Order of the Opus Gluei.  What fun!

First let's start with the card.  I used a Poppy Parade base and added a Top Note and embossed panel in the new Lucky Limeade.  My color inspiration came from the embellishment that I'll get to in a bit.  I punched out a Poppy Parade bird and made it into a cardinal and added that to a large oval punched in white.

The tag on the box uses another oval white punch and the punched out medium oval from making the handle on the box.  (I didn't emboss the back of the box due to time, but if I did, I would have used that embossed piece on the card - oh well!).  The tag is tied on with some Whisper White ribbon.

Now the embellishment is a mish-mosh of some of the things that I had flapping around on my workspace.  I say flapping around because the Stamp Castle is not air-conditioned and I have a fan that blows everything about a bit.  It's almost comfortable, a little noisy, and sometimes a hassle catching things that are blowing around.  

The little rosette is made from a paper doily that I cut the center out of and then scrunched around the edges of a circle dot of red-line tape.  (I get mine from Jody in Texas.)  Then I did the same with a mini-cupcake liner.  There you can see where the colors came from.  The center is a punch out left when I made some candle holders with the daisy die out of an aluminum tray. They were too cool to toss.

What will I put in the little bag.  Well, there's all sorts of possibilities. I could put a few chocolates, or some flavored tea bags, or even a small package of tissues. 

Okay, gotta go and finish cleaning and then check out the others here and here.

Tickle a Teapotter - May


A relatively new feature of our Teapot Tuesday Challenges is the addition of the Tickle A Teapotter Destination on the last Tuesday of the month.  We get to decide if we want to particpate by letting Cindy, our hostess know and then after about a week she assigns us a fellow teapotter to send our card to.  Sometimes we add stamped images or small tokens to go along with the cards that we send out.  It makes it ever so much more fun and shows how much we care about each other. 

My card this month came from Charlene in Michigan, who goes by the screen name LilLuvsStampin on SCS.  If you click on her highlighted name above I've linked into her extensive and inspiring gallery.  She is extremely talented and I'm so lucky to have her included in my teapot friends!


I love this saying and of course the bird and flowers are awesome. 


And these are the goodies she sent along with the card (those cardstock pieces are all embossed).  I can hardly wait to put them to good use! 

Thanks Charlene - you really made my day month!

Tuesday, June 28, 2011

Teapot Tuesday 152

It's Tickle a Teapotter Tuesday once again, and geez, Louise, I'm just now remembering that I never shared the card I received last month.  I'll do that later, I promise - gotta charge my camera first, I just made it with these pictures.

But anyway, don't you just love the teapot above that Cindy chose for us this week.  I do.  I swear I think I've seen a quilt like that someplace, which is where I got my inspiration from this week.  That and the fact that we are supposed to include numbers in our card in some form and I wanted to use this IKEA paper measuring tape that you can get when you first enter the store.  I think I must have about 42,000 of them.  HWNSNBP always just shakes his head when he sees me tear one or two (or three) of them off when we head in to shop.  Especially since we seldom if ever use it, but hey, it's free and it's useful and doesn't take up too much space.  And I wonder if he'll even notice that that's what's on this card!

I used stamps from three different sets - the house is from Quilt Quips, the trees from Trendy Trees (and I think this is actually the first time that I used that tree as a tree!  It's been a carrot and a fish on previous cards!), and the background stamp stamped on River Rock CS is from the SAB set Sweet Summer.  The trimmed cloud and the dots on the flowers came from the Create a Cupcake punch.  I added some simple red cotton string for a bow that doesn't overpower the tryptch which is paper pieced with those added images.
All those black dots on the Poppy Parade CS are done by hand with a black marker and probably took the longest time to complete - or at lease it seemed that way which is why I purposefully left out the white dots on the background paper.  Oh, and you might be wondering why my sky is Blushing Bride - well, that's because I printed the picture of the teapot out to bring upstairs to work on and that's the color the printer printed it.  I thought it matched the flowers.  Oh well - it doesn't look so bad does it?


Now I'm heading over to the gallery to catch the other wonderful creations of the week.  Can't wait to see which one will be coming my way!

Monday, June 27, 2011

Another Something Round

Princess Origami got the best of me this weekend.  I saw this link last week and I finally found a sheet of paper that I could use so I just had to give it a try.  This started as a piece of 11 x 17 copy paper that I cut down to 8 x 16 - you need a piece of paper with a 2:1 ratio.  And that's as far as my math goes on that!  I started Sunday morning and finished later in the day - can't say exactly how long it took as there were many stops and starts and hours between some of them.  But it wasn't hard when you followed the video linked above. 

Here is my Origami Magic Ball - puffed, squished from one side and the other, and collapsed.


Have a Drink on Me


The last two weeks of school are crazy busy - I've said that before, I know.  After completing the craziness of preparing for what we call Move-Up Day, I would have liked to celebrate with some of my colleagues, but since I don't drink I teased that I would just go home and eat chocolate and get fat(ter).    No chocolate in the house, but I did have these candies and a stamp that I thought would fit a little project I had in mind to share with them.

The beverage stamp comes from the set Slice of Life, which I stamped in Basic Gray ink and colored with my SU markers, using pearl shimmer paint for the whipped cream.  The sentiment I stamped with my Just-Rite stamper.  I recently purchased a Martha Stewart stamp set that you could make phrases with only because I had a coupon and was that a mistake.  If you need to create a sentiment of your own and don't want to rely on a printer, check out the Just-Rite stamps (I can't link it here).  The background on the die cut box is a stamp from Sweet Summer just stamped in VersaMark ink on the Pear Pizzazz box.  The scalloped border is in Peach Parfait. 

Inside the box are various drink flavored candies and mixes.  The round ones are rootbeer flavored.  So you can see, they did have more than one drink on me!

Saturday, June 25, 2011

Making Over Bob W, the Bowling Ball


This is Bob W.  Bob W is a bowling ball.  A pretty well-worn bowling ball at that.  Bob W doesn't realize the potential that he really has.   Time for a makeover, Bob W!

After a good washing, we'll give you a coat of white indoor/outdoor glossy acrylic paint.


That didn't hurt now, did it Bob W? 

Now lets slap on, gently of course, some blue paint.  Some bright, some dark, we'll mix it up.  A little dab here.  A little dab there.  Ah, looking better already.  Do you feel a little bloated Bob W.  Kind of under the water?  Not to worry.  There's a reason for that.

Time to get out the orange, yellow and red paint Bob W.  This may tickle a little.  We're going to make some snazzy seaweed, or perhaps we'll call it coral.  And then we'll spray you with some clear glossy sealer.

What's that aluminum tape patch for you ask?  Hmmm, let's see.  Well, Bob W, it's the beginning of a symbiotic relationship.  We're going to need some GE Silicon II Window and Door caulk, some glass bubbles, and some flat and some jellybean marbles.  No, you won't need the Colace or the pencil.  How did they get there!

We'll use that caulk to adhere a bubble over the patch so it looks a little shiny.  Then we'll add some more caulk and one flattened and four jellybean shaped marbles, and, oooh, look at that - a Turtle! 

And another one!


And yet another one! 

Three turtles swimming amongst the coral to keep you company Bob W.  What do you think?   Oh, and you have a seat now too Bob W.  It's a simple seat you can find in the hardware store - just a PVC ring.  And your finger holes won't even show now Bob W.  They'll be hidden by the seat!

Now you can be put in a place of honor Bob W. 

Friday, June 24, 2011

Waterfall for Little Sabrina


I promised another interactive card for my friend's other granddaughter Sabrina.  Her sister Vanessa recently had some emergency surgery and it was hard for Sabrina to understand what was going on and why her big sister was getting all the attention.  Her grandmom did a great job keeping Sabrina occupied and also helping to keep her mind off of things. 

This is the waterfall card I made for her.  She likes flowers and the color pink grandmom said - so she got pink flowers with some peachy ones too.


You can't really see the sentiment too well.  It says "The Earth Laughs in Flowers".

I hope the little one's enjoyed both of the cards - they were fun to make. 

Wednesday, June 22, 2011

Jingle Belles 25


Our challenge guest star Candy Blake has asked us to celebrate the holidays by bundling up - layer it on!  This was a bit of a stretch for me as I usually don't have many layers, but I made it even more of a stretch for myself by waiting until almost the very last minute to get it done.

It's been a very busy two weeks at school and today was the last day.  We have been running around like chickens with their heads cut off trying to get everything done that needs to be done to wrap up the school year, but I'll post about that later. 

Anyway, I came home today near my regular time, although the students and most of the teachers flew the coop much earlier in the day, and remembered that I had promised Kirby that I would clean his cage.  Believe me, it needed it.  And since I sit on the couch right next to where his cage is kept and use my laptop there, that was a pretty good incentive.  You'd be surprised what a mess one bird can make!

So after I finished, I scurried upstairs to the stamp castle (which is so cluttered it's beginning to look like a dungeon - but I digress) and dug out some old dsp and got busy.  With a little less than an hour and only a smidgen of an idea, I think it came out pretty good.

The stamped image is from SU's Autumn Days.  Note to self:  the SAMJ saves a lot of time if you use it to begin with and not wait until you've misstamped the image 3 times!  I used a Fleur de Lis die and some red satin ribbon to class this up.

Anyway, it got done and posted in time, so now, after I clean up a bit, I'll be checking out the rest of the creations here.

Tuesday, June 21, 2011

Teapot Tuesday 151

Being a button lover I would have to say that this is one of the coolest teapots.  You'll have to read the story that goes with it here.  

Our challenge was to make a round card.  I had picked up these scalloped circle cards in the dollar bin at Mike's a few weeks ago to use to practicing my tangling, so I decided to use both the scallop and to tangle the background for my card.   The story refers to a designer dodgeball and I seem to remember those dodgeballs from gym class having a ridged texture to the surface (although they were usually that pinkish-red color).  This is what inspired me for my background, but in black and white.  I added the Summer Sun pieces and the colored buttons to give it some punch.  The black and white buttons are actually stamped with the Button, Button stamps. 


When your tangling you build your pattern from the top to the bottom, or rather from the front to the back.  You see the spirals that look like they are closest to the top are actually the ones that are drawn first.  The rest are added behind them.  The depth comes from adding the pencil shading.  Pretty cool, eh!


Here's another Zentangle card that I did recently.  This one is several ways to do spirals (including more of those that I used for the Teapot card this week).  You can click on it to see the detail better.


Now, I will go and check out the gallery.  Click here to join me.

Oh, and I'm going to have another round project to show you in the next day or so.

Wednesday, June 15, 2011

Jingle Belles 24

We had a sketch challenge this week courtesy of Kirsty Vittetoe.  If you check out this link to the challenge you'll get the links to Kirsty's blog and more.  Here's the sketch....

And here's what I did with it............


There is minimal stamping on this in that it's only the sentiment that was stamped.  The dsp had a candy theme to it so I drew the peppermint lifesaver to add as the circular element.  I had originally drawn one and then coated it in CE, but the marker bled and I didn't have time to redo it and post this before the deadline today.  What I think I will have to do is to put a piece of packing tape over the lifesaver and then add the CE so the red doesn't bleed into the white again. 

Sorry for the quick post again, but I'm still playing catch-up at work!  Oh, I can't wait until next Wednesday at about 3 p.m.  I'll have a few days off before we start our summer hours and hopefully then I will have some time to catch up with my "hobbies". 

I'm sure you want to see the rest of the creations this week - click here.

Tuesday, June 14, 2011

Teapot Tuesday 150


Sorry, I have a very quick post for tonight to show you my Teapot Challenge card.  It's the end of the school year and what I call the "circus" has begun once again.  So many things have to get done before school ends next Wednesday and there are just not enough hours in the day, so I've got HOMEWORK!  Count among that splitting up 3,000 ladybugs for a ladybug release tomorrow in honor of a teacher who passed this last fall.  I just might have to wait that out until just before the event tomorrow as I'm sure, with my luck, I will have many stray ladybugs inhabiting my house.

You see our inspiration teapot above, and our cards have a destination to Orangeville, California to the daughter of one of our teapotters who has had an unfortunate accident while horseback riding.  She's on the mend, but our cards are meant to keep her smiling while she heals.

Not having any horse stamps, or at least I don't think I do, I was drawn to the horses on some scrapbook paper by Debbie Mumm.  I chose two of the spotted horses to put on this "orange" card that's going to Orangeville.  Oh, and we were supposed to have a flower or flowers on the card, so you can see the flowers in the background stamped in VersaMark from the True Friend stamp set (and so is that Crushed Curry medallion). 


I kind of like the way this came out and I hope that Jessica will too. 

I'm making a quick trip to the gallery tonight - care to join me?  Click here.

Monday, June 13, 2011

For Vanessa

The 10-yr.-old granddaughter of a co-worker was recently hospitalized very unexpectedly and needed surgery to remove a cyst near her ovary and appendix.  Poor thing was in a lot of pain and this was scary for her and her entire family.  Thankfully the results were good and the biopsy proved to be negative so now she's taking it easy and recovering nicely. 

I wanted to send a card to her and her little sister so I asked grandma what their favorite colors were and if they had any other favorites.  She told me that Vanessa means butterfly and she happens to love butterflies and the colors pink and purple.  Her little sister Sabrina shares a middle name with her grandmother - Rose - and she loves roses. 

I decided to make them both interactive cards given their ages and I have finished Vanessa's card.  Hers is a Neverending card and it features the Strength and Hope stamp set.  The Melon Mambo butterfly is the focal point that you see repeated four times in exactly the same place when you do the folds.


The colors used were Melon Mambo, Regal Rose, and Pretty in Pink with some Pear Pizzaz for the leaves.  The little flowers are from another set which I'll have to check on the name of - e-mail me if you need that information and I'll be glad to look it up. 

The pattern for this card can be found by Googling Neverending Card.  There are lots of sites with directions as well as videos.  It's really not that hard.

I'm planning on doing a waterfall card with roses for Sabrina and hope to get to that in the next day or so.  This week is going to be a particularly busy one at school and I'm not looking forward to it.

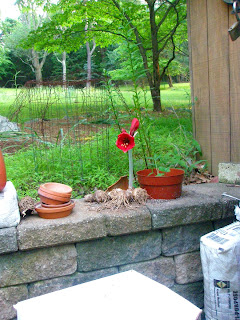
On another note, I just wanted to share a picture that I took last Friday.  As I came up the driveway I saw this red flower and couldn't imagine what it was. It looked like it was coming right out of the wall in the mess next to the shed where he's been potting up the plants. 


Upon closer inspection I could see that HWNSNBP had left some amaryllis bulbs out and this particular one had decided to bloom - no dirt, no pot!


Some things are so resilient. 

Friday, June 10, 2011

Happy Birthday


One of my oldest (in length of time we've know each other) friends celebrated her birthday yesterday and I can only hope that she received her card on time.  It went postal a couple of days ago.  If it looks a tad bit familiar it's because I was having fun experimenting with using the two different embossing folders before I made the wedding card in a previous post and I just had to put it and the punched flowers to good use. 

Hope it was a happy one Joan! 

Wednesday, June 8, 2011

Jingle Belles 23 - The Story to the Card Below

Let it sew, let it sew, let it sew. That's our cleverly worded challenge for this week. And if you click here you will see my card.

Well I hope that this counts as sewing cause it definitely called for a needle and thread. I would "sew" have loved to do something with machine stitching, but alas, my sewing machine bit the dust a few years back and even though I have my sister's now, I haven't even opened the case to see if it's useable (hiding my head in shame!). You know how you get attached to some things. I loved my Sears sewing machine. It was the first major purchase that HWNSNBP and I made when we first got married. Probably took us several years to pay it off on our Sears credit card. But with it I made clothes, costumes, curtains, and crafts of all kinds, including a few quilts. I could go on about how I still add to my fabric stash even though I don't have a machine (hiding my head in shame yet again), but let me forego that and get on with telling you about this card.

When I first saw the challenge I remembered that I had printed up a pattern - within the last year - of a snowflake that was done on paper with silver thread and clear seed and bugle beads. One of those things that I physically and mentally filed away for future reference. Well, although part of my brain remembered printing it off, it could not correctly interface with the part of my brain that was supposed to remember where the heck I put it, so I spent about... too much time...... searching through my papers and googling when I decided to go with this pattern that did pop up when I googled "pin pricked snowflake pattern" (and don't be surprised at some of the things that this points you to!).  The site is Card Inspirations.

I downloaded the pdf and used the pattern provided.  My original intention was to make three separate snowflakes for three cards, however, in my haste to stitch them up, I used a continual thread from snowflake to snowflake so then I could not cut them apart.  Thankfully, they were decently placed on the blue background. 

The thread is one double ply strand of DMC metallic floss - E415 Antique Effects, which I probably should have made single ply.  The background is Pacific Point CS and I've added some doily pieces and a MS punched snowflake with a glitter dot.  Put that on a background of Silver cs and then onto a white bristol board card base. 

Now, the reason that this description is above the picture is because I lost track of time today after I got out of the doctor's office and made a trip to Dollar Tree for pool noodles only to come out with $28 worth of merchandise - two bags full and 4 noodles.  Then I stopped at McDonald's for a Caramel Frappe to enjoy on the way home and screamed in horror when I looked at the clock in the car while I was in a line of traffic trying to get out of the parking lot.  So when I did get home, I quickly posted the pictures to squeak in under the 6 p.m. deadline and thought that I would go back and add the wording, but I wasn't sure if it would make the picture disappear from the link on the Jingle Belles blog, so to play it safe this is what I did.  (This idiocy must have been a side effect of the brain freeze from the frappe, or maybe it was the screaming in the car.)

Now if you click on the link in the very first sentence you will get to see all the beauteous creations for this week.  Please take a look when you get a chance.  These ladies are really talented.

Jingle Belles 23


Be right back with the write-up.

Tuesday, June 7, 2011

Teapot Tuesday 149


Clean and Simple - that's what our instructions were for this week.  Isn't this a sweet little teapot.  I just love the colors.  Some day, when I get my stamp castle reorganized, I am going to be using these colors.  Bring a blossom to the party - well, I'm bringing a blossom from a set I haven't used yet - Sweet Summer - it's a Sale-a-bration set that I had mounted and put aside and forgot about.  I thought I might use one of my new punches to punch out my blossom, but I kind of like this one on the single stem.  I happened to have a piece of the lattice die on my workspace so I added that for some more visual interest. 


Our destination this week is a revisit for a young woman who is now going to go through a bone marrow transplant and can't leave the hospital.  She was told to bring something to do to because she'll have a lot of time on her hands.  Cindy found out that she likes to send cards, so we are not only sending her a card, but we're including the ingredients for her to make more because she likes to send people cards.  She should have a lovely stash of cards after all the teapotters send their kits!

So, let's go see what's happening in the Teapot Gallery this week. 

Saturday, June 4, 2011

It's a Wedding Day


We're off to a wedding today.  This is cased from Cindee Wilkinson.  I just thought it would be perfect for a wedding card and I wanted to try the embossing technique that she used.  If you click on her name she gives the source of directions to get these embossing folders to work together so well.  

Congratulations to Bobby and Rachel!

Last Weekend's Pics


Bird on the dune at LBI - I do not know what variety, but it just awes me how they perch on the grass and it hardly moves with their weight.

Feeding gull at Barnegat Light

Coming in for a landing.


My favorite.  This Asian woman was sitting on the bulkhead behind the lighthouse holding this giant black umbrella.   Her family was off to the right frolicking on the rocks.  The feeding gull from the picture above brought that crab out of the water and landed to her left.  The other gull tried to steal the crab and their antics appeared to scare the woman who started to hiss, yes, hiss at the gulls.  Needless to say, they didn't mind the hissing, but when she moved that umbrella in their direction they took off.  I found the whole thing rather comical.  She did not know I was about 20 feet behind her and saw, and heard, the whole thing.

The sun was rather intense.  So much so that I didn't realize until later when I came back that I actually got a little burnt around the shirt collar.  We weren't going to be out long, but I should have known better and put on the sunscreen - or brought my little blue umbrella out of the car!