Sunday, December 29, 2013

Feeling Elfish

On the last day or so from Christmas break, the Christmas Elf usually shows up at school.  This year the elf came on Friday even though we had a half day of school on Monday.  The elf just didn't want to take the chance of there being a snow day or getting sick or something on that order.  

So, for the secretaries the workshop first appeared to look like this...........


Looks pretty colorful doesn't it?  What was to become of all that?  


Snowmen in hats and scarves.


And tucked inside..... a little bit of candy.


Thanks to Laura Haffke's post found here, I simplified her snowman by using paper for the scarf and drawing the eyes.  I also used my petal punch to create those "carrot" noses, just trimming one end of the petal to be a little more rounded.  I also added real blush for the cheeks.  Inside each one was a Lindor Truffle - one of the white varieties.  These little guys were delivered via our interoffice mail to all the secretaries and clerks in the district.  

I, er, um, the elf also toyed with the idea of making these for the staff at our school, but the elf never seems to leave herself much time to do these things so another plan was hatched.

What can you do for 70 people at a very little expense?  Not that the elf is cheap, mind you.  She's just not rich, so she's always on the lookout for something cute, clever, and inexpensive.  And in this case, practical.  

The elf had her helper pick up two cases of water from Costco because there were 35 bottles in each case for $4.99.  And this is what she created to put on them..........

  
A little work with Print Shop and a paper cutter and tape and into the staff mailboxes they went.  She toyed with the idea of putting lemonade in one of them, but decided against it not wanting to single anybody out.  (Note:  I only added my name to the picture in case this gets pinned anywhere.)

It was much easier to sneak back into the school office after everyone left and put these labels on while there than taking them out of their shrink wrap and bagging them at home, er, in the workshop.  

It's fun to see the reactions of the staff as they find their little "gift" in their mailbox.  Most of them assume it's from me, but I'll only admit to it being the work of the Christmas Elf.


Wednesday, December 25, 2013

Merry Christmas 2013


Wishing all a very Merry Christmas!


My two main cards for this year.  The color is a little off on the bottom one.  It's more green than turquoise.  The snowflake made it a card suitable for all faiths.  

I'm definitely going to be doing the Jingle Bell challenge next year.  I did not keep up past the first month in 2013 and was rushed to get my cards done and even though I am pleased with them, doing them little by little does alleviate the pressure of getting them all done at once.  

Merry Christmas!

Sunday, December 22, 2013

December Birthdays


Well this first one above isn't a birthday card, it's a little punched Santa rocker that I made for some little quick gifties.  I found the directions here.

The card below was for my office partner.  She likes the brown and red combo so I thought this would be a good choice.  The flower was made by layering some scrunched scallop punches over the punched flower.  I curved the petals and put a dimensional under each to make it really pop.


The next card was for our mail lady at work.  Her favorite color is yellow and although that's not a color I would go to at this time of year, I thought this was quite cheery.


Finally, this card was for one of our good friends that was celebrating his 60th birthday.  You will find that you will be seeing a few cards with this tree theme for these special birthdays coming up.  It's a long story, but it has some significance to us.  The challenge for me will be not repeating the design! We had a wonderful time at his party and look forward to celebrating many more birthdays.


Wednesday, December 18, 2013

Flying in From California


I don't know if that video is working and if you can see the solar dancers that I have on my counter at work.  This is the winter holiday crew.  Dollar Tree has had quite a few of these come out for the different seasons and holidays.  They really do help make people smile when they come in to the office.  I just wish there was some way that I could get credit for all the calories that they burn all day long.  

Also on my desk recently is this lovely little paper crane folded by my blogging friend Clare who works in a school office in California.  Clare has a couple of blogs, one of them called Peace, Love, Cranes which chronicles her ongoing project of folding and distributing 1000 paper cranes.  You must read about it here.  Now this is not one of her project cranes but it is a crane that she folded and sent to me along with another surprise or two.


(I've put it on my desk at work alongside some of my piggy things.)


She sent me this beautiful bird pin that her husband found.  Yes found.  She remembered that I had posted about the bird pins that I was collecting and thought I should have this one also.  It looks like mother-of-pearl and not at all green like the photograph.  I can't wait to add it to the "flock".


Accompanying the pin is a doily that was handmade by her grandmother.  Clare had read one of my posts where I mentioned that I would have loved to have one of the doilies that my grandmother had crocheted and so she shared one of her grandmother's doilies with me.  Is that not the sweetest thing!


I have been so very fortunate to have made a few wonderful acquaintances from all corners of the world through this blog and it always touches my heart when things like this happen.  Bloggers share so much in many ways.

Thank you Clare for thinking of me and sharing these wonderful treasures.  

Saturday, December 7, 2013

Pierogi Day


Looks like quite a mess.  This is where it starts the afternoon after Thanksgiving day.  My family - my mother, sister, and brother, along with HWNSNBP and I and Rachel (who was allowed to be absent this year).   Everyone has one or more jobs in the production line - the doughmaker, the roller, the fillers, the pinchers or crimpers, the prickers, the boiler, and the packager.

The Dough  

5 cups flour
1 heaping tablespoon Bisquick 
1 heaping teaspoon sour cream

1/2 stick (1/4 cup) margarine melted in 1 cup of very hot water
1 egg

I start with the first three ingredients in my KitchenAid with the dough hook on.  The margarine and water go in next at a slightly higher speed so as not to cook the flour.  Then in goes the egg.   If it's too dry, more hot water.  Too wet, more flour.  When it pulls from the sides of the bowl I turn it out on the counter, kneading it just a bit to make sure that all the dry ingredients are absorbed and it's not too sticky.  Then it goes into a floured bowl, gets covered with a clean towel and sits and rises.  Then another batch.  And another batch.  And another batch.  Turned out to be 5 batches of dough this year.

While the dough is rising the fillings are prepared.  We make two kinds - potato cheese and cheese. The potato filling is usually what is left of the mashed potatoes from Thanksgiving dinner at mother's house with perhaps a few more made on Friday morning.  To that we add....... wait for it.......... Cheez Whiz.  Two jars that were heated in the microwave with some shredded cheddar and salt and pepper to taste.  When mixed together it should be easy to work with and not sticky so it can be easily molded with spoons.

The cheese filling consists of 3 pounds of farmer's cheese, 28 oz. of large curd cottage cheese (drained if it's really watery), two bunches of scallion tops chopped, a couple of eggs and salt and pepper to taste.  This is the harder filling to work with as it is not as easily molded with spoons.


My brother and HWNSNBP take turns rolling the dough on the counter - the most labor-intesive part of the process.  


We used to use the open end of a two-liter soda bottle to cut circles until I saw this pierogie maker on QVC.  Jeez, it has to be over 15 years ago now as my father was still alive when I got it.

The rollers keep one on the counter to help measure the spread of the dough and the other, with it's dividers goes on the kitchen table which has been covered with a plastic table cloth.

You see below the depressions in the mold where the filling is being placed.  Two of us are responsible for filling and wetting the edges of the depressions with water so when the second sheet of dough is laid over the filled pockets, it will stick together.   There's another rolling pin on the table used to roll over the filled pockets - kind of like using a big shot to die cut the semi-circles.  The excess dough is peeled away and the filled product is dumped onto the table.  


The edges get crimped to make sure none of the filling will escape and then they are pricked several times with toothpick.  I'm not sure exactly why that is, but I guess it's so they don't blow up when heated.


From the table they go into a pot of boiling water and will stay there until they rise to the surface.  


Once cooked they're scooped onto a jelly roll pan and rubbed with margarine.  This will help them not to stick together as much during the packaging process.


From there they go outside onto the covered picnic table to cool and be packaged.  No more than 6 to a package or they're almost impossible to pull apart after freezing.  


We prepared 7 dozen cheese and 9 dozen potato cheese in just about three hours thanks to the assembly-line we had going.  Three dozen of each are put in the freezer to be defrosted and cooked on Christmas Eve.  The rest get divied up for a meal over the weekend or to share with friends and colleagues at work.  

Of course, any casualties (those that may have opened during boiling) are used for tasting purposes but there only happened to be one of each kind this time. 

Usually we order pizza for afterwards, but this time we just had leftover desserts and I finished cleaning up after they all left.  We had pumpkin, apple, cherry, and butterscotch pie to choose from, and my pumpkin roll of course.  

Tuesday, December 3, 2013

Fall in Love


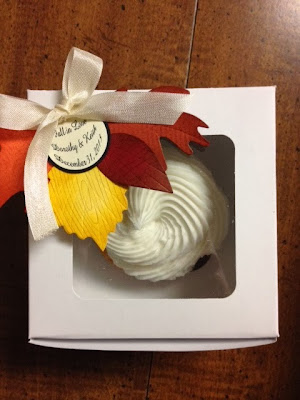
Fall in Love - that was the theme of the bridal shower that Rachel recently took part in.  Her friend is getting married on New Year's Eve and last Saturday was the shower.  If you remember the piles of leaves from this post you'll now see what I did with them.


Four different leaves of different colors, each stamped with a different pattern and then the leaf veins were embossed with a stylus.  You can't see from the top that they were glued to a 1" circle of cardstock.   I used my computer to print up "Fall in Love" as well as the bride and groom's names and the date of the wedding on Very Vanilla cs and then punched out with a 1 1/8" circle punch layered onto a 1 1/4" circle of black (off-white and black are the wedding colors).  I added a simple bow in Very Vanilla, stuck a dimensional on the back and they were ready to go.


Rachel and her housemates who are also in the wedding party, were responsible for putting them on the boxed cupcakes they had ordered as favors.


They did a nice job, don't you think?  

I've got some additional leaves that I diecut from the scraps I had leftover, but of course I have not done anything with them yet and now they will be put away until next fall.  Someone remind me about that next August, okay?