Showing posts with label TLC Challenges. Show all posts

Wednesday, May 14, 2014

Clean-Up Card and the 300th Tea Party


So as I was trying to straighten up the stamp cave I kept getting distracted by some of the scraps from other projects.  It was like they were talking to me saying "we belong together".  And maybe it looks like a pretty weird color combo, but I think it works.  The green wood background was too pale for the project that I originally made it for but here, with the shades of pink and burgundy I like the contrast.  

This next card was meant to be part of the 300th Teapot Tuesday celebration.  I even used some of the featured techniques of some other challenges that week - the pillow top background technique and the ribbon flower.  But I never got around to posting it.  You were to bring a piece of furniture or a room decoration to the party.  When I saw that, I immediately thought of this chair stamp.  It looks so pale here, but it's really pretty IRL.  


I stamped the image on watercolor paper in Basic Gray ink and then used a combo of inks and aquapainter and straight marker color.  I colored the doily portion with ink and a dauber in Blushing Bride and used Calypso Coral as the card base and the ribbon flower.  The pillow top background was created with Calypso Coral and Blushing Bride ink.  


I'm sorry I missed the party.  I'm sure it was lot's of fun!

Tuesday, May 14, 2013

Bouquets with Bokeh


Here is the delphinium I mentioned in a previous post.  And below are the lilies.  I saw the technique challenge on Splitcoast yesterday - to use the Bokeh Effect.  I had been stuck as to what kind of background to use behind my flowers and figured I'd give it a chance.  Instead of using a solid stamp as suggested by the directions, I used my daubers.  I've always twirled them on my grid paper after I've used them and thought that I could blend a couple of colors together easily to get the effect.  Twirling the daubers gives you a circle, or hint of a circle and when the center is not completely filled with ink, it appears to look to me as a highlight.  Well, you be the judge.  


Have I fooled you into thinking that the background is the rest of the garden out of focus?  Here is a link as to what a photo looks like with the bokeh effect.

Now let me tell you how I created the delphiniums.  After running the die and Pacific Point paper through the Big Shot, I took the flowers and added a quick cross of white Prismacolor pencil in the center.


Then using the stylus in the flower kit (yes, I did splurge on the kit, but I've always said it pays to have the right tools) and the foam mat and


depressed the centers of the flowers.


See what it looks like after just doing that.


Then I took the flower and put it on the leaf mat (this is a thinner, hardcore mat covered in what appears to be a suede-like fabric) and again used the stylus but this time I ran it up and down the petals


so they would curve gently.


You see the flower before cupping and after.


Once I had all the flowers prepared, it was just a matter of adding them to the stem.  I choose to use a green wrapped floral wire and starting at the top added flowers in groups of 1, 2, 3, and then 5 flowers leaving the stem to show through between each group.  Leaves were only added at the bottom of the stalk.


I have to check on what other flowers I can make with this die. It truly should not be pigeonholed as just a forsythia.  


Monday, November 7, 2011

Teapot Tuesday 171, Try a New Technique (TLC 350)


Aren't these two kitties cute perched on the checkerboard shelf?  So, you can see we were to bring cats today.  Cats with bling or cats and bling, or just bling.  Well, you'll want to read the story here.

I have a few cat stamps, but none of them appealed to me today.  What I was thinking of was the Technique Lover's Challenge that I saw earlier today.   The challenge today was to create a card without any stamps.  I immediately thought that my teapot card from last week would have fit with this challenge, but you know you shouldn't post something that has already been posted.  So thinking back to the bowling balls that I had done several years ago in the form of cats, I decided to draw my card for the Teapot Challenge and also put it in the TLC gallery for challenge 350 today.


I first sketched the cat on some copy paper and then, since I couldn't find any carbon paper, I quickly scribbled all over the back with a pencil enabling me to transfer the drawing to some watercolor paper with a stylus.  I decided to go with both of the colors you see in the cats in the teapot - blue and yellow.  I added the color by using my ink pads and aquapainter.  The detail lines were added with markers.  The flowers were punched, sponged on the edges, and then added to the cat's neckline.  Last touch was to add the sticky pearls to the flowers - thus the bling.

The image was cut out and then mounted on a simple card base with the fold at the top.  Looking at the picture now I'm torn with whether I should blacken the eyes instead of leaving them white.  What do you think? 

Well, there are two galleries to visit today - the Teapot Gallery here, and the TLC gallery here

Monday, October 11, 2010

TLC Challenge - Wet Paper Stamping


This morning I had a little bit of extra time before I had to leave for work because it was an In-Service day.  I managed to get in my exercise and then I made the mistake of sitting down at the computer.  When I saw the Technique challenge for today I had an idea that I wanted to try. 

This technique involves wetting watercolor paper first and then stamping an image on the wet paper.  The image blurs because it is wet and the next step would be to use a heat gun to dry it.  Once the paper is dry, you stamp over the image.  You'll see my Paisley Print oak leaves are done this way.  I stamped them in Pumpkin Pie on the wet paper, heat dried it and overstamped with Cherry Cobbler. (Sounds like a dessert special doesn't it?)

That's about all I got done before work.  Then when I came home I stamped a Paisley Print Pumpkin in Pumpkin Pie, rolled it in Cherry Cobbler and used my markers to color the stem and vine.


I had a Starbucks coffee sleeve on my table and I pulled it apart to get to the corrugation.  After I squared this piece up, I tied a piece of hemp around it, placed the pumpkin on it and added the button with the linen thread.  Oh, almost forgot - the sentimenet "Gratitude" was added from the Day of Gratitude set using Cherry Cobbler and my Stamp-a-ma-jig.

The leaf layer is backed by Cajun Craze, then Autumn Spice DSP on a Cherry Cobbler card base.  I kind of like this technique and will probably give it another try.  What do you think?

Tuesday, May 25, 2010

Black Magic

Yesterday I needed to take a break from gardening.  We've been trying to get as much of the bed prepared as possible and finally on Sunday we were able to put in some plants.  There's still a way to go, but I felt like channeling my energy elsewhere. 

What I should have been doing was starting to move my stamping supplies so I can paint and put up more shelves in my "stamp castle", but instead I sat down at my workspace and decided to do this.....

I actually did start cleaning when I found this frame in a bag behind the door and thought I'd incorporate it into Monday's Technique Lover's Challenge.  We got to use the Black Magic technique.  Stamp in white craft on a dark cardstock, heat set and then color the white image with colored pencils and highlight with a white gel pen.

The frame was from the dollar bin at Mike's and I used Bermuda Bay cs as my background paper.  I stamped the image from Elements of Style in white craft ink and heat set it.  Then I got out my watercolor pencils and colored over the white ink.  I colored the lighter colors first and then added the darker highlights and then went over it again with the lighter color to blend the colors.  The dots were added with my gel pen. 

The hummingbird is also from that set and I colored directly to the stamp with my SU markers and stamped it on Whisper White cs.  After I carefully cut it out I covered it with Crystal Effects.  Then I left it to dry and when I came back to check on it an hour or so later, it appeared that the inks had blended together, but I like the effect.  It kind of looks like it's enameled.  The bow (of Melon Mambo) and hummingbird are attached with glue dots (as is the half pearl on the bow).
 

This might be a nice little pick-me-up for my desk at work or a quick gift.  Now I regret not having purchased more of those frames!

Tuesday, May 4, 2010

Embossed Vellum

The technique challenge today involved embossing vellum.  You could dry emboss or use images and embossing powder.  I chose to dry emboss.

I first used my new Watercolor Trio stamp set to stamp the flower image on plain white cardstock.  The stamp was colored with markers and then stamped off once and then onto the white several times to give varying degrees of intensity. 

My vellum piece was punched on one edge with the open scallop border punch and I used my bone folder and Score Pal to emboss the diagonal lines.


The vellum piecewas adhered  to the background with red line tape at the top and the bottom, thus the ribbon at the top to hide that, and the punched flowers at the bottom.  The sentiment is from the same set and punched out with the fancy label punch.  The flowers and leaves were leftover from a previous project. 

I must admit I'm not crazy about the ribbon.  What do you think?

Monday, April 12, 2010

It's a Technique - It's a Card - It's a Bookmark

The Technique Lovers Challenge today is called Save the Page.  We were asked to make a card that contained a bookmark. 

I used my perforating tool to create this bookmark card.  (And the ribbon really isn't that shiny!)


I used Herb Expressions for my image and sentiment.  I first stamped the image in Basic Gray on Confetti White.  Then I used my SU markers to color the image.  The card base was stamped on the left with Sahara Sand Ink.  I added some torn edge layers, repeating the color combo and this is what I came up with.  The bookmark on the right can be snapped or gently pulled off because I perforated the edge. 

If you haven't heard the announcement, Stampin' Up is going to go through a Color Renovation and these colors are among those that will be discontinued.  They are Sahara Sand, Mellow Moss, Perfect Plum, and Pale Plum.   The image was colored directly with SU Stampin' Markers.  The ribbon (Mellow Moss Tafetta) is not as shiny as it appears in the photo. 

Thanks for looking.

Tuesday, January 26, 2010

Teapot Tuesday 78

Rapunzel, Rapunzel, let down your hair.  Would you believe I used to have hair that went below my waist?  Yes, I was a child of the 70's.  Straight, dark brown hair parted down the middle.  Well, I still have the center part, but it's no longer brown and it's very short.  And.... I played the role of Rapunzel in our Junior Carnival in High School.  

So what's that got to do with Teapot Tuesday?  Well, take a look at Rapunzel's castle............


Cindy has woven a great story about Rapunzel and her hair, and her beau, and her beauty salon, and the knights, and the neighbors, and the gossip........... oh my, I don't know how she does it..... comes up with these things I mean.  You really need to go to her glob and read the story for yourself to understand what I'm about to tell you.

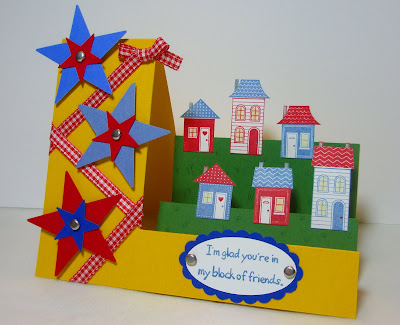
This is Rapunzel's neighborhood.  She may have a moat around her castle, but the neighborhood is rather commonplace.  That is, unless you realize you are only allowed to paint your house, white, red or blue, or any combination of those colors.  It's a very patriotic neighborhood.  It's also full of very nosy observant people. 


How do I know that?  Well look at those houses.  Not one of them has curtains  and there are no trees obscuring the view.  And that's not just because they like to watch the fireworks every other weekend.  They like to keep an eye on each other.   They like to keep the terrorists or would be terrorists out of their neighborhood.  We should all hope to live in such a safe and caring neighborhood.

So Rapunzel, you are very lucky and shouldn't have any problem getting your hair salon up and running!

This is a side-step card and here is the recipe:

Stamps:  Good Neighbors, Quilt Quips
Paper:  Summer Sun, Garden Green, Whisper White, Real Red, Brilliant Blue, Brocade Blue, Ballet Blue
Ink:  Brocade Blue, Ruby Red
Accessories:  Barely Banana, Going Gray, and Garden Green markers, Silver brads, Red Gingham ribbon, small and large star punches, large oval and scalloped oval punches

Now, go take a look at the gallery!!! 

Monday, January 4, 2010

Combination Challenges

There were two challenges today I thought I could combine.  The CAS (Clean and Simple) challenge was to create a Valentine card and the TLC (Technique Lovers Challenge) was to do paper quilting.  I had a few ideas as to how to combine this, but when I went to get the new blade for my paper cutter out of the bag from Michael's it hit me - or rather it fell on the floor.  No, not me, the stamp that I had picked up from the dollar bin at Mike's this weekend.  You see, I was given a giftcard for Christmas and I decided to treat myself to some goodies and despite all my efforts (and all the stuff I already own), there are times that I just can't seem to resist the urge to use the 40% off coupon from the Sunday paper.

Anyway, while shopping yesterday I found this stamp with the squirrel that says "totally nuts for you" and added it to my basket, along with a new MS punch (Birds on a Wire), replacement blades for the cutter, and a selection of Valentine ribbons.  (Oh, I spent every penny of that giftcard plus a bit more!)

When the bag spilled open today and I picked up the stamp I knew it would be perfect.  The sentiment is good for Valentines and since it was square I knew I could build a quilt around it.


The stamp itself is a little over 1 1/2" inches.  I used my 3/4" square punch to punch out squares of some patterns from the new Welcome Neighbor paper that will be available from SU tomorrow.  I drew a grid on white CS and after running the punched squares through my Xyron, laid them down on the grid to make the quilted frame.  I added a simple white cotton string bow and some faux stitching around the edge of the card.  After I stamped the squirrel, I used my markers and blender pen to accent the image a little and stuck that to the back of the quilted piece.  Nothing like a pink squirrel!!!

I was pretty proud of this card and even showed it to HWNSNBP and told him it was his Valentine.  He nodded his head as usual and said "very nice" and then I went to take my pictures.  I even thought I'd provide you with a close up of the squirrel so you could actually read the background and then it hit me...... see if you notice the goof up............