Wednesday, June 27, 2012

JB:12:13 - mele kalikimaka

Sheesh, I can't believe that I haven't posted a Jingle Belle challenge in so long.  How long you ask?  Don't ask.  Life has gotten in the way of some of my favorite things lately, but rest assured, not all of it has been bad.  

In case you don't know, and probably there are a lot of people out there who don't know (I'm talking the world guys, not my blogging buddies!), mele kalikimaka means Merry Christmas in Hawaiian.  The highlighted link will take you to Bette Midler's version of the song that goes along with it - have a listen.  

So for this challenge we were asked to make our cards hot or tropical and we can "do this by using bold, saturated colors... or by incorporating tropical flora and fauna like palm trees and flamingos... or by taking santa from the north pole to the beach... OR... well, however you'd like to interpret "hot" or "tropical" in a holiday context!"

I made a cheater card of sorts.  I used some hot colors on a printed base card which is a notecard that I found in the $1.50 bins at Mike's.   I'm calling it a "Deconstructed Christmas Tree"


You see all the balls laying on the background with the streamers and lights not yet on the tree.  The only thing that made it to the tree was the little shiny star at the top.  The tree itself is actually one that I had made for a previous Jingle Belle challenge that I didn't finish - that was to be the one inspired by a Christmas Carol and I think I was going to say it was "Oh Christmas Tree", but luckily for me, the cs matched the green in the notecard and there you have it.  

I almost forgot, the directions for the tree I found on Pinterest with directions from this lovely blogger Sarah Jane.  It's cute and simple and I've been seeing them all over the place now.  (Yes, that's another hole I've fallen into - Pinterest - great for ideas, if only I used them!)


Oh, and my friend Michelle showed me a great way to do those banners and get even ends.  I know I should have taken pictures, but maybe you'll understand if I explain it.  You make a cut into the center of your strip from the end as deep as you wish your tails to be, then you snip from the corner of the strip to the center cut on each side and you have perfect sides.  Look at what she did to a toilet paper tube - click here - and you'll see her demo the banner too. 


Gotta hurry off to get some more projects done.  It's been a lovely day here - quite breezy and not too hot and I've been procrastinating with these projects.  I promise more creativity in the near future!


Let's go see the rest of the Jingle Belle creations - click here.

Tuesday, June 26, 2012

Something Old


About 58 years ago my mother received a gift for her new baby to use.  It was a little bonnet made from a lacy handkerchief, sewn together with a few stitches and some ribbon.  Twenty-two years later, that baby - me, used the hanky bonnet as my something old when I got married.  Then I put the hanky away.

Three years later, almost 32 years ago now, when I was expecting my first child I received a little box with a bonnet made from a hanky along with this poem:

I’m just a little handkerchief
As square as square  can be
But with a  stitch or two
They made a bonnet out of me.

I’ll be worn from the hospital
Or on the christening day
And after that be folded
Then carefully put away.

When on that future wedding day
So we’ve always been told
The well dressed bride must always
Carry something that is old.

So what could be more fitting
Than to find little me
And with a few fine stitches snipped
A wedding hankie be.

And if perchance it’s a boy
Someday he’ll surely wed
And his bride can have the hankie
Once worn upon his head.


This I passed on to my future daughter-in-law at her bridal shower.   


Monday, June 25, 2012

Bridal Shower

Yes, I haven't posted anything for a while because of some things going on here but hope to make up for that a little now.

My son is getting married in October and on the 16th of this month they had their Bridal Shower.  Michelle is his bride-to-be and her sister Julie and her mom put together a wonderful shower that was held at a local winery.  I'm still trying to figure out how to edit the pictures on my new camera which I used that day so they will be forthcoming.  But I do have pictures of the card I made and the gift.


My only regret here was not using a darker ink for the sentiment.  This is a 5 x 7 card with a Pool Party base.  The dsp came from various sources.  I first stamped the back image with VersaMark ink and then added the banners in the assorted papers.   Some of them had additional embellishment with punched edgings.  The oval with the sentiment was popped up and around it and down the banner I added punched flowers and starfish embellished with sticky pearls.  Two little punched hearts were also added to the sentiment oval.


The gift I made them is the Newlywed Survival Kit which begins with an empty paint can, some scrapbook paper and ribbon.   (I always go overboard buying ribbon, can you tell!)


Once you add the paper, ribbon and some paper flowers you have this...........


A few close ups of the flowers.............


They are made with a combination of punches.  The largest punch is out of dsp and all I did to that layer was to curl the petals slightly and set it aside.  The inside of the flower was made with two shades of solid cardstock and two different punches.  I first punched a hole in the center of each punched shape and before I fastened them together I spritzed them with water in a cake pan and smooshed them around in it before I wadded them up.  I unwadded them and then put them together with a brad and then shaped the petals.  Then I put them back in the cake pan and you could leave them overnight to dry or you could happen to be baking cookies or cupcakes (like we were) and you could set the cake pan on the stove top to use the heat of the oven to dry them.  (You can also stick them directly in the oven after you've turned the oven off while it's cooling down, just keep an eye on them so they don't get crispy - know what I mean!)  Then I took the dried centers and hot glued them to the bigger punched flower.  You could used dimensionals or glue dots for this, but since I was hot gluing them to the lid I just went with it.

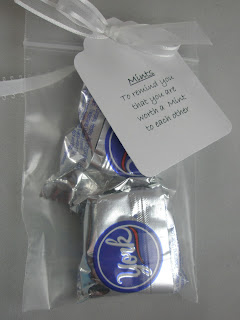
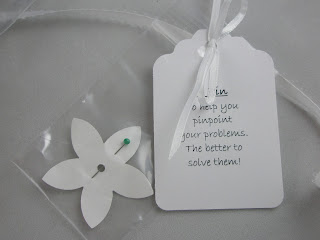
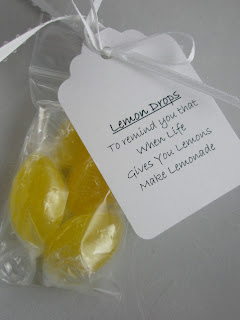
Once you open the can, here are the contents all attached to the lid via a long strand of ribbon.  Each item is in a little zip plastic bag with a tag tied on with a bow...........

(sorry, the first picture is a little blurry - if you click on the pictures you should be able to read the tags)


I like to alternate the edible packages with those you can't eat and spread the weight around also.  Some of the things are heavier than you think and will pull off.  

The end of the ribbon holds an envelope with the real gift - a gift card, gift certificate, cash, etc.  I did not attach a tag to this one this time, but you could have a tag that says "A GIFT CARD for you to use for something you did not receive at your shower" .  You can make it as personal as you would like.  


I had another gift for them that I will share a little later. 

Monday, June 11, 2012

Stamping Get Together - New Catty Products!

 At our most recent Stamping Get Together our fearless leader Debbie found some awesome projects for us to work on using some of the products from the new Stampin' Up catalog.

We used a new die for the shaped card below also incorporating a new stamp set and some paper and ribbons, and the green leaves are stamped with ink from the new stamp pads - wow!  Great coverage for those solid stamps now - can't wait to make the transition.


Another project using the die is this little holder and set of cards.


(Bonus points if you noticed the pearl out of place above.  I only noticed it after I took the photos - it belongs on the little yellow flower on the card above!)

I love, love, love the way these cards came out.  The papers and the images are so interchangeable and that was evident as all of us picked and chose to do them all different ways.


One of our lovely stampers, Carol, made these too cute origami dress cards for all of us (and with the handmade hanger too!).  I think she's vying for the Princess Origami title!!!


This cool little 3-D project is meant to be used as a pin cushion on top and inside you can add whatever your heart desires - candy, sewing notions, buttons, candy, ribbons, candy, etc.  (It was full of candy kisses which did not last long in this house!)


Debbie let us choose from her stash of SU fabrics for the tops and we all added one of the new buttons.
Great idea Deb!


Sunday, June 10, 2012

June Birthday


The inspiration for this birthday card comes from the beautiful hydrangeas that are blooming all over the place down the shore and hopefully will look as beautiful in front of our condos in Barnegat.  

Happy Birthday!

Saturday, June 2, 2012

Historical Society Tea at the Cox House

On Saturday, May 19th two of my very good friends joined me at the Cox House in Barnegat for a tea sponsored by the local Historical Society.  The building is owned by the Township and the Historical Society is lucky to have it at their disposal for events when needed.

I was in awe of the three dimensional ship displays that they had framed.  One of them was hanging in the Library, which was also the room that we ate in.


The other was upstairs in a room not being used, and as you can see was not mounted but sitting on the floor being stored there.


Also upstairs was a fairly newly refurbished bedroom that had beautiful trompe l-oeil portholes which really did fool the eye, but not the camera so much.


Our lunch was delicious with an assortment of savories and sweets and our choice of tea.  Oh, and there was a chocolate covered strawberry for each of us.


In the downstairs alone, there were five clocks.  The one with the glass front hanging on the wall had a date of 1894 inside the glass.


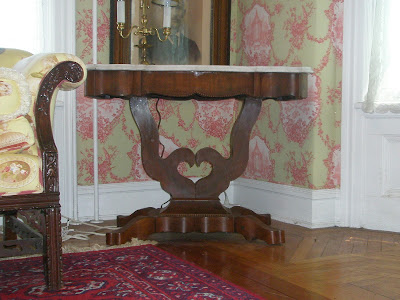
This last picture is of a table that I spied across the room from where we were eating and was intrigued by the heart shape formed at the bottom (this is for you Clare).


It was a nice relaxing luncheon with terrific company and wonderful staff who were there to answer all of our questions and take care of our every need.