Sunday, August 21, 2011

Masculine and Feminine Sympathy


A co-worker recently lost her father and I tried to do something a little masculine in a sympathy card.  This card has a Chocolate Chip base and the front panel is River Rock.  I use the images from My Friend and the sentiment is from a recently retired set (I think).  When I stamped the silhouette image in Chocolate Chip on the River Rock cs it didn't cover completely so I took my SU marker and added some more color and then blended that together gently with my blender pen.  You can't really tell from the picture, but it gave the image a someone suede look.  The droplets were colored in with a white pencil.


Another friend lost her mother-in-law recently and I put this together to send to them.  The base is Calypso Coral and there are a few stamp sets that I used with this one - Clearly for You, Pocket Silhouettes, Elements of Style and Teeny Tiny Wishes for the sentiment.  I framed the Clearly for you image in strips of Lucky Limeade paper.  The Very Vanilla oval that I stamped the Pocket Silhouette image on was framed with a split scalloped oval of Blush Blossom.  The flowers were punched from Calypso Coral and I added sticky pearls in the centers.  The butterfly embosslit provided the butterflies in Pink Pirouette. I like this combination and may use it again changing the sentiment to almost anything. 


Still another co-worker lost her father this past week.  This card is done on Island Indigo paper.  The background is En Francais (retired) and the other images come from Just Believe.  The circles are popped up and backed with Pool Party circles (and they're centered much better than they look in the picture.  I stamped the image with the sentiment once directly on the card and then again on Whisper White so I could add the sentiment (from Teeny Tiny Wishes).  Another quick layout that can be used for any occasion.

One would think that with all the supplies that I have invested in that I would have a stash of suitable cards for these kinds of moments, but I do not.   Aside from some generic thank you cards, I don't have much of a "stash" of cards - not counting my teapot cards pre-destination station days, some of which are hard to pair with a specific occasion or person. 

I prefer to make birthday cards for the person's taste, as well as thank you's for the most part.  Sympathy cards can be made ahead as they pretty much are mostly either masculine or feminine.  I do not have any sentiments that say specifically for loss of father, mother, etc.  And I usually try to write a short note on the inside of them, especially if I personally knew the person who passed.  I remember looking at the cards that my family and I got when my father and sister died and the one's that stood out among them were the one's with the notes inside relating personal remembrances.  I found that to be very touching and have since tried to do that when I can.  I did not personally know any of those that these cards are for, but letting friends know that we care is important and part of the circle of life as well.

Saturday, August 20, 2011

Sister, Dear Sister's Birthday

It was this week - Monday to be exact.  And I made her a card the week before and promptly ....... forgot to send it!  But, I did call her to wish her a Happy Birthday and to tell her that the "card was in the mail." 

Yes, I mailed it, but not before I forgot to photograph it!  So today, when I stopped by to drop something off, I sheepishly asked her if I could take a picture.  She didn't question me, just went to get it and then I found a suitable space to snap a picture of it.  Not such a great picture, but a picture nonetheless.


To make the card I first tore a page from a book that was going in the recycling bin and used that to stamp my first image onto.  The large blossom from Floral Fillers was stamped in Basic Gray and then colored with my Old Olive and Regal Rose markers.  (It looks difficult but I found it fun!) 

Then I stamped the large blossom from Posy Punch in Regal Rose and used a Rose Red Marker for the center and punched it out.  The final flower is in three layers, thus the name Triple Treat Flower.  Again, I used the same three colors.

The card base is the new Lucky Limeade as is the punched accent on the left.  The sentiment comes from Teeny Tiny Wishes.  I added some sticky rhinestones on the punched border and the first flower to finish it off. 

I'm linking this to How Sweet the Sound's Pink Saturday.

Thursday, August 18, 2011

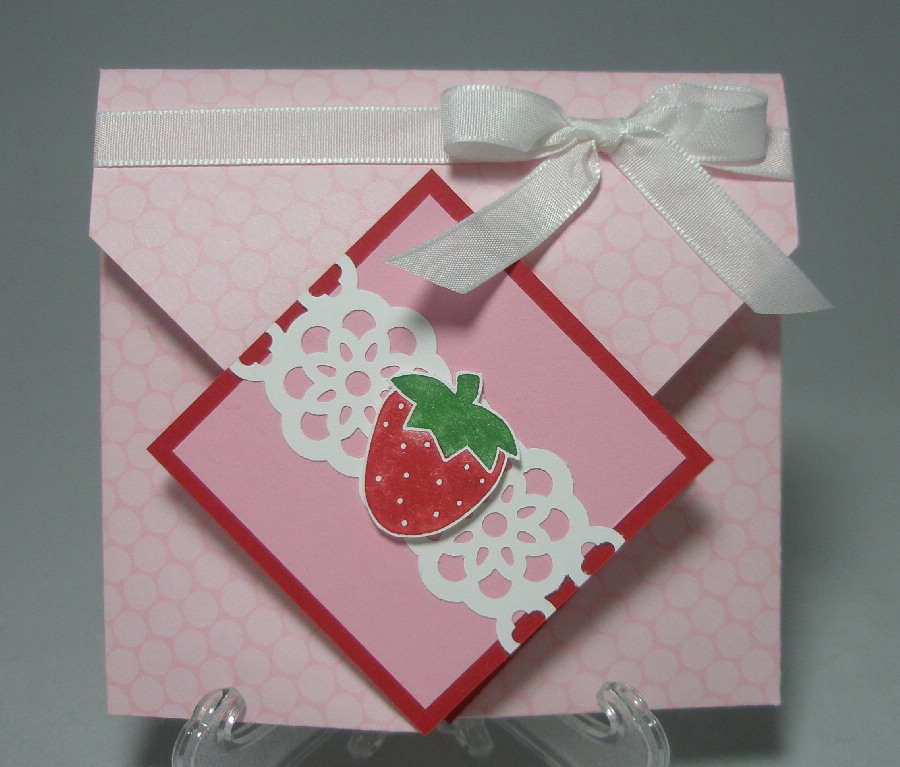
Strawberry Origami

HWNSNBP says that I need a nickname.  I told him that I already have one - Princess Origami.  He doesn't think that's good, but I like it.  I think I'm even going to make myself a Princess Origami crown and possibly costume to wear for Halloween.  Of course, no one will know who I am, but that's okay. 

When I saw this card-fold I knew I had to give it a try.  There's a very good tutorial by Wendy Weixler here.  The one difference that I made was to score my first scores at 3 1/4" to center the those diamond shapes a little better. 


This card was destined for a co-worker along with a strawberry coring tool that I had been telling her about.


But before I sent it  Rachel needed a Thank You card for someone and this was the only one I had with me that would have been suitable so I gave it to her to use and made another.


Just a little bit different on the outside.


I like this fold.  It's not hard at all and is a good way to use some of the accumulated dsp that I have. 

For both cards I used Tart n Tangy for the strawberry and Vintage Vogue for the rest. 

Wednesday, August 17, 2011

Jingle Belles 33

Bring on the Bling!  Show the sparkle, twinkle, razzle dazzle.  Make it shine, glitter, show it's pizzazz!  Get the picture?  I did, but I struggled a little with this one.


I actually spent about an hour straigtening out my work table, cleaning and putting away stamps and sets, filing paper and scraps, picking up bits and pieces on the floor, etc., before I started working on this and I think I wore myself out.  I had thought that I wanted to add glitter to that wreath but I stopped myself and now I think it will become a royal mess and stick to that snowflake gem sticker if I do.  Oh, but wait.  Now that I'm thinking about that I can take my Frost White Shimmer paint or some H2O's to that wreath and sparkle that up a bit.  Yes, I think I will........... sometime before it gets mailed. 

I wanted to use that new Island Indigo paper as my background.  I know it's not a usual holiday color, but I like it.  The wreath is my new Memory Box twig wreath die I had been playing with with white paper this time.  The snowflake is one that I found in the dollar bin at Mike's (when they still had dollar bins, now they're $1.50 bins!).  I punched some holes at the corners and threaded some silver metallic stretch cord through them then added the blue gems in the corners.  This is only 4" x 4" but it will do well for a gift enclosure or thank you note during the holidays.

Off to check out the rest.  Click here to join me.

Teapot Tuesday 159


There is a wonderful little scene on this week's teapot.  Reminds me of the covers of the Lumby Line series.  You bet there's a story to go along with this one - click here

In the challenge translation Cindy said to bring trees, well I brought trees.  I think maybe too many trees at that.  They're more overwhelming than I had planned.  And instead of people houses I have bird houses! 


The birdhouse border stamp is an old SU stamp that I got on ebay a little while back.  Though the houses are not exactly the same as those on the teapot, they are cute and I had fun coloring them.


This card is destined for one of our fellow teapotters who has just undergone a knee replacement.  I hope this brightens up her rehab.  I know that it is not an easy recovery.

But, as late as I am, I am venturing over to the gallery to peruse the other lovely entries.  You really have to click here to see Cindy's card alone (Mothermark) - it's a jaw-dropper!  And Sabrina (cook22) has a waterfall card you won't want to miss.

Sunday, August 14, 2011

Piggy Things

It's been raining all day today so I thought I'd catch up with some of these posts I had queued up.   


This piggy weather vane was coming home with me until I saw the price - $84, which probably wasn't a lot for a copper weather vane, however, it would probably cost me a heck of a lot more to have it installed on the roof as HWNSNBP is not about to try that trick.

Now this was supposed to be funny below.  I used my pig "corn-pickers".  HWNSNBP didn't quite get it (although it sometimes applies to him!).  Let me know if anyone does or if I really missed the mark.

Antiques, Fleas, and Garage Sales


I don't know why I do it, but I always find myself looking at the hand-decorated and printed hankies whenever I go into an antiques or consignment shop.  We recently stopped at a new antiques store on a whim and found some nice hankies there that I couldn't resist.  I know the time and effort that goes into creating those beautiful borders and embroidered initials and the prices don't reflect the work at all. 

These two with the "L" on them had to go into my stash.  I'd love to find an R and an M for Rachel my daughter and Michelle my son's fiance just to put aside for their weddings in the future.   I could make them a new one, but then that woudn't qualify as something old, so I'll keep looking.


These little purchases below were at the little flea market that they hold a couple of times during the summer across the street from the condo.  The round pink ceramic "vase" was only a quarter and so different with that opening I snapped it up.  The mailbox was also a quarter and is a magnet that actually will hold a roll of stamps.  The dolphin is supposed to be worn as a necklace, but I will be hanging that on my gypsy rod in the kitchen.
After the flew market, we got on our bikes and pedaled over to a community garage sale not too far away.  Another saucer for 50 cents.

This lamp was two bucks and just barely fit into my bike basket.  I will be changing the panels in that shade, either with a new paper design or stringing beads on it.  Put that on the "to do" list.


This was a real steal.  This stands about 12" tall and just about as wide and the little resin figures inside all came with it and it was brand new in the box for only $1.  I was just going to use the base itself filling the compartments with our beach finds, but for the time being I have the figures in it. 


We had to head home after this purchase because the basket was full and HWNSNBP had to carry this in a plastic bag. 

Hot as it was that day a couple of weeks ago, it was still a great morning fleaing and garage-saling.  We even discovered an old high school teacher from our home town as a vendor at the flea market.  My friend J had noticed a binder with letters in it in page protectors that had our hometown in the address line and upon closer inspection we realized that they were letters sent to politicians in the 70's by a teacher from our school district.  He happened to be the vendor selling these so we spent a little time talking and browsing through the book.  We're out of high school for several decades now and I know I would not have recognized this man had we not seen the address.  You really never know what you'll turn up at a flea market, even a small one!

Friday, August 12, 2011

Tag Card and Cupcake Stand


I promised this a while ago and had it queued up and almost forgot about it.  Wish I had a cupcake to show you how great this works. 

The cupcake stand is easy peasy.  You need a strip of cardstock 3" x 11" and you need to score it every
1 3/8".  Do mountain and valley folds across.  You can use whatever decorative punch that will fit inbetween the folds and punch it as you see in the picture above.  (I punched mine with the paper folded, but I caution you to take care not to force your punch with more than one layer of cardstock or you might break it.) 


Decorate as you like.  You will need a circle approximately 3" for the top.  I used a scallop circle die.  The pink circle is from the pennant die. 

I also used four 1" squares of paper in the top of the folded portion - half of it in the folds, the other half extending out so you could bend them down to accommodate the circles.  They were glued into the folded base and then I added strips of red-line tape on the top to adhere the circles.  (If this is unclear let me know and I'll try to take step-by-step pictures of another one.)

It honestly will hold a cupcake or muffin and would make a cute presentation on someone's desk at work for their birthday!

The card was done very simply with my stamping spots.  I just picked out some coordinating colors and stamped them somewhat randomly on the front of a tag-shaped card.  Then I used the same colors of ink to stamp the little flowers from Itty Bitty Pieces.  Before adding the ribbon, I used some of the leftover punched flowers that I had from the cupcake stand. 

Wednesday, August 10, 2011

PUBLIC SERVICE ANNOUNCEMENT FROM ME

I have learned a lesson the hard way and I would like to pass along what I've learned.

If you take your camera card to a store that has one of those machines that let's you print your own pictures or create a cd from what you have on your card, always make sure that you check that the pictures have actually been transferred to the cd before you leave the store.

Or at least check the CD when you get it home before you clear your camera card.  Don't wait two years like I did only to find out that the index card of thumbprints is all you have to show for your effort!

Thankfully, most of the pictures that I had on the CD in question I had already transferred to the computer, I just had to look very intently for them.  HWNSNBP knew that I was upset about this, but it was my own fault for not checking it sooner.  Oh, I had printed out some of the pictures that I wanted while I was doing the transfer originally and then I just filed the CD,  I remember that shortly after I had done this transfer I was in another store with another card and the counterperson actually suggested the checking to me at that time as they had had a few instances of CD failure.  You would think that I would have checked what I had at home, but not so. 

Hope this saves someone else some grief.

(There is another post for today.)

Gary's Gruffie


I had been wanting one of these Gruffies stamps and finally found one on ebay last month at a reasonable price for trying's sake.  I must say that there is a lot of effort involved in the coloring process, but I think it's well worth it.

Our school custodian is out on medical leave with his second knee replacement surgery this year.  He was in a lot of pain and now he isn't which is great news.   I'm always in a pickle about what images to use for masculine cards.  You don't want to have it flowery, but I think that these two sunflowers are being used in a clever way and not necessarily meant to be feminine. 

With the exception of the blue sky background, this image was colored with markers and blender pen.  I added the picket fence border punch piece along the bottom and a quick Thinking of You sentiment in green.

Just before school let out for the summer there was a bear sighting in the neighborhood.  It caused a little bit of commotion as we have students who walk home, but the bear moved on and everyone was safe.  Maybe he found a hammock somewhere along the way!

Jingle Belles 32 - Shape Up For Christmas

Shape Up For Christmas!  Okay, that's a good goal.  Gives me plenty of time to work on my............. oh wait, we're not talking work outs of the physical kind.  We're talking about shapely cards.  Something not your typical square or rectangle card. 

Our lovely hostesses Lauren and Steph have outdone themselves with their wonderful samples this week.  Please do click on their names above to see just what I'm talking about. 

I mulled over some ideas that I had for this challenge.  I actually had the pattern and a mock up started a couple of weeks ago for the star card that Steph featured, but it was not coming together in my head.  Then I thought about doing a telescoping circle card, but again, blank.   Finally, I had an idea......... not a telescope - a stack of blocks.


I took the actual stamp blocks and lined them up on the paper giving me my pattern.  Cut that out and then did some masking and then stamped each block individually with my Woodgrain background stamp.  Then, to delineate the lines between the blocks, I sponged on darker ink around the edges of each block.  The base of each block is slightly darker than the top, hopefully to give it some dimensional quality. 

The snowflake images from Serene Snowflakes were stamped onto each block with VersaMark and then embossed with White EP. 


To embellish, I used the fourth stamp from the set with the smallest snowflakes.  I stamped them in Crumb Cake on white cs and then used round punches to punch them out.  Then I layered a piece of SU baker's twine between two of the same snowflakes.  These were tied into the knot of Red 1/8" ribbon. 

This is one of those cards that really is prettier in real life - trust me. 

Now, I've got to get over to see what other shapes have been created.  You can join me here.

Tuesday, August 9, 2011

Teapot Tuesday 158


Hold on!  Hold on!  That's not a teapot.  Well, according to Cindy it might just be a teapot that's lost it's handle and spout.  You have to read her story to follow along with this one - click here

But let's cut to the chase.  This week's destination is a young man who lives in the Bronx, is going through some medical difficulties, likes dogs - especially golden retrievers, and is a Yankee and Giants fan.   Whew - how to tie that all together? 

Not being  a dog lover, I am limited on my choice of stamps.  Here I have the image from D is for Dog stamped to hopefully look like a golden retriever (with shorth ears I think!).  He is wearing his pinstripe collar as he too is a Yankee fan and no, you should not interpret this as the Yankees are going to the dogs even though they are in second place right now. 


The little Yankee logo was part of the packaging from a key blank that we recently had made into a key for our house.  Yes, we are Yankee fans!  And Giant fans too so aside from not being a dog fan, we have some things in common with our destination this week. 

I think I'm going to send him a picture with this card.  This is the picture that I took of Derek Jeter when HWNSNBP and I spent our 30th anniversary at the old Yankee Stadium. 

Okay, got the rest of the day free so I'm going to brave the steamy stamp sauna and try to get some projects finished.

I'll be visiting the gallery here later.  I'm sure there'll be tons of wonderful sights to behold!

Monday, August 8, 2011

Glossy Experiment

A reader asked a question about the card I previously posted................

"I've always wondered, and now can ask: WHY do you use glossy paper? I'm thinking of expensive photo paper that I'm not about to stamp on when I can use glassy glaze to add shine."


Well, lovely reader, in this instance I wasn't going for shine, though that is a bonus with this technique, I was looking to get the effect I wanted with the ink.

To show you what I mean I've done a little experiment.

First, I stamped the image - which is a lined image and not solid - in VersaMark on regular cardstock and glossy cardstock and then coated that with clear embossing powder. (Keep in mind, it's always much more of a challenge to do this in a room with a fan blowing on you!)


Then I used my heat gun to emboss the images.  (Have I mentioned that I stamp in my bathing suit now? )


Then I put a couple of drops of reinker onto one of my acrylic blocks and picked some up with my aquapainter. 


Without pretreating either of the papers, I applied the ink directly to the paper with the aquapainter first.  On the second image of each sheet, I first spritzed the paper with water and then applied the ink.


So you see the results below.  The first is not bad but streaky and yes, it does give a flat looking image.  The plain cardstock just soaks up the liquid and does not let it blend.


The water spritzed paper is terribly washed out.  Again, the plain cardstock just acts like a sponge.


The glossy with just ink is again, streaky.  The brush marks are not exactly the effect I wanted to achieve.


But this is the effect that I'm going for.  I tried to speed up the drying process with the heat gun and you can see the water marks a little where it was really pooled.  Normally, I would let it dry a bit more on it's own.   The glossy paper doesn't soak up the liquid allowing it to pool and the ink to blend with the water thus giving it a natural look.


The results side-by-side. 


So I hope, dear reader, that this will answer your question. 

Friday, August 5, 2011

Birthday Flower Fest Blossom


I made this card last month for my cousin's birthday and since I finally delivered it to her I can post it now.  I used the Flower Fest stamp set which I tried to do without, but I kept seeing such great cards made with it that I finally succumbed and ordered it. 

The image was stamped four times in VersaMark ink on glossy white paper and then embossed with clear EP.  I splurshed some ink mixed with water over each flower and gave it a chance to dry.  Then I cut out the four layers separately.  (If you're very careful with your cutting you can use the discarded piece for something else like .... this.)  I added dimensionals to each layer to give it a stacked effect and some depth. 


I think it would be nice to have some of these blossoms handy in various colors to slap on a card, or a bag, or envelope or tag.  If you stamped a whole page of them and colored them, then you could take the sheet(s) along with you to cut out the flowers when you go away, or when you're in a waiting room or the audience of a very boring meeting. 

I also got to use some more of the new products that I've recently purchased.  The center motif is backed with a strip punched from the new floral border punch.  The corners were punched from the new three-step doily punch and trimmed to fit.  I added some leaves in Old Olive and the pearls to jazz it up. 

I'm wondering if this stamp would work with my Fabulous Flower Angel idea (click here).  If I ever get the time I'll let you know!

Wednesday, August 3, 2011

Jingle Belles 31


This week we are celebrating a Blue Christmas as suggested by our guest hostess June Houck.  What does that mean - well blue should be the predominate color of our card and I think I pulled that off.

I used both Marina Mist and Night of Navy cs and I also got to use my new Memory Box swirly tree die.  I love those delicate swirls which I tried to compliment with the swirl embossed background.  Those are some MS punched snowflakes with sticky blue jewels.  The oval was cut using the Scallop oval die and embossed.  I didn't want those background swirls to disappear so I swiped some white craft ink over them. 

So don't be blue but come and see the other blue beauties here.

Tuesday, August 2, 2011

Teapot Tuesday 157


Cute, cuter, and cutest!  Aren't they though?  I don't know where Cindy keeps getting all these wonderful teapots, and I don't know how she keeps coming up with such intricate stories like this week's (click here), and oh, my gosh - her cards!  You have got to see her cards (click here ). 

I read the challenge and the challenge translation and I think I totally was off-base.  We were supposed to make cards in the colors of yellow, green, and blue and I thought that meant all one of those colors so this is what I did yesterday.............


I had recently received a package from an order I placed on ebay with The Guilded Bee Paperie haberdashery and in it was a sample of this bright green striped ribbon that I built this card around.  The bottle cap in the middle of the bow is actually a pin that can be removed and worn (oops, I forgot the Crystal Effects - thank goodness I haven't mailed it yet!). 

My intention was to make a card in each color of the teapots - green, yellow and blue and I was on a roll last night and then the heat got to me at about the same time that I dropped the multipurpose platform from my big shot edge side down on the instep of my foot - OUCH!  So I came downstairs to post my card and I looked at the gallery and realized that I totally misinterpretted the directions.  Everyone was making cards with all three colors, not just all of one color.  So I decided to rethink it and came up with this..........


I used the same stamp sets - Circle Circus and Rough Type but you can see the second one combines all the colors.  Strangely enough, the tissue paper trim also comes from that same etsy purchase.   It had a layer of red also, but I gently peeled that off to keep with the color scheme.

The letters for the word SMILE are attached to the trim with strips of paper that I folded like springs keeping them well above the trim, but able to flatten out nicely to mail.

This week our cards are being directed to an organization by the name of Hugs and Hope Club for Sick Kids.  If you click on the link that I gave you for the story thread you will get all the information about that club and maybe you'll decide to make a card to send to a child yourself.  (Aww, come on - you know you don't have to make a card to send a card!)

My card is going to a little girl by the name of Emalee in Pennsylvania, though I found out that for the next couple of weeks she and her family are staying in New York for some treatments for her illness and I'll mail it there.

So, are there any takers out there?  Takers to take the challenge of the Teapot and the Destinaton Station?  

Sunday, July 31, 2011

July 31 - Self-Portrait


This has been an interesting endeavor.  I have enjoyed thinking about the prompts and planning out my photos for the past month.  Thanks to those of you who join me here for seeing me through this and special thanks to those of you who commented. 

There is an August group and the prompts are listed here.  You might have to be a Flickr member, but there is no fee involved in that.  I am not going to participate this time as it will be a busy month at work and with our vacation during this time, I didn't want to commit to anything personally.  There is no formal commitment to participate in these things, and I think that I even learned that you really don't have to post a picture that you have taken that day as I thought.  I might do some of them, but I won't post here, I'll have them in my Flickr account.

I'd love to follow along with anyone if you decide to participate in August.  So let me know if you do.

Friday, July 29, 2011

July 29 - What You Did Today

I went through this pile of driftwood pieces that we have collected......................


Picked some choice pieces out...........................................................


Got a piece of scrapbook paper.......................................................


And made this to hang on the wall.


I also took lots of picture of birds this morning which I'll share later and I finished up a little paper project which will be shared later also.

Hopefully we'll get some real fishing in tonight.  I hear that the snapper blues are biting.