Pages

Tuesday, December 25, 2012

Christmas Memory

My father would do his Christmas shopping on Christmas Eve.   Included amongst his purchases would be our small Christmas tree and gifts for my mother and grandmother.


The tree had to be small in order to fit in our living room which also served as my parents sleeping quarters for much of my youth.  We lived in a four room apartment upstairs from my grandparents.  My two sisters and I shared one bedroom, my two brothers shared the other.  There was a kitchen that barely fit a table big enough for all of us and the living room with the pull-out couch.


The tree would be set up before our Christmas Eve dinner downstairs at my grandparents, the decorating to be left for after dinner.  Coincidentally Santa Claus always seemed to arrive downstairs just about the time we were finishing up the tree decorating.

He, Santa, always made such a ruckous.  We didn't have a chimney so he came in through the cellar door on the side of the house.  My grandparents and uncle would be so busy cleaning up the dinner dishes that they would always just miss seeing him run out the door to the next house.

 We opened our gifts on Christmas Eve.  There were ten of us altogether and it didn't take long but it took forever taking turns opening up the few presents we each had.  I remember looking forward to getting another Nancy Drew book that I could read over the school break.  I can still picture the yellow spines of those books lined up on the bookshelf.


I also looked forward to seeing the gifts that my father gave my mother and grandmother.  Each year, on Christmas Eve as I said, he would go down to the local drug store - Ruzycki's Pharmacy where they had a jewelry counter - and pick out a Christmas pin for each of them.  I seem to forget whether they were Monet or Trifari, but I do remember that they were the most beautiful costume jewelry and my mother and grandmother would wear them proudly to church the next day.


When my grandmother died in 1986, my parents still lived upstairs in that house with my two brothers.  It was in early December that she passed.  (My grandfather had passed away about three years before that.)  I remember the day because it was the day that we, our little family of four, were going with our neighbors on the annual Santa Claus steam train ride, only Christopher was sick so HWNSNBP stayed home with him and I went with Rachel who was just about three.

After the funeral we still went on with our usual Christmas celebrations and had our Christmas Eve dinner downstairs in my grandparent's house, which now was my parent's house.  My mother had one of her creative moments and set up a little 2-foot artificial Christmas tree on the telephone table in the corner of the dining room.  She decorated it with my grandmother's Christmas pins and some of her more flashy clip on earrings.  It was beautiful and unique and I wish I had taken a picture though it's as clear as ever in my mind.


Over the years, and more frequently lately, I have seen people using old costume jewelry to create wonderful framed pieces of art.  Keeping this in mind, along with the memory of my grandmother's jeweled tree, I found that I couldn't resist this summer, picking up a box full of clip on Christmas earrings at a church bazaar.  There were 10 pairs in a box marked 25 cents each.  What a start that would be for a tree of my own.


I put that box away and almost forgot about it until a teacher that I work with brought in a bag of some Christmas decorations that she was discarding.  Some people know that I have the crafting bug and like to offer me their cast-offs before they toss them.  I was thrilled to find a small, 12 inch tree in the bag.  I knew exactly what I was going to do with it.


Merry Christmas!

(pictures include TP Star ornaments made by one of our 4th grade classes, tea light ornaments made for our district office personnel, and a bookmark and candy made for the school staff)


Tuesday, December 18, 2012

Cards and Tags

 I haven't quite yet been able to get my daughter to join me in my stamping hobby.  Ahhhh, one day maybe.  But until then it is encouraging to know that she appreciates what I do (and also knows a good deal when she see's it, ha!).  Who needs to buy Christmas cards when you have a good source in the family!  She gives me her suggestions, her count (25 this year), and let's me get to work.  

We like the blues and cards that do not say only Merry Christmas because they are going to friends of other faiths.  Here are this year's creations.  The first one is based on one of the cards I did for one of the Jingle Belles challenges - the one held during the time around Earth Day.  I changed the position of the trees, used some clear EP on the bottom to better represent water, and used white torn paper for the snow as opposed to the foamy stuff.  The sentiment says "Merry Winter!"


This Peace on Earth card is more striking IRL.  The snowflakes are embossed on White CS and then I added one in Navy over the largest embossed flake.


In the center of that blue flake is a stamped and embossed representation of the Earth.  


I also had a stamping event last week.  Here's a sneak peak at my tag for the tag swap.


I'm frantically putting together some handmades for the ladies at work and the house is a messier mess than usual.  Why do I always get these bright ideas so late?????


Sunday, December 16, 2012

Thinking of................Who

As I sat down to post something yesterday I could not find the words to express the overwhelming sadness that has taken the place of what is supposed to be a joyful time of year.  I was reminded of the episode of Star Trek when Spock, a character who shows no emotion, telepathically feels the anguish of his fellow Vulcans who are on another ship that is destroyed.  Who now, cannot feel the anguish and heartbreak of these families and community that are suffering the horror of the situation at the elementary school in Connecticut.  We, as individuals and a country are blanketed in sorrow.  

I pray for those precious angels who lost their lives and their heroic teachers and administrators who sacrificed themselves trying to keep the children safe.  I pray for the children and staff who were there in the building, who witnessed first-hand, if only by sound the horror as it played out.  I pray for the families of them all whose hearts will be forever wounded.  I pray for the community in Connecticut.  For their loss of their loved ones as well as the loss of their peace.  I pray for the education community.  May we never have to be faced with another tragedy such as this.


The card above was created for a teacher in our school who slipped and was injured.  It was made with bits and pieces that I had left from the centerpieces I made for my son's rehearsal dinner.  It is a larger card - a full sheet of 8 1/2 x 11 folded in half, and I added four pages, book style, inside to allow for all of the staff to sign.  

Saturday, December 8, 2012

Remembering Ben Casey

I remember watching Ben Casey as a child but honestly, I can't remember any single episode to this day.  What does stand out in my mind is the opening of the show.


Dr. Zorba drawing those characters and explaining their meaning, for whatever reason, made a lasting impression on me.  I don't know if it was the artistic part of it or that I've always had a fascination with codes and symbols.  Something made it memorable.

While I was making two cards I needed this week, this kept going through my head because of the events that I was creating the cards for.  

First a birthday (our lovely mail lady at work who loves the color yellow), 


And then a sympathy for a former co-worker who just lost her mother to Alzheimer's.  Her mother was an artist and the co-worker has shared craft supplies with me that her mother no longer used or needed.


Both cards use the same stamp set - Betsy's Blooms, a new SU die set, and a couple of new embossing folders (non-SU) that I've recently obtained.

I wasn't sure about the color combo on the first one, but in daylight it looks prettier than here.  The  flower was stamped in Daffodil Delight and I used a Summer Starfruit marker to give some depth to the petals.  It's not as tedious as you think to add that little bit of oomph.  I also used a marker to highlight the "feathers" on the bird's wing.  

The second card blossom was highlighted in the same way - just a different color combination.  

One of the things that I did during our "storm recovery" was to use some scrap cardstock and make a sample of all of my embossing folders.  I did this for two reasons.  Well, three if you count keeping busy without power.  First, I wanted to have an actual example of the embossing on cardstock to aid me in choosing one when creating.  Also, if you notice in the two cards above (which I have not made samples for yet as I got them after we recovered) although I started with the same size paper, the embossing itself can cause the paper to appear to shrink in size depending on the pattern used.  

The card bases were the exact same size and so were the white panels before embossing, but if you look at the "frame" created from adhering the embossed panel to the base, you will see that it is slightly different.  This doesn't bother me here with these cards, however, if I were doing a different project that I wanted to be more precise, my samples could help me to see which ones might need adjustment in their measurements.  

Gotta run and get some holiday projects finished before HWNSNBP returns from his reffing today.  Hope you have a wonderful weekend!


Tuesday, December 4, 2012

Under the Tree

So I bet you thought this was going to be a Christmas post!  Gotcha.  

This is our black walnut that was knocked over by the winds of Sandy.  Mind you, HWNSNBP stands 6'1" so this root system is quite extensive.  Behind him you can also see the old cherry that was also blown over.


Here's the rest of the tree.  It has a slight crack running up the trunk.


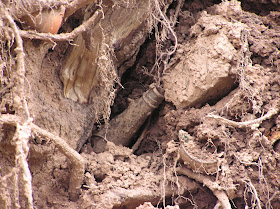
Now here is a closer look at the roots.   We bought this house when it was 40 years old and this tree was huge then.  We figure the tree to be close to, if not 100 years old.  There are all kinds of interesting things in that root system.  Bottles, jars, pots, cans.  It appears that it took root over an area that was used as a dump.  The tree is very near to the property line and when it rains heavily, that area sometimes looks like a brook coming down the hill.   So we think that people who lived around here may have filled in a natural stream.  


These are some of the bottles that HWNSNBP has pulled out already.  I'm looking forward to seeing what other "treasures" we might find.  


We've been told that the wood from this tree could possibly be of some value to a woodworker/furniture maker, so we will be looking into that before we cut it up.  The cherry wood is earmarked for his brother-in-law who likes to smoke fish and also has a fireplace.  

Sadly, there were so many trees blown over from that storm that seeing the root systems upended in yards is commonplace.  There are some areas where it looks like Mother Nature was playing dominos with them and what remains looks like dark headstones in a very strange graveyard.  Removing stumps is not an easy thing to do yourself or inexpensive to have done. 

As I drive to and from work - a mere 2.2 miles - the neatly stacked and layered branches and logs in front of houses has almost made it look like a rustic wall of sorts.  We are lucky that our township is picking this up.  In some adjoining towns it is the responsibility of the homeowner to transport it to a designated area and if you don't have a suitable vehicle for doing that, it only makes it more difficult.  

Utility companies have estimated over 116,000 trees were downed in NJ alone.  And I think they are counting mainly the ones that have affected power lines on the roadsides.   There were thousands more in parks and backyards.  

Monday, December 3, 2012

The Other Recycling Project


HWNSNBP was kind enough to bring me back hot chocolates on his trips out to wait in line for gas during our "storm recovery".  Looking at the corrugated cup wraps I was accumulating I wondered what I could do with them.  I had just gotten the Bigz leaf die and decided to use that to die cut some of them into leaf shapes.  Then it occurred to me that it would be nice to add some color so I went through the bag of recycling that we had and pulled out anything that had autumn colors.


There was a red pizza box, some cheez-it boxes, Stewart's orange and root beer soda carriers, a box from some wafer cookies, and others that I don't remember anymore.  I wanted to avoid the lettering so I chose the smallest leaf and set about cutting and rolling and cutting and rolling and cutting and rolling until I had a nice little bag full of the leaves.  

They sat in the bag for a bit because I knew that I would need to use a hot glue gun to use them however that might be.  You know I didn't think that I would be waiting that long to be able to use the gun and then when I could things like oh, Thanksgiving and pre-holiday cleaning  caused me to set them aside.

Finally last week I completed the project.  In my purging I found another piece of lightweight cardboard that was on some bakeware that was purchase quite some time ago.  Why I was saving that I do not know, but because it was already a circle with a hole, all I had to do was make the hole a little bigger.  


I kept to the recycling by using the brown shipping paper that comes in my SU deliveries.  I always fold it up and set it aside and have used some of it on occasion.  Don't worry, we have recycling every two weeks so I don't have an overwhelming pile of this stuff.  I don't keep it forever because I know I can always get more when the next order comes in.

What I did while it was folded was to cut a strip of about 3 inches from the end, ran that through my paper crimper and then used my fingers to make a gather along the center of it.  I added about 2 inches of hot glue to the circle about midway and kept doing that and pressing down the brown paper until it was completely covered.  Then I started adding the leaves.


I like the way it turned out (minus the magnetic clip).  Of course, it wasn't up for long because we're fazing out autumn and bringing out the Christmas/winter decorations.  I've already used some more of the brown paper that way on another project I might be sharing soon.  

Sunday, December 2, 2012

Advent Calendar and the Story Behind It

Back in 1986 we lived in a four room house on four acres.  We had already outgrown the house and were contemplating what to do when we were approached by a realtor who lived up the hill behind us to see if we wanted to sell off two of those acres.  It took a lot of talking it out before we decided to go ahead and instead of putting the money we would make into fixing up the house for someone else to buy, to add on and up for ourselves.  It was an eventful 8 months of that year between March and September.  

Things kind of fell into place for us in that my grandmother had recently passed away and we were able to move into her part of the two-family house that my parents still lived in.  The four of us slept in one room - HWNSNBP and myself in the bed, Chris on a mattress on the floor, and Rachel still in her crib.  It was cramped but cozy.    

We had hired someone to design the addition and do the framing and we did the contracting of the other work like plumbing, heating, and electric.  The finishing of the inside was done by HWNSNBP and his band of buddies who spent many evenings and weekends putting in the sheetrock and other various jobs.   There was still a lot of "finishing" work that had to be done when we moved back in in September, and truthfully, to this day there are still some things that have not been completed.  But we added out and up and made a comfortable home for our family of four.

Paging through a book or craft magazine (I don't remember exactly where) I came upon and idea for an advent calendar and knew that we had the basic ingredients in the scrap wood pile.


I asked HWNSNBP to cut me a piece of plywood leftover from the subflooring in a rectangle about 20" x 12" and some one inch strips of 1x4 in lengths to frame it.  I did a quick whitewash of the plywood rectangle and painted the frame red.  The tree was dry-brushed with green paint and no pattern in one try - I think I got real luck with that.  One more red strip of wood was needed for the ornament bar.  Tiny brass nails were positioned on the tree and ornament bar - 24 on each.

On the back it was dated with our names as co-creators.


And each year from then until 2002 we kept track of the kids taking turns to start hanging the ornaments on the tree - beginning with the angel at the top.


There was a store called The Pink Sleigh in a town nearby that had all kinds of craft supplies as well as finished Christmas decorations.  It was kind of like walking into an old candy store with bins of this and that and on top of one of the counters was a partitioned box that you could pick out the little "ingredients" for your crafts from.  I had the kids, then 3 and 5, help me pick out 24 of the little wood and plastic figures and at home I meticulously glued the gold thread to the top of each one so they could become ornaments.


They get all lined up on the ornament bar with the angel first and the Baby Jesus last (one of the nails has gone missing which is why everything is pushed over one for now).


On December 1st we put it up and begin by hanging the angel at the top.


We're not keeping track of who goes first any more as the kids have moved out.  It's basically who remembers first for the day that gets to put the ornament up now.

This advent season we are also trying something else that I had read about on someone's blog.  We're trying to do a Random Acts of Kindness Advent.  Beginning yesterday we will try to do something somewhat unexpected for someone each day.  Nothing really big or too expensive.  Just thoughtful.  For instance - donating a book anonymously to the library, or sharing coupons at the store with the person behind us, paying for the next person's coffee, or leaving a little treat for the mailman or crossing guard or co-worker.  We're still trying to come up with ideas, so if you have any, please feel free to share them - or perhaps, if not for the next 24 days, pick out a few days that you might like to RAK someone.  

Friday, November 30, 2012

Juice Carton Wallet


We had to purge the contents of 3 refrigerators after the storm.  We had tried in vain to keep the main refrigerator going with the generator we had, but we gave up on that when it got too cold to stay here.  Aside from the cold packs we keep in the freezer, I did not trust to keep anything else.  

Thankfully we had removed all bait (dead fish) from the freezer at the condo the weekend before the storm because that would have been most unpleasant to come back to.  One of the things that was in there was this carton of lemonade.  We don't usually don't buy drinks in this size carton at home and I had remembered seeing a project that I wanted to try with it, so I brought it back.  

As I sat in the kitchen here, trying to keep myself occupied and warm, I started going through some of the Gooseberry Patch Christmas books that I have which has nothing to do with this project except for the fact that I had printed up the pattern from the internet at some point and found it in one of the books.  That was a stroke of luck because I would not have been able to print anything from the internet without power.  So it was meant to be.  A Juice Carton Wallet.  You can find the directions and pattern here (click on the word "template" in the #1 direction not the one in the supply list).


I found I had to enlarge the hole slightly.  If you try it, be careful and do this a little at a time, otherwise the cap will not keep it closed.

So, I would probably use this to hold gift cards or business cards if I had them.  

There was another "recycling" project I started during that time I'll be sharing in a bit.  

Tuesday, November 27, 2012

Teapot Inspiration - MMTPT226


My friend Sabrina is hostessing the Teapot Challenge this week and she showed us this lovely Japanese teapot that was given to her by a friend who got it from a "sea-captain uncle of an old family friend" many years ago.  It is old and authentic and the inspiration for our tea party this week.  Isn't that China blue with the gold leaf beautiful!  I know this must be a very special treasure for her.  

We were challenged to make an Asian-influenced card and there were a few new "toys" that I  thought I could put to good use on this.  First and foremost was the new bamboo embossing folder.  I played with inks and sponges and my brayer, and then added some metallic pencil and shimmer paint.


Don't mind the schmutz too much between the bamboo stalks.  Just consider it some natural shadowing.  I inked the raised side of the embossing folder with Pear Pizzazz and embossed it on a panel of Marina Mist.  I really love the blue in the teapot and was trying to bring that out in this card.  The bamboo needed some extra braying after running it through the Big Shot and that's when the shadowing appeared.   I tried this a couple more times and believe it or not, this was the best.  I'm thinking that next time I will try gluing down the panel to a flat sheet of paper first because the embossing naturally puffs the paper out.  

This one wasn't too bad so I continued on and took a Prismacolor gold pencil and filled in the "stripes" on the stalks.  Needing just a little more reflection, I decided to go over the pencil with my gold shimmer paint.  When that dried I added the gold foil tape to the perimeter.  I think below you can see a little more of the shine.


The image from Asian Artistry was stamped in black Staz-on and then watercolored.  I used a gold gel pen on the edges of that panel.  The finishing accent was a gold metallic piece that has some dragons on it, to which I added some red thread.   The card base is Basic Black.

Since I had done some experimenting with the embossing folder I decided to use another one of the pieces to create the card below along with another new "toy" - my Memory Box bird die.  


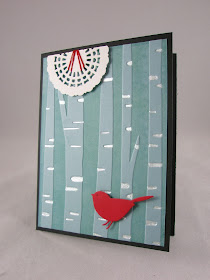
This time It was just blue on blue with white accents but this time the blue went on the debossed side.  The bird, as you can see is in red, and I found another experiment on my table - the die cut doily, or part of it, which I added the red string to also.  This doily isn't too frilly so I think it fits okay with the theme.  

I haven't been to a Tea Party in a while and I enjoyed doing this this week though I may not get this posted in the forum.  I have to get down to business with my Christmas cards which I have fallen behind on.  I'll still be sending handmade cards out this year, but some of them are going to be duplicates.  

We had about 2-3 inches of snow today which didn't start until right around rush hour this morning.  Had it started at 3 a.m. as predicted we might have had a delayed opening, but I was glad that they didn't decide to have an early dismissal because that's a nightmare for us in the office.  I was thinking that I could use a snow day to catch up on some things - with power of course!

One more thing - do you think this embossing folder could pass for birch trees?  May have to try that too.  

Edited to add - After looking again at Sabrina's blog, I realized that this last card had been inspired by her lovely creation.  She is quite a talented lady!

Monday, November 19, 2012

Candy Acorns


Candy Kisses
Mini Vanilla Wafer Cookies
Peanut Butter or Chocolate Chips
Peanut Butter (used to "glue" the pieces together)

With a little stretch of the imagination you have Candy Acorns that you can put out with your dessert for Thanksgiving or just as a fall treat. 

Sunday, November 18, 2012

Birds, Bag, and Tag


We wanted to say thank you to a few people who helped us out during our wait for power and I had colored these leaf images with the bird that I thought would be perfect for a fall thank you.  I used the Top Note die to create a gift card holder.   It is really easy. You start with a sheet of 8.5 x 11 sheet of cs and trim it to 5.5" longways.   Then score that in the middle at 5.5 and again at the 3.5 and 7 inch marks.  Fold it so the pocket will be on the inside and carefully place the piece onto the die so that the top will be straight across.  Once die cut, use a punch or a die to make an opening in the pocket portion and then some red tape to keep the top seam closed.  


And I promised to show you the goody bags that I added my punched pumpkins to.......


The bag included a small can of orange soda, a snack size bag of microwave popcorn, a pumpkin spice tea bay and some candy that I managed no to eat during our power outage.  Oh, and the punched pumpkins too.

Those tags were kind of a last minute addition.  I had just planned on tying them at the top, but they needed just a little bit more.  I stamped the fall bird wreath in VersaMark on orange cs and embossed with espresso ep.  Did the same on Daffodil cs but punched out the center bird and then popped that up on the wreath.  I daubered the edge with some more Early Espresso.  Not wanting to just punch a hole in the top of that I die cut some of the smaller tags from Two Tags in Cajun Craze.  Then I really wanted to add some texture but would you believe I do not have any burlap hanging around here!  So I took a piece of Crumb Cake and embossed it and tore the edge.  


I was really pleased with these and since this stamp set has a wreath for each of the four seasons you can bet that I will be doing this for them all.  

Saturday, November 17, 2012

Punched Embossed Pumpkins


You might think these look like some funny asterisks from the top.  But focused in the right direction you can see what they are (although I do apologize for the crummy photos - lights and photo tent were not available at the time).


I have spent much time perusing Pinterest and pinning things that are interesting and I think I could possibly create.  The thing is is that you fall into a hole of sorts.  At least I do.  I keep perusing and pinning and perusing and pinning and before you know it, that little bit of time that I have for "creating" has been spent in this gathering process.  

Not having power kept me from this process so I thought I would take advantage of the time and actually try some of the things that I had seen there.  I did use my iphone sparingly to check my Pinterest boards to find some of the things that I had pinned that would 1) require little electricity, 2) that used things that I had on hand, and 3) that would keep me busy.  

I had seen these little pumpkins on Pink Buckaroo Designs and thought that they would be perfect for Halloween and/or Thanksgiving as I was putting together some little goody bags which I thought I would be able to disperse on Halloween.  Of course we know that Mother Nature nixed that and they became Thanksgiving bags.  

If you clicked on the link to the blog I referenced you will see that she used hers for placecards and they are a bit different.  I simplified mine in that I used my 2 3/4" punch to punch out 8 circles for each pumpkin, my little leaf sizzlet and a strip of brown cs for the stem.  I ran the circles through the Big Shot using the wallpaper embossing folder and then daubered them to highlight the embossing.   I didn't score my circles, I gently folded them in half and lightly pinched the fold because I find the embossing leaves the cs a little fragile.  The circles were glued together with Tombow Multi which is quick adhering and made that process go pretty quickly.  


I rolled the brown strip around a toothpick that I had snapped in half and used red line tape to secure that.  I put a glob of glue on the exposed end of the toothpick and slid that and the leaves into the center of the glued circles.  They look pretty simple compared to the placecard holders that inspired me but I think they are still pretty cute.   

When I am doing multiples of things I like to work in an assembly line manner doing each step to each piece before I move to the next.  I feel that this makes the process go faster although that could all be in my head because I've never really taken the time to actually time it.  

How do you do projects with multiples?  Do you do them one at a time or assembly line?  

I'll be posting pictures of the finished bags soon.  I handed them out yesterday when our school had it's "low key" Halloween celebration.  Trick or Treating had been cancelled in NJ on Halloween and postponed to Nov. 5, but our town was still having issues with downed wires and dangerous broken trees and limbs so they cancelled it all together here.   Our school decided that the children could have their parties and get dressed for them since the homeroom parents had spent money on classroom craft projects and whatnot for the parties that were supposed to be held on Halloween.  It was a screwy day with all the traffic in the office - parents dropping off party treats and costumes and various other forgotten things.  But the kids were happy and the homeroom parents were happy that now they could "put Halloween away" and get on with the next holiday.


Tuesday, November 13, 2012

Getting Back to Normal

One could ask if there is such a thing as normal.  After a catastrophic event things change.  You may be extremely affected by it or mildly affected by it, but don't kid yourself and think that you are not affected by it at all.  Just like that butterfly that beats it's wings in the jungle and starts the hurricane the ripples keep spreading outward.

Many of us here in our town were without power as a result of the high winds from Super Storm Sandy.   Most of our block's power was restored on Tuesday - the eight day mark.  There were two exceptions, us and our neighbor.  We were unfortunate enough to have had to wait until the 12th day.

School had been cancelled for 6 days and during that time I was able to keep some warmth in the house by boiling water on our gas stove top and powering a little heater with the generator that we had the refrigerator hooked up to.  I had taken three large smooth rocks from outside and was heating them atop the heater and I would alternately put them in the pouch of my sweatshirt to keep my hands warm.  You could only feel the heat from the heater if you were within two feet of it, but the rocks on top really got hot.  When we shut the generator down, I took the three of them to bed with me.  They got shoved to the floor when they lost their heat.


In order to run the line from the generator into to the house meant keeping a door or window opened a crack.  We decided that it would be easier to close the gap in a door rather than one of our casement windows.  Strange as it seems, we had four brand new pool noodles in the laundry room so I took two of them to help with this.  I used a serrated knife to make a slit down the length of one plus a little more of another noodle and then coaxed the slit part over the edge of the sliding glass door.  We pushed the door as closed as we could get it.  I then took the leftover noodle and sliced that up into quarters and stuck it into the gap where the doors overlapped.  We have a board that I decorated years ago that we keep in the channel to prevent break-ins and this is what served as a lock for that door.


HWNSNBP was determined that we would stick this out and though we were offered hospitality by several of our friends who regained their power before we did, we only took them up on warm showers.  After school resumed, and with the evening temperatures dropping into the 30's it became too difficult to try to heat the kitchen.  And, if you can believe it, it became painful, at least for me, to sleep.  It wasn't trying to keep warm, it was trying to move under the weight of all the covers.  On good days I have to be careful with my hip rolling over.  So, when the kitchen temperature became the temperature that they said was safe for the inside of your refrigerator I told HWNSNBP that we needed to leave.  We headed to the condo in Barnegat where power and cable service had been restored earlier in the week.  HWNSNBP could telecommute from there.  

I have posted pictures in the past of the public dock that is across the street from us there similar to this.


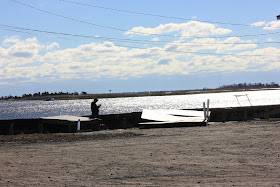
The figure on the right is HWNSNBP fishing.  There will be no fishing at the dock now.


There is my fisherman standing along side the bulkhead and you can see some remnants of the dock.  Most of it was heaved by the water and a lot of it wound up on and around the condo property.  


The picture above is the back of the condo property and midway up on the right side you can see a section of the dock that got washed over.  You can also see a lot of the debris that was accumulated there.  Under our unit the water had rushed with such force that the tall grass was flattened.  Standing upstairs in our unit, when I look out over the refuge there are large areas where the grass was flattened and there are large pieces of homes and belongings strewn about.  It is not really safe to go out and try to retrieve them because of what is under the grass, or rather what you don't know is under the grass.  Boards with nails or ditches could cause injury, so we were careful not to venture too far into that area.  

From upstairs we saw this blue heron standing in a patch of that flattened grass.  I can imagine that he's thinking that he doesn't know this place.


As he flew off you can see the scattered debris in the immediate distance.


We were down there the first Saturday after the storm with some of the other residents to clean up the property.  At the time we were still without power.  If you looked out the front towards the dock you would see the debris being piled up in the parking lot.  When we got their on Friday the pile was even bigger and the machines were constantly moving. 


The dumpsters were lined up and as they were filled the dozer would slide them across the parking lot.  Oh, it was noisy but necessary.  You see that tree near the water below?  The dockmasters shed used to be between that tree and the boat ramp.  They have no idea where it ended up.  It could have broken up and be behind us or it could have been sucked back into the bay by the wind.     

That blob above and to the left of the tree is a boat that must have broken free from some marina and came to rest on that island.


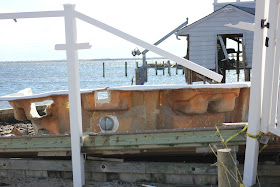
My friend J and I took a walk down the street towards the bay beach around the corner.  The condos that were on the water there were very seriously damaged.  This is a view of the boat slips in the back.  There used to be a boardwalkway there.  We don't know where all the boats are.  They could have been pulled out of the water by the owners before the storm, floated away or sank.  We just don't know.


These units on the street side had damage also.  And in this picture you can see where their built-in pool was heaved right out of the ground.  And the shed was ripped apart.


There was a private fishing pier there also.  Not any more.


The thing (I don't know what you call this wooden wall in the water) that the birds like to perch on didn't appear to have much damage.


But as we continued down the road we stopped at the bay beach because there was a wire down in a puddle and even though there was no power, we didn't feel it was safe to continue.  You can see the shed that rammed into the little gazebo which was pitched up itself.  Further down the road you could see things that had been dumped by the water in the refuge.  In fact, this Saturday we noticed a complete shed had been transported there.  


It was so sad to see all the possessions out on the curb and houses that had holes in them or were missing parts of their roofs.  We lost our pool fence and the cover was ripped.  There was some damage to the pool shed, but all in all, we got off pretty well.


We have learned that we are not prepared enough for a disaster like this at home.  Even though pre-storm warnings said power outages could be in the 7-10 day range we never thought that it would be that long and look how much longer we actually did have to wait.  We McGyvered some things but need to make a storm kit.  We did not have enough batteries, a battery operated radio, nor did we have enough gas cans to make HWNSNBP rest easy.  (Did I mention that 12 counties in the State of NJ were on an odd/even gas rationing program which was just lifted this morning.)  We do not have a safe way to hook up the generator to our furnace or well and this has to be taken care of soon.  We had bottled water for drinking and cooking and used buckets of water from our above-ground pool for "flushing".
I would have loved to have had 6 days off from work with optimum working conditions at home, but the sun didn't cooperate with enough light or heat to make it comfortable enough for me to work in the stamp cave.  Whatever I worked on had to be brought to the kitchen table.  I'll show you pictures of what I worked on soon.

Trust me when I tell you that what you see in my pictures is mild compared to what has happened elsewhere.  You have to be a resident of the areas that were hardest hit and to be quite honest, anything that I have seen, I have seen through facebook postings as my iphone was my only connection to the world without power.  I can tell you that the place where my son got married last month is still stands but the dune that was the backdrop for their ceremony is gone and the whole first floor including the reception room and all of the hotel rooms were underwater.  Our childhood haunts at the Jersey Shore have been devastated by water, wind, and fire.  It is truly heartbreaking to see.

We are lucky to have only been inconvenienced 12 days.