Pages

Sunday, April 29, 2012

April's Special Days

This month has been chock full of special days.  Easter, Earth Day, Administrative Professionals Day, and several birthdays some of which I haven't posted yet.

Let's start with some thank you's for gifts I got for my birthday last month.  I've been trying to both use what may have been "laying around" my workspace and some new things that I haven't yet tried.  

This first card uses an embossed background from Spellbinders that I had not yet opened as well as the die cut leaves.  The flower and circle were remnants from previous projects.  I did the inked embossing folder technique on the circle with the houndstooth embossing folder.


For this next card it was a matter of using a couple of new stamp.  The hedgehog is a Penny Black stamp that I had won on ebay and the sentiment comes from one of the SU Salebration sets that I had not yet inked.


Can you tell that I had a bunch of these Marina Mist butterflies on hand?


My future daughter-in-law celebrated her birthday this month and her favorite color is green.  I love this daisy die and am I still planning to use it forever even though it's retiring soon.  The light green pieces were again embossed - I know it's barely visible.  I had used one of the framelits dies and cut it in half.  The background was stamped with VersaMark ink using a stamp from one of the hostess sets (sorry, I'm not near my stamp cave at the moment so I can't look it up). I added one of the new Summer Smooches brads for the flower center.


My friend Sabrina has an April birthday.  This card went to her and I'm ashamed to admit that it got posted late.  The stamp was a new one as was the viney die.  I cut out the "window" opening on this and there was a lot of fussy cutting for the bird and the flowers, but I really like the 3-D effect it has.  The flower centers were made by chopping up the So Saffron cs very fine and adding them to the flowers.  I color this little bird to resemble the little robins that visit Sabrina in Ireland.  


I finally got out my new sewing machine and put it to use to make this bag.  The fabric squares were cut with the scallop square die and layered with batting.  I had found this "pack" of fat quarters with the birds and knew I had wanted to do something with them together.  I have a similar bag that I got at a stamping event and I use it to store all my adhesives in at my work station.


I also sent her one of my bottle cap pin cushions.......  These aren't SU fabrics but some that I picked up at a  quilt shop recently.  I got adventurous with the floss accent on the felt.  The strands of floss were in a bag that I had picked up at the White Elephant sale last year and were tied together - I think someone had been making bracelets with the floss - anyway, they looked so nice together that I just kept twisting them into a rope and stitched it down with a single strand of floss.  


I tucked it inside this little box which was made using the new bitty purse die altered to make a box.  Again I used one of the Summer Smooches brads on the little daisy.  The fabric bag and it's goodies were wrapped in another patterned fabric from that bundle - you can see it in the background. 


Yes, a busy month, but a very creative one too!  Two more days till May!

Wednesday, April 25, 2012

Administrative Professional's Day

AKA Administrative Assistant's Day, AKA Secretaries Day - by any name, a day that allows you to be thankful to those that are the most helpful to you in your workplace.  Think front office, reception, dispatch, etc.     Wherever you work, or for that matter wherever you encounter someone who takes care of your clerical needs there is someone who you can give a little thanks to today.   I have one of those jobs, but I am not alone in what I do.  I work with some amazing and caring ladies who are part of my support system.  For them I did this...........


These little boxes were filled with four very thin pizzelles - two vanilla and two chocolate with a touch of cinnamon.

To begin with, the containers were recycled.  I've been eating this cheese and saving the boxes for about a year now (the wedges are only 1 pt. a piece if you're doing Weight Watchers and they are good on crackers as well as vegetables).  I carefully removed the paper label on the top and sides and covered them with some DSP that I thought was pretty appropriate as it had letters and numbers on it.


I also took out a tool I have and used it for the first time - the Circle Cutter and Glass Matt.  The top of the box was larger than any of my circle dies and I did not want to have to cut them, so out of the box came the circle cutter.  And it was pretty simple to use.  I ran the side strips through my Xyron so I didn't have to worry about messy gluing.  I didn't bother to remove or cover the label on the bottom.

The typewriter image has a piece of paper in the bale and onto that I used a Just-Rite stamp to add the wording.  I used some cs to make a little folded triangular piece (which I apologize I do not have a picture of) and put that under the paper and bale to raise it up off the box a little.  The finishing touch was adding a die cut daisy and some punched petal leaves.


So here they are waiting to be packed.  (I had to use a rubber band around the box so they wouldn't accidentally open and spill the contents - those pizelles are very delicate!)


To get them delivered to the ladies, I took out some cookie tins and carefully put the correct number of boxes in for each office and sent them with the Interoffice Mailman today.  Gee, maybe I should have saved him some cookies too.  

B to B's Become F to F's


Over the years I have made quite a few Blog to Blog friends from literally, all over the world.  But this week I got to meet one of my B to B's and made her an F to F - Face to Face friend.  My friend Michelle from Denver was out here on the east coast for work and happened to be be staying in New Jersey with her aunt about an hour away from here.  How could I not jump at the chance to meet her!  This really was exciting.  

So I drove out to her aunt's framing shop (Glen Roc Framing) in Ewing.  I will say that I couldn't help but feel a little nervous as I got closer to the shop, but my nervousness was swept away when I got such a warm welcome.   They were both so easy to talk to and we really had a good time.   The shop itself was a place that lent itself to our "creative" chatting.  The atmosphere was so comfortable even with the occasional customer coming in.  It was fun to see the interaction and to talk about art in the presence of art.  

I think Michelle and I could have talked for hours.  I am so glad that we got this opportunity to meet in person.  I'm beginning to think I may have to plan a different kind of Blog Hop and start hopping around to meet my B to B's because this was sooooo much fun!  

Look at the beautiful necklace that Michelle made and gave to me.  I will surely treasure it as I will this very special get-together. 


Sunday, April 22, 2012

Earth Day and Birthday

First a little recycling project.

These are the ingredients - floss, felt scraps, leftover fabric circles, batting, bottle cap


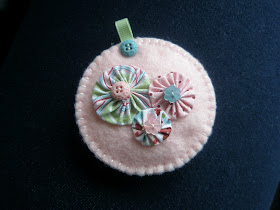
Take the felt and floss and blanket stitch them together.  Make yo-yos out of the circles, the smallest one filled with batting.  Layer them together.  Add remaining batting to the bottle cap.


Insert the cap into the felt and then whip stitch the yo-yos to it.  Add some decorative stitching in a contrasting color.


And you have some sweet little petit four pin cushions.  


And for my friend A whose birthday is on Earth Day - Happy Birthday!

Friday, April 20, 2012

How Far is it to New Zealand?

Maybe I should ask SIRI that?  Hold on - SIRI says................oh forget SIRI.  I know it's halfway around the world from here.

Well, getting a package from halfway around the world is what I call a special occasion and I had the good fortune to have one such special occasion recently.  My friend Sunshine, who lives, creates, and blogs in New Zealand sent me this adorable card and some of her "peg" creations.


Sunshine really liked the little pig that I sent her for Pig Day and treated herself to the die and stamp set and look at what wonderful results she got.  This is so cute.  I'm loving the wings too!

And below you will see the fruits of her crafting.  She sent me this lovely assortment of what she calls pegs.  They are made with what we call clothespins that are covered with decorative paper and then embellished.  She had a great idea to use them too - to hang cards she receives.  I think I will do that too - as soon as I get the craft room organized!


Thank you Sunshine.  You really did make me smile with both the card and the pegs!

Wednesday, April 18, 2012

Jingle Belles 2012:08b - As I Promised


As promised, here is my second card for the Jingle Belles sketch challenge.  (The check engine light went out in the car, and they said to wait until it happens again so I had a little more time to finish this up today.)

I took my inspiration from the star in the sketch and the stars in the sky on the stamped image.  The background was made by punching out a bunch of stars and running them through my Xyron sticker maker and adding them to the card front.  (Can you tell that I really love this Marina Mist color!)  

I've also been trying to tap into some of the supplies that I've accumulated and haven't used much or at all.  For this card that would include the stamped image which was in the $bin at Mike's this winter, and the nestabilities die.  I actually have an embossing folder with stars on it that I had tried to use, but the stars were  a little to, shall we say, orderly and I wanted a more random pattern.  

The image was heat embossed with SU's pewter embossing powder and looks much nicer and shinier IRL.   I tore down the edges of the Bashful Blue and Night of Navy cs just because.  

I'll be visiting the rest of the Jingle Belles a little later to see the wonderful creations for this challenge.  You can also view them by clicking here.

Tuesday, April 17, 2012

Jingle Belles 08a - Twas the Sketch Before Christmas

Our guest hostess for this challenge is Amy Tsuruta and she came up with this great sketch for us to use.


I had parts of this card made for a previous Jingle Belle challenge which I fell behind on.  (It was the one with the neutral pillow prompt.)  So, adding a little bit of color and turning the sketch on it's side, here's my first card for this challenge. 


I inked up the embossing folder again for the background.  The swirly band is a new Memory Box die that I was dying to use.   This color combination is one of my favorites.  I could see making multiples of this.  (Hey Rachel - what do you think about this for your cards this year - just askin'?  Lovya, Mom)

I promise I will try to get the second one posted asap, but I think I might not make the cut-off tomorrow because my check engine light is on in the car and we have to take it in right after work - but I'll try.

Sunday, April 15, 2012

A Drink of What?

When HWNSNBP and I went to the Philadelphia Flower Show last month we saw some cute things in the vendor area however, some of the prices we thought were astronomical.  There was one thing in particular that I thought I could recreate for much less.

You take some little potted succulents (approx. $3 each)


Then you get a martini glass from the dollar store ($1) and some colored pebbles ($2-3 dollars a bag with a 40% off coupon at Mike's) and fill the bottom of the glass with the pebbles.  


Or you could splurge a little on a $5 terra cotta mini planter.


Add some cactus soil (approx. $3) and the succulent on top of the pebbles


And then add a layer of the pebbles over the soil.  Tah Dah!


A succulent parfait - prettier and much cheaper than the $16 price tag that we saw at the flower show!


This one's a little more mediterranean looking I think.


And if you happen to have leftover or other colored stones or crushed shells and more $1 glasses you can have a party!


PT Thanks

I recently finished up with my physical therapy.  I've graduated to the Wellness section which allows me to continue with my exercise routine without the benefit of the physical therapist (PT) but under the supervision of an exercise physiologist.  My PT helped me to learn how to stretch correctly and rebuild the strength in my hip with her hands on care.  She gave me an exercise routine for both the gym and at home that I continue to do.  The rest of the staff scheduled appointments, helped set up machines, got me equipment, made sure I was staying on the right track while I was completing my routine at the center.  The Wellness will help me to build on that and continue to strengthen my core to help with the pain that I still have from my spinal stenosis.  

I wanted to thank the staff for all the wonderful attention that they gave me during my pt so I made a card for the PT and a box of pizzelles for them all to share.  


I covered an envelope box I had brought home from work with wrapping paper and made some rolled roses out of the scraps and punched some flowers out of the brown packing paper that Stampin Up ships with.  They were just scrunched up and set in between the roses with a hot glue gun.  The tissue was actually  leftover from some that I had put through the shredder at work to make basket filler for some other project. I just stacked the cookies in plastic bags and added a bow to the twist ties.  The one on the right also has a tag with the ingredients listed and a little note from me.  

I am going to try to make a wreath out of those punched flowers - some time in the near future.

Thursday, April 12, 2012

Felt and Yo-Yo Key Chain

Last month at our stamping group gathering we had a little swap amongst ourselves and I made these little key chains as my swap.  I was challenging myself to come up with something using the Stampin Up fabric and using some of the other "stuff" I had on hand.  I found some felt and embroidery floss and some batting and thread and set to work.  


I started by using the circle die to cut the two felt circles and a piece of batting.  This batting, by the way, was the cast off of a project that we did a few years (yes, you know I am a saver!) ago at a stamp workshop.  It was from some specimen frames that we made into shadow boxes.  Everyone at our table was throwing away the batting because we didn't need it, and I couldn't just let that happen. (If I only had time to use all the good throwaways that I've rescued!  I promise, I've been trying to purge.)


I used the white embroidery floss and the blanket stitch to sew all the layers together, making a little loop with the ribbon and catching it in between.  I secured that area by sewing two buttons to the front and back. If you had a sewing machine that worked (my new one is still in the box and waiting to be set up) you could quickly sew this together, or if you're not a sewer at all, cut the batting a bit smaller than the felt and use some fabric glue to attach the felt layers.  You could also use an eyelet in place of the ribbon loop for your metal key ring.


Out of the designer fabric I used the many circles die to punch out my circles.  I chose to use the largest of them for this project.


I know it seems tedious, but making yo-yos is really simple.  You just knot your thread (I use quilting thread) and make a running/basting stitch all around the edge of the circle and then pull and knot.  For these, I knew that the centers would be covered by buttons so I did not mind the raw edges.  If you are not adding buttons, you can fold over the edge of the circle (finger pressing helps with this) and then you have a nice finished yo-yo.


I sewed the buttons to the centers of the yo-yo's and then sewed the yo-yos to the felt circle.  You could also glue them, but since I already had the thread out and didn't want to move it was the simplest way to go.  The last step was to add a metal key ring to the ribbon loop.


This could be a keychain, or a luggage tag, or zipper pull for a child's backpack, or it could just go in the drawer and sit there until it's time to clean out the drawer and you wonder - where on earth did this come from!  Come to think of it, if you added a bit of lavendar in with the batting it might make a nice sachet for the drawer or hang it on a hanger in the closet.

Wednesday, April 11, 2012

From Pig to Elephant

Sounds like a magic trick but it's not really.  I had promised to show how I had decorated my pig in the Pigs on Parade post and I finally got around to putting something together.


I couldn't believe, as I was finishing up my pig last month, that I failed to take pictures of the steps as I was decorating it.  Bad blogger!  Usually, even though I may not decide to post, I have been trying to photo document my work, even if it's just for my own future personal reference so I can recreate something.  I guess I was just too much into the experimenting part, not knowing if it would turn out the way I wanted that I just forgot all about the camera.

Well, I happened to have another little (and when I say little, I mean smaller than the pig, can you believe!) papier mache animal - an elephant.  This I picked up in the clearance bin at Mike's for a whopping 20 cents!

Here it is - standing on an empty yogurt cup to give you an idea of the size.


And here are the steps..........................................

I gave the original papier mache elephant 3 coats of white gesso.


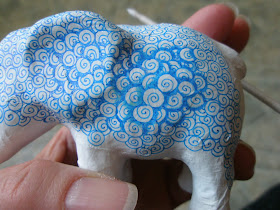
Then, using a Sakura Micron blue pen I started drawing spiral circles.  You start with one complete one and then add from the back the partials.


Once you fill in a little, start another section the same way.  The spirals that are drawn first will be the foremost when shaded.  I did the same thing with the wings that I drew on the pig, starting with one wing and then adding from behind.  The difference with that was the pattern that I chose.  The wings had direction which I think gave them more dimension than these spirals.


Once I had enough a bunch done, I got out my Prismacolor pencils (not watercolor) in a similar shade of blue and started defining the areas to be shaded to give it some depth.  I found out very quickly that since this pattern, and the whole of the elephant, was very small, that not a lot of penciling was necessary.  Just a light line.


You can see that just the pencil alone starts to make the pattern pop a little.


To blend the pencil I use some odorless mineral spirits (oms) and a paper stump or tortillon.  I just dip the end of the  stump into the oms, being careful not to make it drippy, and then go over the pencil line.  


The more that you move the stump over the line, the more the waxy pencil mark flows.


Hopefully you can see some dimension of the drawing here after the blending was done.  


I got tired of this little pattern and added some others around the rest of the elephant as you will see below.  I even left some of it white and blended another lighter bluish turquoise into those areas.


I almost forgot - I added a couple of light coats of a spray fixative.  I use a matte finish which I think gives it just the right amount of sheen and enough protection from fingerprints and smearing.

Hmmm, I think I have a little papier mache giraffe around here - maybe he's next!