Pages

Tuesday, June 30, 2009

Teapot Tuesday 53

When I saw the teapot of the day I knew pretty much what it was that I wanted to do today. I actually pulled Cindy's glob up at work (shhhhh, don't say anything!!!) and started planning in my head. Since school is not in session now I was going home for lunch and I thought (silly me) that I could get this done during my lunch break. Well, it almost happened.


I fixed my lunch and while I was eating I was collecting my supplies. The stamp I wanted to use was upstairs, so I ran upstairs (well, not really - let's say I moved as fast as I could up the stairs) and then went over to the stamping table (my dining room table) and got out the colors of paper and markers that I wanted to use. Then I ran the paper through the Big Shot with the oval scallop die.

Since this image has to be colored with markers it does take a little time - tick, tick, tick. I colored the stamp, huffed, and stamped. Then I ran the image through my paper crimper. THEN I decided I didn't like the way the blue flowers looked - tick, tick, tick. So I decided to throw everything in a bag and take it back to work with me and finish (no one else was in the office today - remember I said SHHHHHH!)

When I got back to work and sat down to finish the card I quickly realized that I had forgotten a few things........... like the paper crimper and the mat pack for the paper piercing. This is when it occured to me that I would have to improvise if I were to get the card done. You'd be surprised what you can use in the place of something else (and what money I could have saved by using these makeshift tools) (Hey Dana - are you reading this?).

I recolored the image and stamped it again. The blue is still not quite right, but better than it was the first time. The little butterfly is actually two half butterflies glued together at the body. I stamped each side separately, cut them out and then glued them together. Just a little hint here if you do this - take your marker(s) and colored the white edge of the image after you cut it out - it blends in so much better that way!

I work in a school, so there's lined paper available. I took the lined paper and some post-its and was able to use the lines in the paper as guidelines for the scoring (since I forgot the crimper). I had a metal ruler in my desk and a letter opener which doubled as a bone folder. Putting the paper on my mouse pad gave just the right resistance for the scoring. I did one side of the image and then turned it over and recentered the lines so that when I was done with both sides the paper would have hills and valleys (like it would if it were properly crimped).

Then I got out a push pin and my mouse pad and did the paper piercing. Next was the bow. I didn't like how bulky it was when I tied it normally and just wanted to gather the center. I did have some white cotton string in my hand and then remember the brass brads. I took a brad and trimmed the ends before I opened it as wide as I could without breaking the ends off. Then I wrapped the brad around the gathered center of the bow.


Everything was taped and glued in place and I was happy. I had to wait to get home to take the photo. This was delayed even further because I had a haircut appointment right after work. Then when I did get home I got involved in something else that needed my attention.

One of these days I'm going to be able to get to the tea party on time!!!

So - you stampers out there - what do you think of my tool improvisation?

Oh, btw - the image is Pretty Petals a retired SU background stamp and the colors are Rich Razzleberry, Melon Mambo, and Whisper White paper. The flowers are colored with Garden Green, Ballet Blue, Rich Razzleberry, and Melon Mambo markers. The ribbon is polka-dotted Melon Mambo grosgrain. It's all SU except for the brad.

May I Have Your Attention Please

Just wanted to let you know, if you have my e-mail address in your address book, it has changed. You can click on my profile at the left and once you get to that page, it's listed on the left under "contact me" or something like that. (If you can't find it, leave me a comment and I'll make sure you get the right info.)

We had FIOS installed last Friday and after working the kinks out (several return visits by several service technicians) we think we've got most all of it worked out.

I can tell you that the HDTV picture is better, the internet is slightly faster than the cable hook-up we had, but there's still a minor glitch with our telephone answering service which should be resolved today. All this will be worth it, however, as it looks like we'll be saving $100/month (more craft money?) guaranteed for the next 2 years.

Now that all that nonsense is over, I'll be posting again real soon.

Friday, June 26, 2009

Friday CPR 6/26 - Solitaire?

To view my Friday CPR post for 6/26 - Solitaire? click here.

Thursday's Throw Aways - Week ?

Taking a break this week - too much chaos. Will be back with a new Thursday's Throw Aways post next week!

Tuesday, June 23, 2009

Teapot Tuesday 52

It's been 52 weeks of teapots. I've missed a couple, but if I hadn't, I'd have a full deck of cards! This gorgeous teapot came straight from England to our hostess. This being her Teapot Anniversary, Cindy decided to use this wonderful teapot as our inspiration this week. In her story, she tells us that we've been invited to have tea with the queen this week. Please do go check out her story and her fabulous castle card on her glob. You just can't miss this one!

I started reading the comments on some of the cards in the Teapot Tuesday 52 Gallery on Splitcoast and there are some stories flying around this week that are so funny and so clever. Not only do these ladies come up with their beautiful creations each week, they laugh and cajole one another. And one of them even made a special 3-D teapot with all our pictures in it for Cindy's anniversary. So cool!

This has been so much fun participating this last year in these challenges. Thanks Cindy for inspiring us all.

So for my contribution this week, and in honor of our tea with the queen, I made a crown (that also is a box) for our fearless leader. I vaguely remembered seeing this box over a year ago in the Splitcoast gallery and after I did a little searching I found it and was pointed in the right direction for the template. This is a creation of Jan Tinklenberg and you can find the template and directions on her blog (look in the left column under My Templates and Queen for A Day Box).
I used Glossy White cardstock for my crown to resemble the white porcelain of the teapot. The top of the crown is a piece of pattern DSP from the pattern pack. The very top of the crown is a clear bead from the Pretties kit held in place with a clear seed bead and some wire. The "flower" jewels are stick-ons that I found in the $ bin a Mike's a while ago.

So, what do you think I should put in this Queen for A Day Box?
Psssst - don't forget to go over to Cindy's glob and wish her a Happy Teapot Anniversary!!!

Sunday, June 21, 2009

Catching Up

I know I haven't posted much lately. It's the busy time of year at school, believe it or not, and I've had some personal projects to attend to at home. Mostly I've been trying to take advantage of the cooler weather on dry days to catch up with the weeding! We have had so much rain lately that it's been hard to find those days, so when they come, I really feel I need to take advantage of them.

But, I have been stamping and trying to keep up with my challenges and weekly posts. I just haven't had time to post them all. School will be done in two days and, although I do work through the summer in the office, I should be able to share more in the near future. So thank you for your patience.

Psst. Wanna see something new? Look here. This card I made for my co-workers b'day has all new SU product. The card base is one of the new In Colors - Rich Razzleberry. I hope your computer screen does it justice because it is the purple that I know I've been waiting for. Not too blue and not too red - just right Goldilocks!

The little scallop edge you see is another In Color - Melon Mambo with some punched dots of Crushed Curry. Two more colors that you'll be seeing a lot of in the future.

The patterned paper is called Razzleberry Lemonade and I noticed with this patter particularly that it almost looks 3-D when you stare at it with 350 magnifiers! Of course not everyone does that - just sayin it's pretty.

And the stamped image itself is from the new set called Razzle Dazzle. And the coolest part of this is it's colored with markers - new IN COLOR MARKERS!!!! (Except for the green which is Old Olive). This is something that SU demos have been asking for since they introduced the In Color business a few years ago. They come as a set!

Oh, and don't let me forget the ribbon - new In Color Polka-dotted ribbon to boot!


Now this card was quickly done last weekend for my daughter who needed a wedding card to send to a friend's wedding. The base is Pink Pirouette and the vellum was imbossed with the Manhattan Flower embossing template. I stamped the sentiment from Happily Every After on top of the vellum and then adhered the vellum to the background with red line tape at the top. I added the MS scallop heart punch at the top to hide the view of the tape through the vellum. The ribbon also has red line tape on the back to help stabilize the vellum piece.

This embossing folder is great for quick elegant cards.

Friday, June 19, 2009

Friday CPR 6/19 - End of the Year Circus

To view my Friday CPR post for 6/19 - End of the Year Circus, click here.

Thursday, June 18, 2009

Thursday's Throw Aways - Week 15

My daughter visited us last weekend. When she left, I found this shampoo bottle that she had thrown away. I love the color (I think it looks like the new In Color Melon Mambo).

Of course it had labels on it but that was a plus. Sometimes the information is printed directly onto the plastic and you can't do anything with it. In this case, the labels were pretty easy to peel off. There was some sticky residue that needed to be removed. I remembered reading somewhere the WD-40 works on labels, and guess what? It does!

The next step was to cut the bottle. This was pretty easy also with a pair of craft scissors. I left the long sides intact to get the most usable area.

I used my Big Shot and the Butterfly Die to punch out these butterflies. It cut very easily.

I gently folded the butterflies in the center (where the body would be) to give them some dimension.
On the larger one I added some sticky pearls and half pearls from the Pretties Kit after I had punched a hole with the Crop-a-dile. I intended this one to be a plant poke (and it still could be). The 14 guage wire was pretty malleable (sp.?) so I curled it on the bottom so the butterfly could stand on it's own for picture purposes. I made a little loop on the end where you see the bow.

The smaller butterfly found it's way onto the end of stick pin. Another little recycling note here - the wire used to hold the stick pin in place and to make the antenna was from a twist tie.
I think the stick pin will make a very nice accent to a card or 3-D project in the future. Of course, it could also be worn.

You can see from the last picture that there's quite a bit of sparkle to this plastic. IRL it really looks pretty. I'm going to have to keep my eyes open for some other plastic bottles that could be used this way.

Tuesday, June 16, 2009

Teapot Tuesday 51

Okay. I'm going to warn you. This is some strange looking teapot. So strange in fact, that it has been referred to as butt ugly. All in jest of course! I've looked and looked and looked at this today, and I just can't quite figure out what that peach thing is. Is it the big belly of that Asian fellow? Is it a giant oriental fruit? Is he holding his pet pig and all you see is the pig from behind? Beats me.

Our hostess Cindy has come up with something quite, er, different. Check this out. I think she's been focusing on bellies a lot lately! First we had belly dancers and now sumo wrestlers! Happily, my belly looks a lot less like this one. I've lost 30 pounds since my surgery in January! (And I plan to keep on going!)

But let's get back to the challenge. What inspired me? First of all, I love blue and white things. And this complimentary color combination has always been one of my favorites, the blue and coral. When Cindy mentioned in the gallery to the other tea partiers about not stepping into the circle, well, I just had to.

The blue and white reminded me of some ceramic balls that I have in my landscaping. They are about the size of a softball and each of them has a different pattern. (A Christmas Tree Shop purchase.) And I just got this Sneak Peak set from SU called Circle Circus.

The circles were stamped in Brilliant Blue on Whisper White CS and then arranged on the Cameo Coral circle that I cut out using my Coluzzle. (I would have used my circle cutter but........ wait for it.......... I haven't taken it out of the box yet!!!)

I used the Embrace Life set with this card also. The leaves are stamped in VersaMark on the blue background and then embossed with clear embossing powder (I hope you can see that in the picture at least a little). And the sentiment comes from that set also.

I'm calling this card "Who Hid the Sushi" because we were having sushi and green tea at the party today and someone said that there might be some shenanigans going on!

Please do take the time to check out all the wonderful Teapot Tuesday 51 cards in the gallery at Splitcoast by clicking here.

Friday, June 12, 2009

Friday CPR 6/12 - Got Splinters?

To view my Friday CPR post for 6/12 - Got Splinters? click here.

As I typed the date just now - 6/12 - I was remembering the old mosquito spray we used to use as kids and the story that my dad used to tell us about it. He was part of a group of students at Rutgers who were human guinea pigs for that product. He told us about sticking his arm into a special aquarium-type container that was filled with mosquitos to see how good the repellent was. The things you remember from childhood! Sorry about the digression.

Thursday, June 11, 2009

Thursday's Throw Aways - Week 14

If you saw my post yesterday (click here if you didn't) I alluded to the fact that there would be a tie-in with today's Thursday's Throw Aways. The little frames that I used in the project yesterday did have a plastic insert meant to cover a photo. I chose not to use it on my watercolored images and put them aside.

The little framed artwork will be a prize/gift for some of my staff at school and I need to package them. Lucky for me that they happen to fit in the matchbox made with the Big Shot matchbox die.

I wanted to make them peek-a-boo boxes and was able to repurpose the plastic piece from the frame as a window in the top of the box. You can also use transparency sheets for this if you have them. This kind of plastic can come from other packaging. I would consider not using it on items that would contain food unless the source was from food packaging in the first place.

This will be packaging for a gift, but I think if you didn't have the frame inside, it would make a nice little shadowbox just using your chosen image. What do you think?

Wednesday, June 10, 2009

Itty Bitty Birdie Frames

I picked up these little frames at the Dollar Tree a while back. They came three to a package and measure about 2-1/2 x 1-3/4 inches. They are soft like suede. Tonight they happened to be sitting on top of my tool bag so I decided to do something about that.

The image I used is from a retired SU set called Feathered Hope. Of course, you know that I would be making the bird a bluebird! This is only a portion of the image of this particular stamp which I stamped in Basic Gray onto Confetti White CS. Then I used markers and my aquapainter to color the image.

I've already decided to keep the blue framed one for myself for my desk at work and I'm hoping that if I get to Dollar Tree this weekend that they'll still have these frames. You see, I need a little prize for a few of the teachers that I work with.

Every year they get a certain dollar amount of money to order some classroom supplies and, with the approval of my building principal, and in order to get the orders in on time, I make it a little contest. The first three orders handed in get a prize (this year they got to "shop" in our office supply closet for some of the coveted items we keep there). Then I also give out prizes to those whose order comes to the exact amount of their $allowance. There were four of them. So I'm hoping that I can find at least one more package this weekend.

Oh, and you know what - they fit perfectly into the matchbox die box! More about that tomorrow.

Tuesday, June 9, 2009

Teapot Tuesday 50

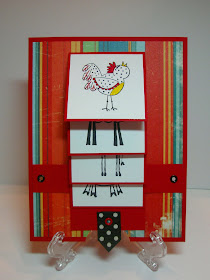
The rooster crowed at midnight, or was it Midnight the Rooster crowed? Whatever. This week's teapot is a chicken afflicted with chickenpox - so says Cindy on her glob. We're invited to the party this week which will be held in the barn. We can bring our farm animals but pigs are VERBOTEN unless you go through the back door where there will be a check for H1N1 - better known as Swine Flu.

I found this striped paper which reminded me of weathered barnboards. It was something I picked up on a visit to AC Moore a couple of weeks ago. Who can resist pretty paper when it's on sale? Apparently not me. Using it up is more the problem!!!
Recently in the dollar bin at Mike's there were these barnyard animal stamps. I actually had them stacked on my table near where I stamp hoping to use them soon. So when I read that we could bring all our animals I knew it was meant to be.
This is called a waterfall card and although it may look complicated, once you have all the measurements, it's quite easy to put together.

My barnboard paper is attached to a Real Red background sheet and Real Red is used for the pull part and cross piece also.

You can see from the pictures that the rooster is the only one with color. That's because he is feeling much better after having passed along his chickenpox to the rest of the gang.


And........... I guess I'm going to be checked for Swine Flu at the backdoor because I couldn't resist adding my new pig stamp.

Are you coming to the party this week? Want to see what's going on in the gallery? Click here.

INKredible Color Challenge - 6/8

Oh, I haven't done one of these in such a long time! This week's colors were Bordering Blue, Barely Banana, and Garden Green. When I see green in these challenges I usually think plant life.

I used the Itty Bitty Buds Hostess set to stamp the wreath in Garden Green. Then I stamped the Barely Banana flowers and cut them out. Yes, I know..... very tiny indeed. The centers of the flowers are Bordering Blue punch outs from the Crop-a-Dile.

The sentiment comes from Great Friends. Note to self: Next time stamp the sentiment before you glue down the flowers!

There is some scoring on the blue and some added punch dots on the banana, and a white taffeta bow finishes it up. The card itself, is 4 x 4.

I've got to do more of these color challenges!!!!

I've Been Teapotted, um, er, Pinned

I saw my son's Kindergarten teacher the other day. She's been retired for several years now, but every now and then she comes in to our school to drop something off or pick something up. We chatted for a while and she was glad to hear that my son had found a career and was doing well. He was, shall we say, a bit of a challenge at that age.

Afterwards I was thinking about his Kindergarten days and remembered that they used to play a game called "Teapot." (We used to play it as a drinking game called "Buzz".) It's where you sit in a circle and after having chosen a number, you couldn't say that number or any number with that number in it, so you would have to say "Teapot" instead. (As a drinking game this got funnier as you added switching directions and using multiples, etc.)

When I got home that day there was a clever little package for me from my Teapot friend MariLynn. She had made and sent me this adorable little teapot pin. Isn't it the cutest!!!!

Thank you MariLynn! You are one of the cleverest people I know. (We call her McGiver over in the teapot gallery because if she doesn't have something she draws it, or prints it out, or makes it from scratch. Go check it out!)

Sunday, June 7, 2009

Memorial Day Weekend Pics

We spent some wonderful time with friends over the Memorial Day weekend. One of the things we did was to visit the Barnegat lighthouse and walk out to the beach. When we arrived at the lighthouse it was clear with a haze over the water. As we walked out towards the beach the haze moved in.

The first picture is of the birds on the rocks when we reached the ocean. I love how this picture came out with the haze. The birds were all gathered there, almost as if they too were waiting for the fog to blow away.


The second picture is walking back towards the lighthouse. Again, it is partially obscured by the fog.

The third picture is of the sunset from the area behind my friend's condo.

Lastly, this is a heron I believe. This guy was among the rocks as we walked out toward the ocean. Again, I love how this turned out with all the textures of the rocks, the water, the moss, and the clumps of seaweed and shells. The bird's neck reminds me of a question mark, so I ask - which is your favorite?

Friday, June 5, 2009

Friday CPR 6/5 - Number Please

If you'd like to read my Friday CPR post for 6/5 - Number Please, click here.

Thursday, June 4, 2009

Thursday's Throw Aways - Week 13

One of HWNSNBP's good habits is that he drinks orange juice on a daily basis. The containers have these neat closures now. I saved a couple of them with the intention of using them someday. Unfortunately, the hinged part tends to degrade with time so I couldn't used them for what I originally had in mind.

The bottom piece however, reminded me of a frame. Although this orange color is quite bold, I thought it would look good framing a botanical stamp. Here you see one of the stamps from Pocket Silhouettes stamped on watercolor paper with Close to Cocoa ink.

The card base is Always Artichoke as is the polka dotted DP. I found a scrap from an old card that was stamped with the Floral background in Pumpkin Pie and I used it as one of the layers. On top you can see a strip of Choc. Chip punched with the scallop border punch.
I got some new stuff today, so I was moving things around to try to find room for it all and found this ribbon. It's gathered grosgrain. I know I have to stop hoarding all this stuff and start using more of it. The little knot on top of the juice frame is Choc. Chip 1/4" grosgrain.

The last touch was to add the sentiment on the orange layer. It's from the 3-for-you punchbox set. Not sure you can see what it says Just . For . You .

I added this close up of the framework. So tell me - do you think this would be okay for a guy? I'm thinking of using it for a Father's Day card for HWNSNBP. Afterall, if he didn't have his daily OJ I wouldn't have been inspired!

Wednesday, June 3, 2009

Teapot Tuesday 49

Isn't this teapot cool! I love the shape of it, and the colors. Cindy says that it's pretty small. She also says that there'll be only iced tea and belly dancing at the tea party this week. You should go read all about it on her glob. And while you're there, click on the link she has to the teapot gallery. There's quite a crowd expected this week!


I'm afraid this scar of mine would scare the bejeebers out of everyone if I were to join in the belly dancing so I thought I'd get a tattoo to hide it. And of course, then I would need a jewel for my belly button. (No, I'm not really getting a tattoo. HWNSNBP would have a canary, or maybe even a pelican!)

Honestly, I love the shape of this teapot, but short of copying Cindy's card, I couldn't come up with something I liked in that shape. I thought of maybe doing something with a zebra, but nixed that. Then I happened to look down at one of the stacks, yes I said one of the stacks of stamps that I had nearby and saw this set - Baroque Motifs - sticking out. I think it was sending me a message. "Stamp me in black on white" it seemed to be saying. Okay. And then we'll go on from there. (Don't your stamps talk to you too?)


I sketched the shape of the handle and cut that out of Summer Sun CS. The orange stripes were added with my Pumpkin Pie SU marker. The center motif was framed in Real Red with 1/4" dots of Kiwi Kiss. And..... I did get a triangle in there. It's cut from Old Olive and the stripes were added with an Old Olive marker.

The finishing touch was the jewel in the belly button........... I mean, in the center of the motif.

Isn't this card pretty cool! I think it might make a good Father's Day Card for HWNSNBP. I'll just tell him that I decided not to get a tattoo afterall.