Wednesday, January 29, 2020

Jingle Belles - Look What Santa Brought Me

The Jingle Belles have asked us to share what Santa brought us this year.  Santa, in this case, took a detour through Ireland to get here courtesy of my blogging friend Sabrina.  She sent me this poinsettia die for Christmas and I love it.  

There are so many variations of poinsettias these days.  I really like the pink and white speckled ones so that's what I tried to create here.  I used some Atelier ink and water to color my white cardstock. When it was dry enough, I used the new die to cut out the poinsettias.  There are actually three layers of petals on each flower.  


The background paper is striped and not layered.  I added some gold twine loops behind each flower.


The actual flower on the poinsettia is the yellow portion in the center.  The colorful petals are modified leaves.  They are part of the spurge family and have a sticky sap which can be irritating to the skin.  I think I'm going to need a special box for this card because it will definitely not make it in an envelope especially with the luck I've been having so far these past couple of months with mailing cards.

So why not join me as I wander over to the Jingle Belles to see what Santa brought everyone else.  Just click here.  

Monday, January 27, 2020

Did You Know Today is.....And Saturday Was......

Today is Bubble Wrap Appreciation Day!  So I sent some bubble wrap out to a select few I thought would appreciate it.  I think that the stamp cancellation machine might have taken all the fun out of the bubble wrap though as I heard from one recipient that it was all popped out.


And Saturday was Rachel's birthday.  It appears the trip made the sequins into card confetti as they were loose in the envelope when she got it.  


Me thinks I'll have to pay more attention to card protection in the future.

Friday, January 24, 2020

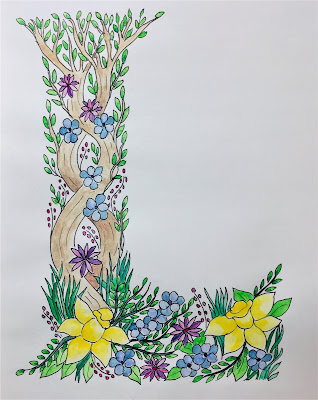
Initial It

It all started with a tutorial on The Postman's Knock.  The Botanical Letter Tutorial Reboot.  I was up for giving it a try in one of my sketchbooks.  I thought it didn't turn out that bad and a lightbulb went off as I was also working on putting together some ideas for Christmas gifts at about the same time. 


So I got out some good paper and cut it to a frameable size and started sketching.  I swapped out the narcissus for some loose roses.  Then I laid down the lines with a Micron pen.  Then the painting began.  Some of the line work was reinforced after the painting.  And before framing they were initialed and dated.


I think I mentioned a trip to IKEA back in the beginning of December - well, part of the reason for that trip was to get some frames.  I forget where I had seen someone using these frames for another art project, but I thought they might be perfect for framing these letters.  

You can find some other good tutorials at The Postman's Knock as well as worksheets and projects relating to calligraphy.  

Tuesday, January 21, 2020

Christmas Wrap-Up

There were a few small projects and things from the holidays that I haven't shared yet.  The first being some more of these die cut junk mail trees.  I gave a couple as gifts and have a few more that are finished and even more that are cut out and waiting to become trees.  The plastic boxes that I found at The Container Store are a perfect size to store them.  I think I'll be looking for a wholesale provider for them for next year.  I have just about 6 months more to keep collecting that junk mail from work.


I had to share my little lamp that I picked up at an antique store in Cape May back in November.  I don't usually buy things like that but as I was walking through the store, my mind kept wandering back to the corner where it was and since it was a reasonable price I decided it needed to come home with us.  


Now I have to give a shout out to HWNSNBP for all the outside decorating he did this year.  He reused some of the pot fillers we had in the garage along with some new purchases from the $Tree and arranged some greens that he picked up to make these lovely outdoor accents.  Those are solar lights that look like the Christmas tree lights.  They don't stay lit long, but they look good even unlit.


He also made this reindeer from some birch tree scraps.  He had made one for our daughter last year.


And he even filled this wooden outdoor basket and put it out on the bench he made a few years ago.


I had ordered this kit through Zulily and stitched up these little gnomes.  It was my intention to change the hair on the girl to be white so that the couple would resemble us more, but I forgot. But that's okay.  They might be having a little adventure next year..... we'll see.


I forgot to post the picture of all the Christmas cards that I made last year.


And these little gift card holders that I threw together kind of at the last minute.  They held the Dunkin' Donuts gift cards I usually give to the custodian and mailmen at work.  Those little houses are stickers and I had those snowflake wreaths leftover from some thank you notes from last year.


And speaking of thank you notes - I made a few of these to use as my thank you's for gifts received at school.  


Sunday, January 19, 2020

With Sympathy (CASE)

I used the spotlighting technique to make a couple of sympathy cards I needed this week with a stamp set from Concord & 9th called Wildflower.  I had seen a similar card on Pinterest here.


I colored the two cards differently.  The first coloring the whole image except for the spotlight and the second spotlighting the color only.  I added some gel pen raindrops or tears.  I actually made two sets of these cards, one in purple and the other in blue/turquoise.  I didn't add any sentiment to the blue ones yet so they could be used for any occasion.  


I got some return mail this week in the form of half of a Christmas card that we sent out.  I was able to figure out who it went to by the partial address that was on the envelope, but if there hadn't been enough of that, I could have consulted my excel sheet for the picture.  There was a ribbon on that card and the knot from the bow must have gotten caught in the cancellation machine.  This makes me wonder at what condition some of my other bulkier cards arrive in.  


Thursday, January 16, 2020

Jingle Belles - Yet Again

I've had the most remarkable week so far.  (We won't talk about last week - that was a disaster.) Three people that I haven't heard from in a very long time have reached out to me.  Tonight I found a comment here from a blogging friend I hadn't heard from in several years.  That was just after I spent over an hour on the phone with a dear friend who I only seem to connect with a couple times a year even though we live in the same town.  

It was during that phone conversation that I put together two more cards using our Christmas tags for the Jingle Belles challenge.  Don't you just love speaker phone.

The Noel tag is in two layers I adhered together and I offset it on that gold disk which was under the fruit tart that HWNSNBP always gets me from Wegmans for a Christmas treat.  Metallic cards are so hard to photograph and this was no exception.


And this cute tag was begging to be made into a card.  I scoured my paper stash and found that star paper which had most, if not all of the colors in the tag.  I added a couple of stars in the corner because I had to hide the hole from the tag.  I'm still debating whether to add a sentiment to the front of this one.  


I've missed the cut-off for the JB challenge, but at least I have two more cards to add to my stash!

Tuesday, January 14, 2020

Jingle Belles - Wrapping It Up Again

Well, no wrap this time.  Just tags. 

The only place I shopped after Christmas this year was at the Container Store because my daughter wanted to get something there.  Of course I had to peruse the Christmas items that were already on mark down.  These tags that came with two other styles in the package (one of them was the snowflake that I used last week) caught my eye because they looked to be just about the right size of a card front and I really liked the colors.  And as it turns out, it wasn't far off about that size.  Just a sliver on both sides needed to be removed and it fit perfectly.  I also trimmed down the top to get rid of the tag hole.  


I thought it would look good picking up that lavender in the tag so that's what I used for the card base.  I stamped a little more of the scene onto that base.  The trees were die cut from a paint chip.  


So how weird is that lavender for Christmas?  Or does it work?  I have a couple more of those tags....

Okay, time to head over to the Jingle Belles and do some perusing there.  Click here to join me.

Tuesday, January 7, 2020

Jingle Belles 2020 - No Time Like the Presents

Hello.  My name is Lorraine and I will admit that I am a paper addict.  A wrapping paper addict.  There is seldom a piece of wrapping paper, tissue paper, gift tag, or fancy ribbon that goes into my garbage without inspection and reflection as to how any or all of those pieces and parts could be repurposed.  I love a carefully wrapped gift, and I love to carefully unwrap them.  I cringe when I hear that paper tearing like some cringe when they hear chalk on a chalkboard.  My reputation is both questioned and respected.  There are those that dare to look me in the eye whilst they tear off their paper and scrunch it into a giftwrap snowball.  And there are those that know enough to try to avoid ripping and will look me in the eye and say "I know, you want this don't you?".  And yes, there are the  occasional newbies that laugh, not having witnessed my obsession before, when I say "this will be someone's Christmas card next year".  

Which brings me to the real purpose of this post.  The first Jingle Belle challenge of 2020.  Using what's been rescued from Christmas.  I kind of hit the motherload this year at our family pre-Christmas Eve gathering.  My daughter-in-law used these fantastic tags she got from Costco a couple of years ago.   I didn't offend anyone by asking for their tag, I simply waited to see what was going into the trash and rescued what I could.  And of course, there were my own.  I have two cards with those tags today and a card with a tag that was on a gift that I got at work.


This one repurposed the tag, and the background was a beautiful holographic wrapping paper.  The green bow is from a package of my favorite USA made caramels.


This oval tag with the bear was on the work gift.  And the snowflake was cut from another tag and popped up on yet another glittery circle tag I had from IKEA.  (The picture doesn't do it justice - it really is much prettier IRL.) (Even HWNSNBP said WOW when he saw it.)


The JOY tag was perfect against some metallic gold gift wrap I framed with some red glitter paper strips.


I have two, possibly three more WIP's on my worktable that I hope to get to this week.  But this is a great start to the year.  What I have to remember to do is not to wait until December to make sure I have envelopes for these sometimes odd-sized cards, and to decide on the sentiment that will be going inside ahead of time. The past couple of years I've stamped the sentiment on white cardstock and used a label die to cut them out. Then I make them into stickers so they can easily be applied to the inside of the card.

Another thing I started last year actually, was to put my Christmas card list into an excel spreadsheet and I have added a column that I can add a (shrunken) picture of which I card I sent to everyone.  That way I'm sure not to duplicate a stamp set, or theme to the same recipient.  And sometimes, in November, if I'm behind on my card count, I'll make a quick batch of duplicate cards and I might have one or two leftover and I don't want to take the chance of sending the same card to the same person again. I'll put a post-it note on the cards as I finish them with the date of the challenge.  When I spread out all of my cards when they're done in early December, I put another post-it on them with the name of who they're going to (this helps HWNSNBP get involved with the signing and mailing - his part in this mayhem along with postage).  We stick the Challenge post-it to the name post-it and set them aside before they're tucked into the envelopes.  Then I can go back to the list and put the correct picture in.  I know, it sounds like a lot of work, but it goes pretty fast, and I really find it helpful.  The post-it's with the names on are saved from year-to-year.  

Okay, this was much longer than intended so I promise you if I get to those other ones it'll be much shorter.  Be sure to check out the gallery over at the Jingle Belles and see what other lovely creations they have there.

Monday, January 6, 2020

30th Birthday Wishes

Oh dear, I see that the numbers "30th" that are in that circle tag didn't show up in the picture and I no longer have the card to retake the picture.  Trust me, it's there in silver gel pen.  This is for our daughter's fiance.  I went with the silver and grey for a masculine card - not my strong suit.  But in the long run, it's the thought that counts - right!


Sunday, January 5, 2020

Twelve Days of Zentangle - Project Pack 7

I finally got to my Zentangle Project Pack 7 - The Twelve Days of Zentangle - and finished up this weekend.  I'm loving the colors they chose for this series.  The grey tiles are great to work on and with blue being my favorite color, it was so much fun to see them come to life.  

Day 1 - Four of the smaller Bijou tiles can be rearranged into many different patterns.  


Day 2 - I think I got some good depth on this one.


Day 3 - Using a round Zendala tile this is a pretty wintry star.


Day 4 - Bijou tiles again in black.  Not really crazy about these, but they have given me some ideas.


Day 5 - This one reminds me of a shard of broken China made into an ornament.


Day 6 - I made a small mistake on this pattern but let's just call it a variation.


Day 7 - I think I want to try this again but bigger.


Day 8 - Do you like how it almost looks like those screws have grabbed the fabric and twirled it around giving all those billows. (And making those orbs into screw heads was the very last thing done on this tile.)


Day 9 - I think this is my favorite.


Day 10 - A little frosty botanical.


Day 11 - Pretty, but oh so very time-consuming.  Done on Bijou tiles again.  Another puzzle-type.


Day 12 - I'd like to enlarge those blue areas on this one so you can see the detail.  Kind of resembles a vaulted ceiling with stained glass windows.


I have to get back to tangling on a more regular basis.  And I think I have to get some more of these grey tiles.  I love the look of the blue, grey, and white together.