Wednesday, March 30, 2011

Thank You and the Inspirations


I was having lunch with my friend Anthony at school and one of his students came into the room.  I just loved the colors of her shirt and the pattern that was on it.   This evening I set out to clean of my workspace but since I had some of these colors out I decided to put the shirt inspiration to work to create this card.  I used the Vintage Vogue stamp set - still one of my favorites. 

The white cardstock background was sponged with Marina Mist, Bermuda Bay, and Certainly Celery Inks.  Then I took an image from the VV set and first stamped in Marina Mist and then in Not Quite Navy.  The rest of the details I think you can see.

The cards below are a case of Leanne Pugliese's club cards.   Make sure you click on her name to see how I was inspired. 


These are just about 100% cased.  I just loved how she combined the embossing folders and layered the image.  Using the Black Magic technique was awesome. 

Do you have a favorite!

Tuesday, March 29, 2011

Jingle Belles 13

Hard to believe that we're already 13 weeks into 2011.  Well, the good thing about that is that I have a good start to my Christmas cards thanks to these Jingle Belles challenges. 

This week we were to be inspired by another Christmas carol - The Holly and the Ivy.  What this translates to is to make a card with holiday foliage.  When I was sorting through my Christmas papers the other day I came across an old scrap of dsp that I thought would be perfect ....... if there was enough of it.   Well, with some careful measuring and cutting, I managed to get the patterned piece that I wanted to use for this card.  It is a clean and simple design, highlighting the patterned paper for the most part.


See the swirls that make up this motif I was trying to get.  This paper reminded me of ivy and the ribbon has holly on it, so I know I have my bases covered with this one.  The sentiment is from Teeny Tiny Wishes and after I embossed it in gold EP I punched it out with the Decorative Label Punch (though it doesn't look it).  I added a 3/4" circle behind the sentiment that I punched out of Poppy Parade and added some gold shimmer paint around the edges.  I also put dots of the shimmer paint on the berries on the patterned paper. 

Want to see the rest of the entries for the challenge this week?  Click here.

Monday, March 28, 2011

Teapot Tuesday 139


Look at the wonderful tea set we have as our inspiration this week.  Could it be any cuter?  I think not.  This is so sweet, although not strictly usable for real tea, it would make quite a display piece or play piece for some youngsters.

There is one thing missing however and Cindy pointed that out in her wonderfully woven story. That would be - ribbon!  Such an adorably feminine tea set needs some ribbon.  And so does our destination station this week. A woman named Ashley has recently lost most of her crafting supplies in a flood out in the midwest.  This had to be devasting to her.  She had her supplies in her basement and the basement flooded up to the ceiling.  That happened to my sister and her husband during Hurricane Floyd years ago.  I remember helping them drag things out the windows and spreading them out on the lawn to dry, but most of it had to be tossed. 

You can't save ribbon or cardstock that's been sitting in muddy water.  So we've been asked to include some ribbon in our cards to help Ashley replace her lost supplies.   Cindy asked us to wrap some ribbon around the card and send it to Ashley, well I took what she said and used a piece of a cereal box and wove my ribbon around it to use as the background for the card front.  I really didn't want to adhere it permanently so I went through my stash and found this binder clip.  It's not your ordinary binder clip as there is a round black plastic disk under the stamped motif.  I just used the clip to hold the ribbon panel against the card and decorated it. 


I saw how Leann Pugliese used this stamp from Punch Bunch.  This used the Black Magic with a twist technique.  I love the way this image turns out when you add the blended pencil.  


So, Ashley will be able to use the clip again and to use all that ribbon that is wrapped around. 

I missed the tea party last week being involved with too many things around here, so if you want to see last week's gallery click here.  For this week's gallery click here.

Friday, March 25, 2011

spring? birthday!


It was my boss's 40th birthday this week and I got to get a little creative.  I made the birthday banner above using the petal cone die and the colorful dsp from the SAB catty along with my Broadstreet Alphabet stamps and the button embosslits.  This was a pretty quick project until I decided to actually add real thread to the buttons.  Thankfully I used quilting thread and it didn't have to be knotted, but it was a nice touch.  I've been a bit of an Indian-giver and asked to have this back so I can send it to one of our teapot destination stations.  My boss was very happy to do that. 


I also made the card above.  Since there are about 45-50 staff members, the card had to be pretty big so I used a file folder that I had and cut the tab portion off.  The ribbon is hiding the gusset scores.  Inside I used some die cut letters to spell out YOU! on the inside cover and then attached 4 sheets of trimmed copy paper in booklet form with a decorative strip across the staples that said WORDS OF WISDOM where everyone could offer theirs. 

This is what it looked like driving to work on Wednesday morning.  Not very Springy, but at least we didn't need a snow day.  Even today there are remnants of snow in the shaded areas of lawns.  Mother Nature is being such a tease!

Monday, March 21, 2011

Jingle Belles 12

It's another sketchy week with the Jingle Belles courtesy of Allison Fillo.   She's got a fun blog called Stampin' When I Can.  Here's the cool sketch she created for us.


I took out an old set called Gifts of Christmas and some old Ski Slope paper and put this together.................


I'm thinking it's a little busy with that background, but I can live with it.   The stamped image was colored directly onto the stamp with my markers - Baja Breeze, Riding Hood Red, Old Olive, and just a touch of Summer Sun in the flower centers.  I took one line from the sentiment stamp that comes with this set and stamped that in Riding Hood Red.  Both stamped motifs were sponged around the edges with Baja Breeze.

Those are faux brads on the five side pieces.  They're 1/4" circles punched out of the same paper that I used for the background and after I adhered them to the tabs I covered them with Crystal Effects. 

I must get to the gallery this week to see what all the ladies have created.  They never cease to amaze me.  Come along and join me here.

Sunday, March 20, 2011

Full Moon and More


What better place to be to observe the Full Worm Moon of March 2011, the closest full moon we'll have for many years to come, than on the dock in Barnegat.  I was lucky to be there and I wasn't alone.  When I drove across the street, there were a few cars in the parking lot and one other soul on the dock with his tripod set up.  As the time neared closer to 7:27 more and more people appeared with cameras, all bundled up as I was because the temperature had dipped down into the 30's and the wind was blowing steadily.  Thank goodness I had a hood and my gloves, though my hands were like blocks of ice by the time we left.

Here you can see the people lining up.  I was approached by a young woman who asked me if this was where you could see the full moon rise and I had to be honest and tell her that I hoped so.  There were a lot of us there taking our chances that it would be visible over Long Beach Island across the bay and not behind those bayside condos that you see in the picture below.  Someone standing in the second story of the gazebo called out when they first saw the moon peeking up over the houses across the bay on the horizon.


It only took a little while before you could see the whole of it.  I kept snapping away because I've been burned in the past by not having a clear enough picture.  I was worried because even though I was using my tripod the wind was blowing and it was moving the camera at times.


HWNSNBP had joined me and was a great sport holding one camera as I hurriedly changed them in the tripod.  I wanted to ignore the fact that I had just recharged the batteries in my old camera and the battery light was blinking, but it was to no avail - they died and the light started blinking in the second camera.  But I wanted to wait until the moon was up high enough to capture some of the moonlight on the water. 


It was a chilling experience being out there so long, but I'm glad I didn't miss the opportunity.  In comparison to last night, Friday was a real treat.  We arrived to the condo early enough to get to the island and the lighthouse with much sunlight to spare.  Though the gates to the park were closed to cars, we were among quite a few who still took the path and enjoyed the stroll in 76º weather with no coats.

Isn't this guy handsome?  He and his mate were hanging out on the water's edge.


They seem to be pairing up, keeping quite close to one another.  Every once and a while the gull on the lower right would fly off over the water, but then it returned to stand right next to it's mate.  These are the rocks at the base of the lighthouse on the western side.


I had taken a picture of the shriveled rose hips on the beach roses around the front of the lighthouse last month.  This new growth is what we are seeing now.  The promise of life again among the thorny branches.

Saturday, March 19, 2011

Speaking of Awards


Over the last month or so I've received three Stylish Blogger Awards and I've been very remiss in my acceptance so without further ado, I'd like to thank:

Holley from Holley's Hobbies
Kim from Stamp, Scrap and Get Kreative
Debbie from The Paper-azzi Connection

You should check out the blogs of these wonderfully talented ladies.  You will not be disappointed.

Now I'm supposed to do two things - tell you 8 things about myself and pass this on to 8 deserving bloggers.  I'm going to do the first and change the second a little.

1.  I can name all the fifty states in less than a minute.

2. When I asked my mother how she chose my name she told me it was the name of a carpet store that she and my father used to pass by when they were dating.

3.  The job that I've held the longest was that of substitute teacher - 15 years.

4.  I love to bake but I hate to clean up.

5.  I hand-raised a clutch of cockatiels.

6.  Before I had children I played woman's slow-pitch softball and was a pitcher.

7.  My sisters and I took dancing lessons and began when we were very young - 5 & 6 yrs.-old.  We were ducklings in our first recital and danced to "A Wiggle and a Waddle and a Clap, Clap, Clap".

8.  When I got married my hair was down to my waist, now it's just about as short as HWNSNBP's.

So now it's your turn - and I mean YOUR turn.  That is, anyone reading this, lurking out there, visiting randomly or regulary - please feel free to grab up this award for yourself and let me know in the comments section, and should you care to add my link to your acceptance that would be great.   I know some of you have award-free blogs and chose for them to be that way and I respect that.  But I think everyone with a blog has some style of their own and certainly deserve a Stylish Blogger Award for themselves.

Teacher's Who Make Magic


One of our local radio stations, WMGQ 98.3, aka Magic 98.3, sponsors an event called Teachers Who Make Magic.  Beginning in December they take nominations and after they choose the teachers from those that are nominated, they read a few of the essays on the radio each Friday until they get through them all.

This year I decided to nominate our physical education teacher and lo and behold, she was chosen in early December.  I won't reiterate my nominating essay here, but just let you know that this teacher is dedicated, inspiring, and full of energy - and she's a grandmother!

On March 10th they held a dinner to honor all the teachers that were chosen.  They called each one up to the stage individually and read the essays and as they left the stage they were given their award and met by the person that nominated them. 

This is the centerpiece that was on our table which I was lucky enough to bring home.  Such a lovely mixture of spring flowers with those gorgeous roses and lilies tucked in.  (The lilies opened a couple of days later.)


So once again I say, congratulations to Shirley for a job extremely well done!

Thursday, March 17, 2011

Happy St. Patrick's Day

Saturday we went to the Philadelphia Flower Show and I'll have pictures to share soon once I can glean through the many that I took.  Before we left Philly we crossed the street from the convention center and went into the Reading Terminal Market to pick up some minty shamrocks at one of the candy booths. 

Now the question was how to package them up, a green and a white one, to share on St. Patrick's Day.  Luckily I came across a Friday Freebie from MeGa Stampin Studio.  So I (also in this instance known as Princess Origami) went to work.


I cut out a 6 x 6 square of Garden Green cs.  Did all the folds and stamped my little shamrocks for the fronts, then I changed up the closure a little.


 Instead of having the closure fold over the front and stick together with velcro, I trimmed it up and made a tab.


 Once you squish all the folds up (with your surprise inside of course) you can take the tab.....


 and slide it in between the last fold and then.....


push it all the way in


 so it makes this cool little triangular box.


 The twine here is strictly decorative - its not holding anything closed.


Here are some pictures of the display at the flower show from the Ireland Travel Board.


I hope you have a wonderful St. Patrick's Day!  We are going into the city tonight to see Celtic Woman with our friends.  It should be a very enjoyable evening.

Tuesday, March 15, 2011

Just Bliss


I had these colors still hanging around from my Jingle Belles card this week and decided to ink up my new set Bliss.  I made my own background paper by repeating the flower image freehand.  That little bird just had to find a place on this as did the butterfly. 


I think this is the first time I've made a card using all of the images from one set.  Hmmm, maybe I should try that with some of the other sets that haven't met up with ink yet!

Monday, March 14, 2011

Teapot Tuesday 137

I feel a little bad because this post is going to be very short and Cindy puts so much time and creativity into her Teapot Tuesday stories.  Please check it out here.  Here is our inspiration ......


This is the cutest little collection of teapots that I have seen in a while.  It was hard to decide which one to go for, but in the long run I took some clues from our destination station this week.  A very young lady who is dealing with ovarian cancer is our destination.  She is only in the 6th grade and she loves art, horses, music, and the color blue among other things.  Our challenge is to bring art with a frame to the tea party. 

Taking all this into account I remembered the little frames I had picked up at the Dollar Tree awhile back and decided to frame my "artwork" that way.


The frame is only about 1 3/4 x 2 1/2 inches and the image from A Flower For All Seasons fit perfectly.  I chose the one with the frog and the pink flowers like the teapot in the lower right corner. 

I stamped the image in Basic Gray on watercolor paper and then using my aquapainter and inkpads I watercolored away.  This frame is so easy to use - the metal bars on the top and bottom are like clips holding all the layers together.  I just added a little button and ribbon treatment to pizzazz it up.

I think Haeli will like it.  I've got another one in the works to keep on hand for another gift, or maybe, just maybe, I might treat myself and put it on my work desk. 

So let's go check out the gallery for this week - here.

Sunday, March 13, 2011

Not Your Everyday Birthday Cake

HWNSNBP had a birthday this week and I promised him a cake.  Actually I promised him a cake that I first made for Christmas this year - Giada's Cranberry Cornmeal Cake

3/4 cup (1 1/2 sticks) unsalted butter, at room temperature, plus extra for the pan
1 cup all-purpose flour, plus extra for dusting the pan
1/2 cup yellow fine cornmeal
1 teaspoon baking powder
1/8 teaspoon fine sea salt
1/4 cup orange zest (from 2 large oranges)
3/4 cup dried cranberries, chopped into 1/4-inch pieces
1 1/4 cups sugar
1/2 teaspoon pure vanilla extract
4 large egg yolks
2 large eggs


Preheat oven to 350º.  Butter and flour a 9" cake pan (or you could use a muffin pan).

Whisk together the cornmeal, flour, baking powder, salt and orange zest.


Set aside 3 tbsp. of this mixture in a small bowl.  Add the chopped cranberries and toss together to coat.


Use the paddle attachment on a stand mixer to cream together the sugar and butter until light and fluffy.


Beat in the vanilla and then add the eggs, one at a time.


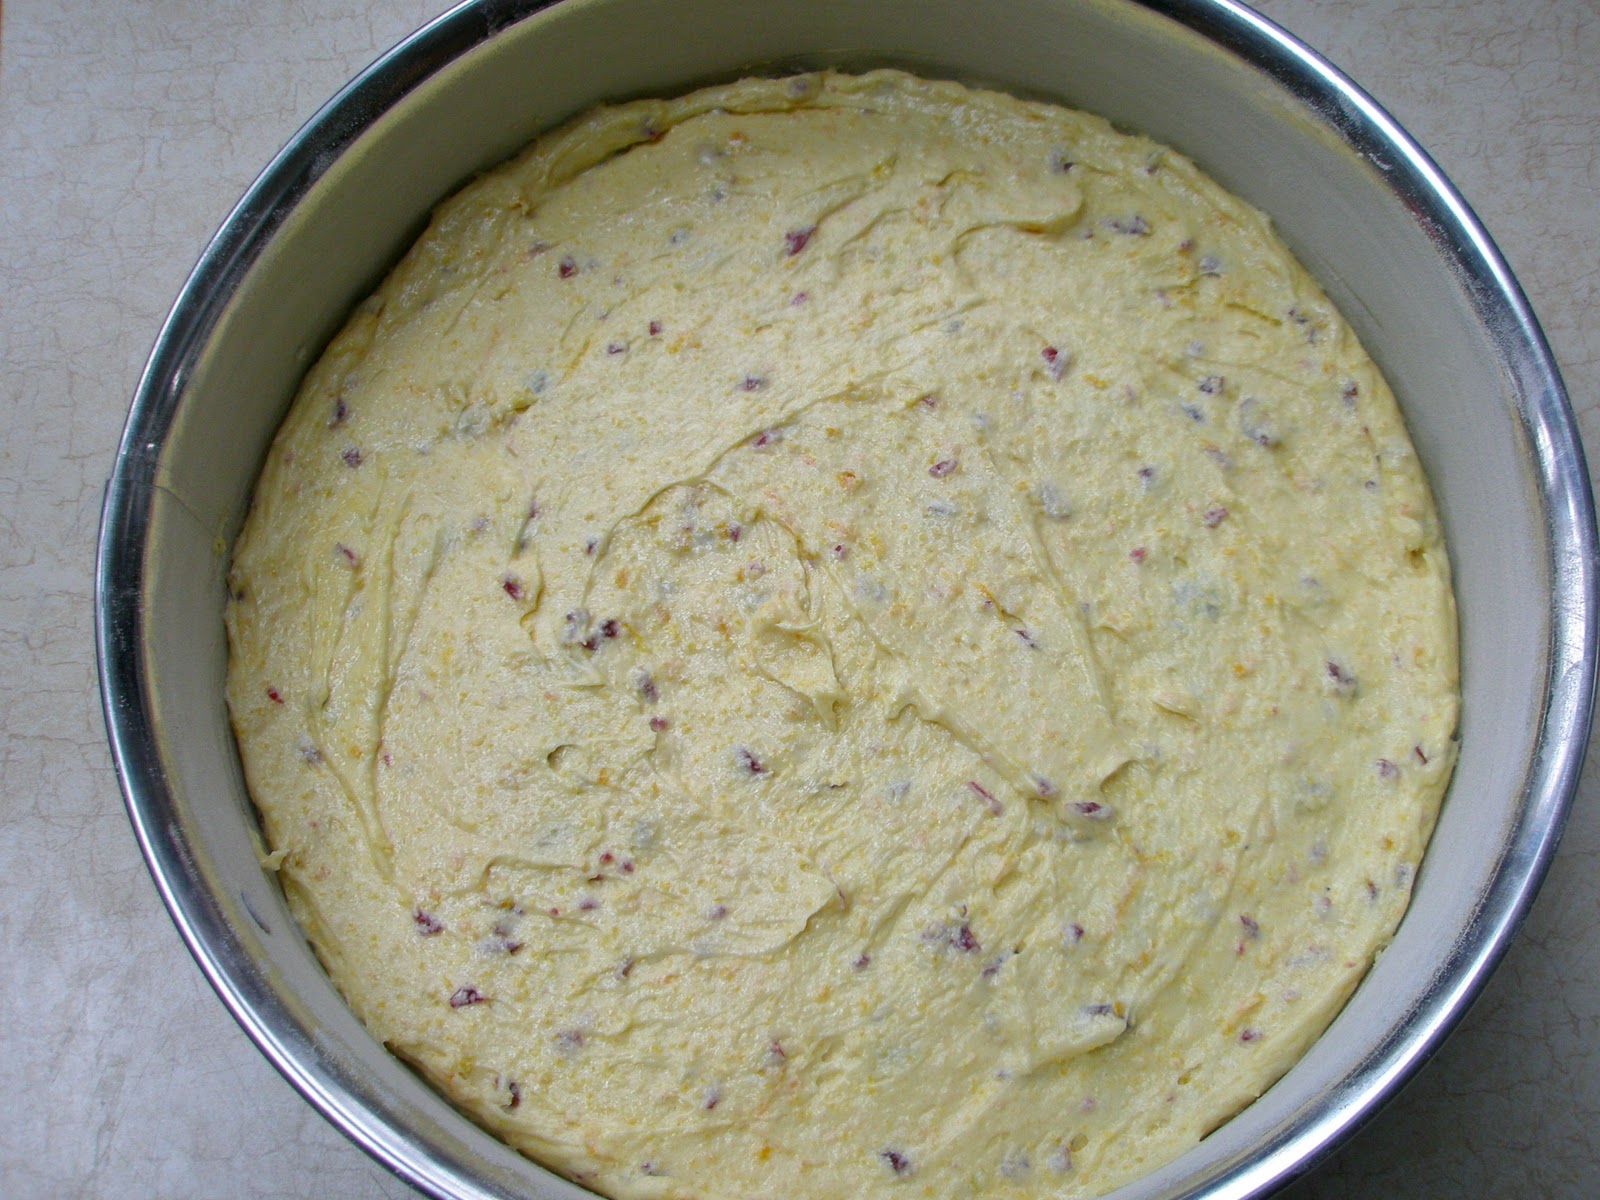
Fold in the cranberries with a spatula.


Put batter in cakepan and level the top. 


Now here is the tricky part.  It says to bake for 40 minutes.  I have had to leave it in the oven for almost twice as long.  Check often with a toothpick to see if it's done. 


Today my cake is very moist I think because I only had extra large eggs in the house and did not take that into account when I was adding them.  I probably should have cut back with one egg or added more flour.  But it still came out and tasted delicious.


The recipe says to serve with walnut sauce and shows the cake dusted with confectioner's sugar but you really don't need to do either of those things.

The first time I tried this recipe it came out perfectly - just needed the extra baking time.  The second time I tried it was on Christmas Eve.  I put it together and got it in the oven just before I started frying the pierogi's.  The buzzer went off and I tested it once and then forgot about it - for over an hour while I finished frying the pierogi's and the fish.  That one came out more like a large biscotti. We attempted to eat it, well at least the center of it, but it was beyond hope - even though everyone said it tasted good.

HWNSNBP loves it.

Jingle Belles 11

We have a color challenge this week from Leslie the Crooked Stamper.  Check this out.....


Let me just say that I'm in love with that room.  Those striped walls are wonderful (hint, hint HWNSNBP).  So here is how I was inspired.


Sorry for the crooked picture.  The stamp set I chose to use is called Scandinavian Season and typically I think I would pair it up with some brighter primary colors of red, blue or dark green, but I think the softness of these colors also relates well. 

I masked off the corners and stamped the snowflakes in Kraft on the corners and in Bashful Blue in the center.  Then I sponged each of those colors on the edges.  The tree was stamped in Kraft and I took a blender pen and lightly added some highlights to the motif.


I cut out the tree and mounted it on Kraft cs and paperpieced the flower with Bashful Blue cs.  After I added the crinkled ribbon I added some pearls at the edges and on the flower.

Great color choices Leslie, thanks for the inspiration.  Now I'm going to check to see how the others were inspired.  Join me here.